Lighting / Controllers & Dimmers
Instruction Manual for MiBoxer 5 in 1 LED Controller
A comprehensive user guide for the MiBoxer 5 in 1 LED Controller. Learn how to configure output modes, link and unlink 2.4G RF remotes, set up dynamic modes, and configure DMX512 control.
Quick answers from the manual
Quick answer
- The MiBoxer 5 in 1 LED Controller is a wireless LED driver that supports five output modes (Single Color, Dual White, RGB, RGBW, RGB+CCT). It is controlled via 2.4G RF remotes, smartphone apps (with gateway), or DMX512 transmitters. p. 1, 2
Key actions
- Set output mode p. 3
- Link remote p. 4
- Unlink remote p. 4
First start
- Set the output mode first to match your LED lights. p. 3
Problems and fixes
Linking/Unlinking fails
Ensure the light blinks correctly (3 times slowly for link, 10 times quickly for unlink). If not, repeat the power cycle and button press sequence.
p. 4, 8Maintenance and reset
- The controller does not have a specific reset button; factory reset is achieved by unlinking the remote. p. 4
Technical specifications
| Parameter | Value | Meaning | Pages |
|---|---|---|---|
| Remote distance | 30m | Maximum effective range for 2.4G RF signal. | p. 2 |
Where to find it in the PDF
- Output Mode Setup p. 3
- Linking/Unlinking p. 4
- DMX512 Control p. 8
Table of contents
Manual images
Click an image to enlargeQuick guide from the manual
The MiBoxer 5 in 1 LED Controller is a versatile device supporting Single Color, Dual White, RGB, RGBW, and RGB+CCT output modes. To begin, you must set the correct output mode using the SET button on the controller. Linking and unlinking remotes requires a specific power-cycling sequence (power off for 10 seconds, then power on) followed by button presses on the remote. The device also supports DMX512 control and features a "Do Not Disturb" mode to manage power failure behavior.
Setting the output mode
You must configure the controller to match the type of LED lights you are using. Press the SET button continuously to cycle through the modes. The indicator light will change color to confirm the selected mode:
- White Light: Single Color
- Yellow Light: Dual White
- Red Light: RGB
- Green Light: RGBW
- Blue Light: RGB+CCT
Note: The controller will exit the setting mode if there is no operation within 3 seconds.
Linking and unlinking remotes
To link a 2.4G RF remote to the controller:
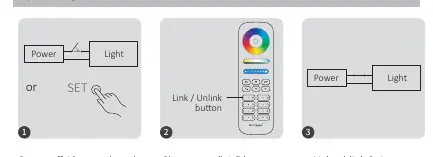
- Power off the controller for 10 seconds, then power it on again (or press the SET button once).
- Short press the I button on the remote 3 times within 3 seconds.
- The light will blink 3 times slowly to confirm successful linking.
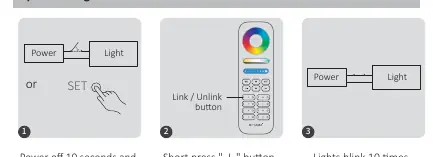
To unlink a remote:
- Power off the controller for 10 seconds, then power it on again (or press the SET button once).
- Short press the I button on the remote 5 times within 3 seconds.
- The light will blink 10 times quickly to confirm successful unlinking.
Dynamic modes and PWM frequency
The controller supports two dynamic mode tables. You can switch between them by pressing the S+ or S- buttons 5 times quickly while the light is in static mode. You can also adjust the PWM frequency to high or low by using the ON and OFF buttons on the remote in specific sequences.
Do Not Disturb mode
This mode is useful for areas with frequent power failures. When activated, the light will remain off after a power cycle until manually turned on. You can toggle this mode by pressing the OFF or ON buttons three times within three seconds.
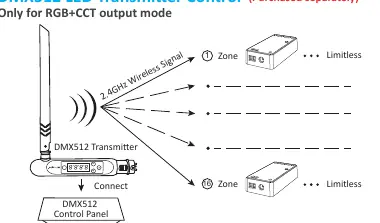
DMX512 control
For RGB+CCT output mode, the controller can be controlled via a DMX512 transmitter. Follow the transmitter's instructions to select the zone, then use the SET button on the controller to link it, following the same power-cycle and button-press logic as standard remotes.
Safety and installation
Always turn off the power supply before installation. Ensure the input voltage matches the device requirements. Do not disassemble the device. Avoid installing the controller in areas with large metal surfaces or strong electromagnetic interference, as this will significantly reduce the remote control range.

Practical help
Common problems
Linking failed
Ensure the light blinks 3 times slowly. If it does not, repeat the power-off/on sequence and ensure you press the button 3 times within 3 seconds.
Unlinking failed
Ensure the light blinks 10 times quickly. If it does not, repeat the power-off/on sequence and ensure you press the button 5 times within 3 seconds.
Remote control range is short
Check if the controller is installed near large metal objects or sources of strong electromagnetic interference.
Before use
- Turn off the main power supply before starting installation.
- Verify that the input voltage matches the controller's requirements.
- Identify the correct output mode (Single Color, Dual White, RGB, RGBW, or RGB+CCT) for your LED lights.
- Ensure you have a compatible 2.4G RF remote control.
Specs in practice
- PWM Frequency
- Adjustable frequency setting to optimize LED dimming performance.
Images and diagrams
- The output mode table on page 3 helps identify the correct mode based on the indicator light color.
- Linking and unlinking diagrams on page 4 illustrate the power cycle and button press sequence.
- The DMX512 diagram on page 8 shows the connection flow between the transmitter and the controller.
Model compatibility
- Compatible with various MiBoxer 2.4G RF remotes (e.g., FUT089, FUT092, B8).
- Smartphone app and voice control require a MiBoxer 2.4GHz gateway.
- DMX512 control is only available for RGB+CCT output mode.

Manual page author
Michael Turner
Technical manual editor
Reviews PDF manuals for structure, safety notes, and practical product details so readers can find the right information quickly.