Smart Home / Smart Relays
User Manual for Niko Connected Dimmer 552-722X1
Quick guide for the Niko Connected Dimmer 552-722X1. Includes installation, wiring, Zigbee network setup, dimming profile configuration, and troubleshooting.
Quick answers from the manual
Quick answer
- The Niko 552-722X1 is a 2-wire Zigbee connected dimmer. It can operate in stand-alone mode or be connected to a Zigbee smart hub for advanced features. p. 1, 2
Key actions
- Pairing mode p. 2
- Resetting p. 4
First start
- Connect to lighting circuit, ensure power is OFF during installation. p. 1
Problems and fixes
Lamp flickers
Adjust min dim level or install LED compensator (310-05001).
p. 5, 7Maintenance and reset
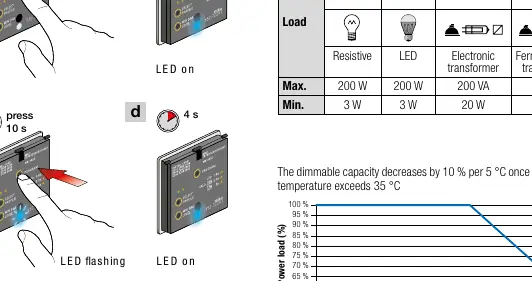
- Reset the device by pressing the button for 2 seconds, then 10 seconds. p. 4
Technical specifications
| Parameter | Value | Meaning | Pages |
|---|---|---|---|
| Power supply | 230 Vac ± 10 %, 50 Hz | Operating voltage | p. 4 |
Where to find it in the PDF
- Wiring and Installation p. 1
- Stand-alone and Connected use p. 2
- Configuration p. 3
- Troubleshooting p. 5, 6, 7, 8
Table of contents
Manual images
Click an image to enlargeQuick guide from the manual
The Niko 552-722X1 is a 2-wire Zigbee connected dimmer designed for 230V lighting circuits. It can operate in stand-alone mode (switching/dimming its own contact) or be connected to a Zigbee smart hub for advanced control via the Niko Home Control app or programming software.
Installation and Wiring
Warning: Installation must be performed by a qualified installer. Always switch off the 230V power supply before starting work.
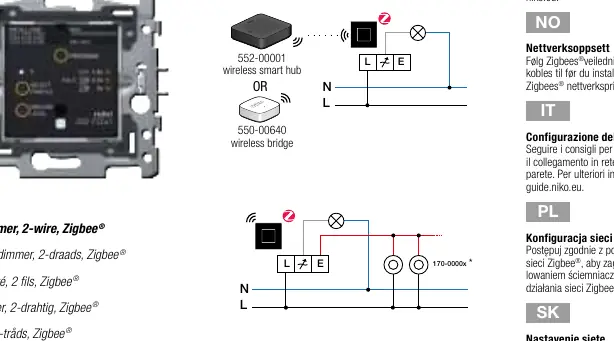
- Wiring: Connect the dimmer to the lighting circuit. The product must be secured with a miniature circuit breaker (MCB) of max. 16 A.
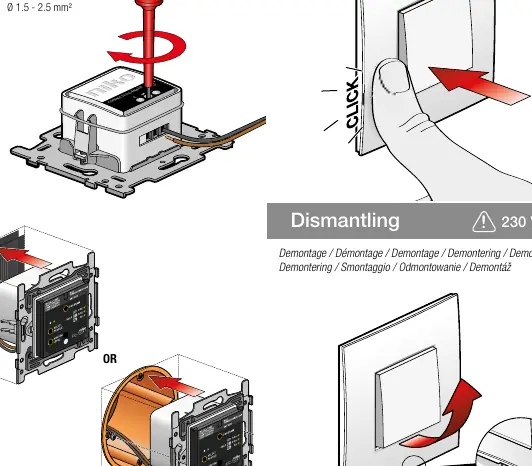
- Flush-mounting: The dimmer is designed for flush-mounting boxes with a minimum depth of 40 mm.
- Dismantling: Ensure power is OFF before removing the dimmer from the wall.
Zigbee Network Setup
To connect the dimmer to a Zigbee network:
- Reset the device if it was previously connected to another network.
- Follow the onboarding procedure in the Niko Home Control software or app.
- Set the dimmer to pairing mode by pressing the switch button 3 times within 6 seconds. The blue LED will blink for up to 5 minutes.
- The dimmer is successfully added when the blue LED stays ON for 4 seconds.
Configuration
Setting Minimum Light Intensity
Adjust the minimum dimming level to optimize the dimming range for your lamp:
- Dim the lamp to the minimum level using the dimming button in the middle of the base.
- If the lamp is too bright, reduce the minimum level using the MIN DIM LEVEL button.
- If the lamp flashes or switches off, increase the minimum level using the same button.
- Switch the dimmer off and back on to save the setting.
Selecting Dimmer Profile
If the lamp does not switch on or flickers, you may need to select a specific lamp profile (LED 1-8). The first button press 'Select Profile' indicates the currently configured profile by the number of green LED flashes.
Troubleshooting
If you encounter issues, check the following:
- Dimmer switches off suddenly: Check for thermal overload or short circuit. Ensure the load is not too high and the ambient temperature in the flush-mounting box does not exceed 35°C.
- Lamp flickers: Check if the lamp is dimmable. Adjust the minimum dimming level or install an LED compensator (310-05001) between the switching wire and the neutral wire.
- Cannot find dimmer in app: Ensure the distance between the dimmer and the smart hub is at least 2 meters and no more than 10 meters.
Technical Specifications
- Power supply: 230 Vac ± 10 %, 50 Hz
- Protocol: Zigbee® 3.0, 2.4 GHz
- Maximum load: 200 W / 200 VA
- Protection degree: IP20
- Ambient temperature: 0 – 35 °C
Practical help
Common problems
Dimmer switches off suddenly
Check for thermal overload, short circuit, or incorrect dimming profile. Ensure ambient temperature is below 35°C.
Lamp flickers
Check if lamp is dimmable, adjust min dim level, or install LED compensator (310-05001).
Cannot find dimmer in app
Check power supply, ensure distance to hub is between 2m and 10m, and verify Zigbee connection.
Before use
- Ensure power is OFF before installation
- Use a miniature circuit breaker (MCB) max 16A
- Check if lamp is dimmable
- Ensure Zigbee hub is ready for pairing
Specs in practice
- Power supply
- 230 Vac ± 10 %, 50 Hz
Images and diagrams
- Wiring diagram shows connection to L and N terminals
- Pairing mode requires 3 presses within 6 seconds
Model compatibility
- Compatible with Zigbee 3.0 hubs
- Requires 2-wire connection
- Max cable length for extension buttons is 50m

Manual page author
Michael Turner
Technical manual editor
Reviews PDF manuals for structure, safety notes, and practical product details so readers can find the right information quickly.