HVAC / Air Conditioners
Remote Controller for Inventor Air Conditioning Systems
Quick guide for the Inventor air conditioning remote controller. Learn how to use basic and advanced functions, set timers, adjust airflow, and troubleshoot common settings.
Table of contents
Manual images
Click an image to enlargeQuick Start Guide
To begin using your air conditioner, follow these steps:
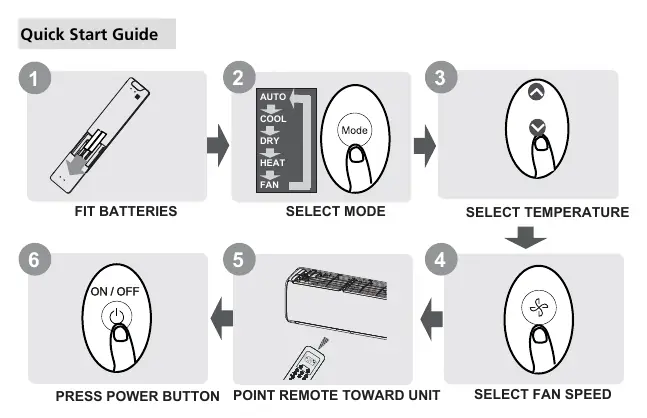
- Fit Batteries: Slide the back cover down and insert two R03/LR03 batteries, matching the (+) and (-) symbols.
- Select Mode: Press the MODE button to cycle through AUTO, COOL, DRY, HEAT, and FAN modes.
- Select Temperature: Use the TEMP up or down buttons to set your desired temperature.
- Select Fan Speed: Press the FAN SPEED button to adjust the airflow.
- Point Remote: Aim the remote toward the indoor unit.
- Power On: Press the ON/OFF button to start the unit.
Buttons and Functions
Familiarize yourself with the remote control buttons:

- ON/OFF: Turns the unit on or off.
- MODE: Scrolls through operation modes (AUTO, COOL, DRY, HEAT, FAN).
- TEMP: Increases or decreases temperature in 1°C/1°F increments. Pressing both TEMP buttons for 3 seconds toggles between °C and °F.
- FAN SPEED: Selects fan speeds (AUTO, LOW, MED, HIGH). Hold for 2 seconds to activate Silence mode.
- SWING: Starts/stops horizontal louver movement. Hold for 2 seconds for vertical auto swing.
- ECO/GEAR: Enters energy-efficient mode or power consumption settings (75%, 50%).
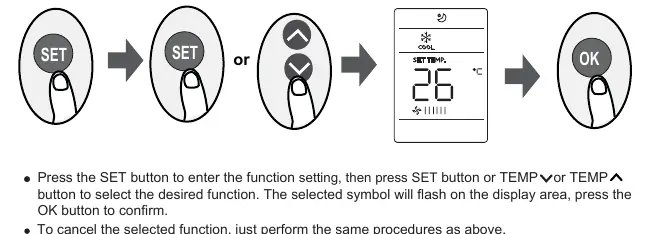
- SET: Scrolls through advanced functions (Breeze Away, Sleep, Follow Me, AP mode).
- OK: Confirms selected functions.
- TIMER: Sets timer for unit operation.
- FRESH: Starts/stops the Fresh feature (UV-C lamp/ion generator).
- CLEAN: Starts/stops Self Clean or Active Clean function.
- LED: Turns the indoor unit's LED display and buzzer on/off. Hold for 5 seconds to display room temperature.
- Turbo: Enables the unit to reach the set temperature in the shortest time.
Remote Screen Indicators
The display shows active settings, including:
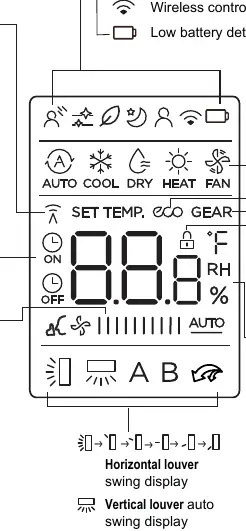
- Mode: Current operating mode (AUTO, COOL, DRY, HEAT, FAN).
- Fan Speed: Selected fan speed level.
- Timer: ON/OFF timer status.
- Features: Indicators for ECO, GEAR, LOCK, Silence, Turbo, and wireless control.
- Temperature/Timer/Fan: Displays set temperature, timer duration, or fan speed.
Basic Functions
AUTO Mode: The unit automatically selects COOL, FAN, or HEAT based on the set temperature. Fan speed cannot be adjusted.
COOL or HEAT Mode: Set the desired temperature and fan speed. HEAT mode is not supported by cooling-only appliances.
DRY Mode: The unit acts as a dehumidifier. Fan speed is automatically controlled.
FAN Mode: Only the fan runs. Temperature cannot be set.
Advanced Functions
Timer Setting: Use the TIMER button to set the time after which the unit will automatically turn on or off. Time increases in 30-minute increments up to 10 hours, then 1-hour increments.
Swing Function: Press SWING for automatic horizontal louver movement. Hold for 2 seconds for vertical swing. Pressing SWING repeatedly allows you to set five different airflow directions.
ECO/GEAR: ECO mode automatically adjusts temperature and fan speed for energy saving. GEAR mode allows you to limit power consumption to 75% or 50%.
Silence Function: Hold the FAN button for 2 seconds to reduce compressor frequency for quieter operation.
FP Function: In HEAT mode, press the TEMP down button twice within one second to set the unit to 8°C/46°F.
Lock Function: Press CLEAN and Turbo buttons simultaneously for 5 seconds to lock the remote. Repeat to unlock.
Follow Me: The remote measures the temperature at its current location and sends the signal to the unit every 3 minutes.
AP Mode: Used for wireless network configuration. Press the LED button 7 times in 10 seconds to enter.
Maintenance
For optimum performance, do not mix old and new batteries. Remove batteries if the remote will not be used for more than 2 months. Dispose of batteries according to local laws.
Practical help
Common problems
Remote control not working
Check if batteries are inserted correctly. Ensure you are within 8 meters of the unit and there are no obstacles like curtains blocking the signal.
Function button has no effect
The indoor unit may not support that specific function. If the unit does not have the feature, pressing the button will have no effect.
Temperature display is incorrect
Hold the LED button for 5 seconds to toggle between displaying the set temperature and the actual room temperature.
Before use
- Insert two AAA batteries into the remote.
- Ensure the air conditioner is plugged into a power outlet.
- Check that the remote is within 8 meters of the unit.
- Remove any obstacles (curtains, furniture) between the remote and the unit.
- Verify the unit is powered on.
Specs in practice
- Signal Receiving Range
- 8 meters
- Rated Voltage
- 3.0V (using two R03/LR03 batteries)
- Operating Environment
- -5°C to 60°C (23°F to 140°F)
Images and diagrams
- Quick Start Guide: Illustrates battery insertion, mode selection, temperature adjustment, fan speed, and power button usage.
- Buttons and Functions: Provides a visual map of all buttons on the remote control.
- Remote Screen Indicators: Shows all possible icons that may appear on the LCD display.
Model compatibility
- Some functions (like HEAT mode) are not supported by cooling-only models.
- Button designs may vary slightly depending on the specific unit.
- If the indoor unit lacks a specific function, the corresponding button will not work.

Manual page author
Emily Carter
User documentation editor
Prepares concise manual descriptions and highlights the most useful setup, operation, and maintenance information for readers.