Lighting / Stage Lighting
User Manual for Laserworld BeamBar Series MK3 Laser Projector
Quick guide for the Laserworld BeamBar Series MK3 laser projector. Includes setup, safety instructions, DMX operation, Master-Slave configuration, and technical specifications for the 10R, 10G, and 10B models.
Table of contents
Manual images
Click an image to enlargeQuick Guide from the Manual
The Laserworld BeamBar Series MK3 is a professional show laser system. Before operation, ensure the device is not damaged, the voltage is correct, and the interlock bridge is connected. The device requires a key to operate and must be used in enclosed spaces only. Always ensure adequate ventilation and keep the device away from heat sources.
Device Overview
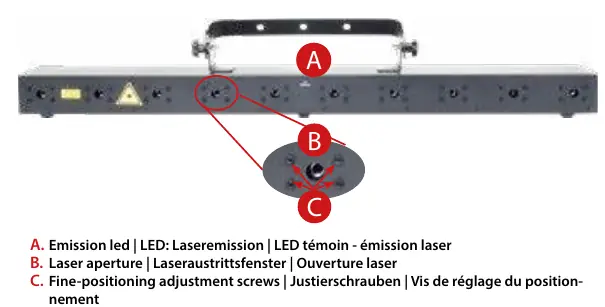
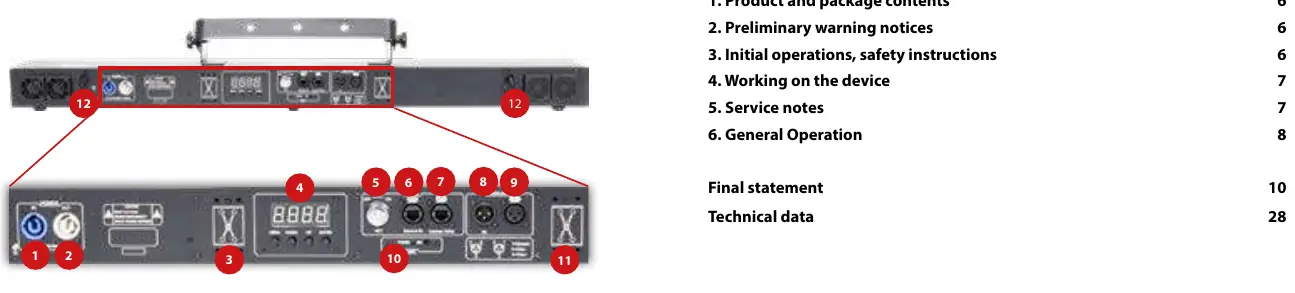
The front panel features the laser emission LED, laser aperture, and fine-positioning adjustment screws. The back panel contains the power input/output, DMX ports, interlock connector, key switch, microphone, and the settings display with navigation buttons (Menu, Enter, Up, Down).
Installation and Safety
- Safety First: Never look directly into the laser beam. The device is Class 3B.
- Mounting: When installing on walls or ceilings, use a safety cord capable of withstanding ten times the weight of the device. Maintain a minimum distance of 15 cm from walls and objects.
- Ventilation: Ensure ventilation openings are not covered. Do not place the device on heat-radiating surfaces.
- Interlock: Connect an easily accessible interlock connector or circuit breaker to the projector.
Operation
To start the device, connect the interlock bridge, insert the key, turn it to 'ON', and switch on the power. The 'Emission - Laser on' LED will light up when ready.
Operation Modes
- Sound-to-Light: Select 'ShΠd' in the menu, then 'SoUn' to trigger beams to the beat of music. Microphone sensitivity can be adjusted in the 'SEnS' menu (1-100).
- Auto: Select 'ShΠd' then 'Auto' for random pattern playback.
- Master-Slave: Link multiple units using DMX cables. Set the Master unit to 'ΠASt' and Slave units to 'SLAu' in the 'SLΠd' menu. Slave units must be set to DMX mode 'Addr' with address A001.
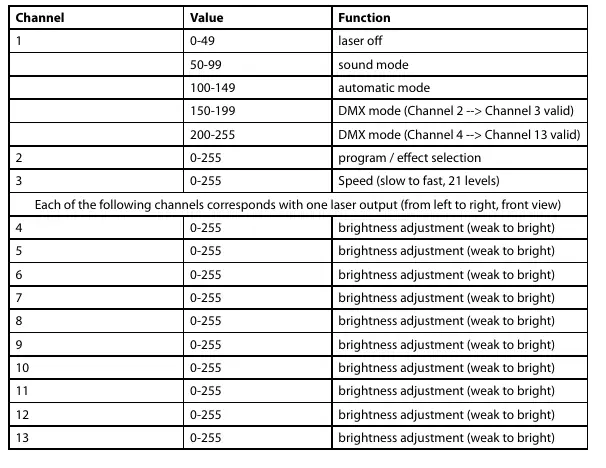
- DMX 512: Select 'Addr' in the menu to set the DMX address. The device uses 13 DMX channels.
Maintenance
Regularly clean the exit window with glass cleaner. Keep fans and heatsinks free of dust to prevent overheating. Do not use the device in high humidity, rain, or dusty environments. If the device has been exposed to large temperature changes, allow it to acclimate before switching on to prevent condensation.
Technical Data
The BeamBar Series MK3 operates on 100-250V AC, 50/60Hz. Power consumption is 50W. The series includes models 10R (638nm), 10G (520nm), and 10B (450nm).
Manufacturer information
Laserworld (Switzerland) AG
Practical help
Common problems
Laser does not turn on
Ensure the key is inserted and turned to 'ON', the interlock bridge is connected, and the power cable is securely plugged in.
Device overheating
Check that fans and heatsinks are free of dust. Ensure ventilation openings are not blocked and the device is not placed on a heat-radiating surface.
No DMX signal / Slave units not responding
Check DMX cable connections. Ensure the Master is set to 'ΠASt' and Slaves are set to 'SLAu' and address A001.
Before use
- Check for visible damage on housing, cables, and connectors.
- Verify the power supply voltage matches the device requirements.
- Ensure the interlock bridge is connected.
- Insert the key and turn to 'ON'.
- Ensure the laser is not directed at people or flammable objects.
- Check that ventilation openings are clear.
Specs in practice
- Laser Class 3B
- Requires professional handling; avoid direct eye exposure to the beam.
- 13 DMX Channels
- The number of channels required for DMX control; ensure no address overlap with other devices.
Images and diagrams
- Front Panel: Shows the emission LED, laser aperture, and fine-positioning screws.
- Back Panel: Shows power ports, DMX ports, interlock, key switch, and settings display.
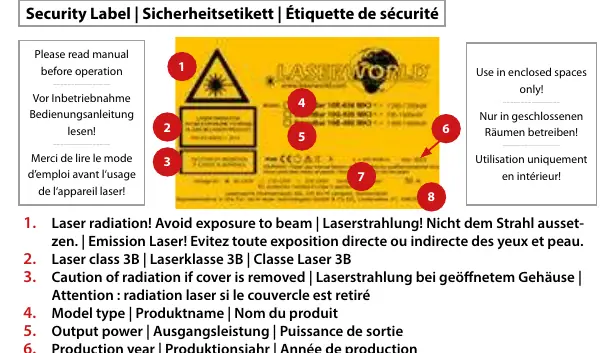
- Security Label: Indicates laser radiation warning, class 3B, and power requirements.
Model compatibility
- Master-Slave operation only works with lasers of the same product series and generation.
- Do not use with dimmers or electronically switched sockets.

Manual page author
David Miller
Documentation analyst
Organizes user manual content into clear summaries, with attention to model details, product context, and everyday usability.