Electronics / Monitors
LookOurWay 10ft SEG Backlit Trade Show Display Assembly Guide
Comprehensive assembly and maintenance instructions for the LookOurWay 10ft SEG Backlit Trade Show display system, ensuring professional setup and longevity.
Table of contents
Manual images
Jump to the sectionProduct Overview
The LookOurWay 10ft SEG Backlit Trade Show display is a professional-grade modular system designed for high-impact visual presentations. This kit includes all necessary hardware, including frame segments, support poles, frame feet, and a dedicated power cord for the integrated lighting system. The SEG (Silicone Edge Graphics) technology allows for a seamless, tensioned fabric display that provides a clean, modern look for any trade show or event environment.
Assembly Instructions
The assembly process is modular and requires no specialized tools. Begin by laying out all components to ensure all parts are present. The frame is constructed by matching the corresponding shapes on each piece, ensuring a secure fit. Start by assembling the bottom frame sections and attaching the frame feet. Once the base is stable, connect the vertical support poles and the horizontal support bars to create the structural skeleton of the display. Ensure all locking mechanisms are fully engaged to maintain structural integrity.
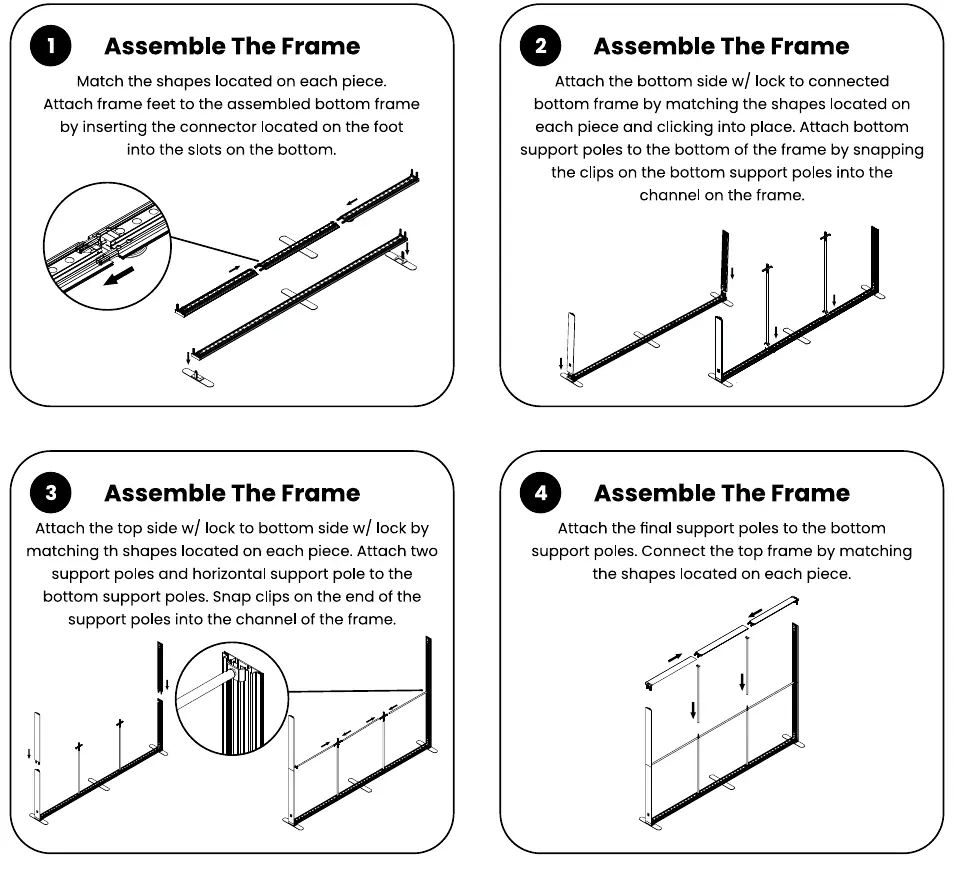
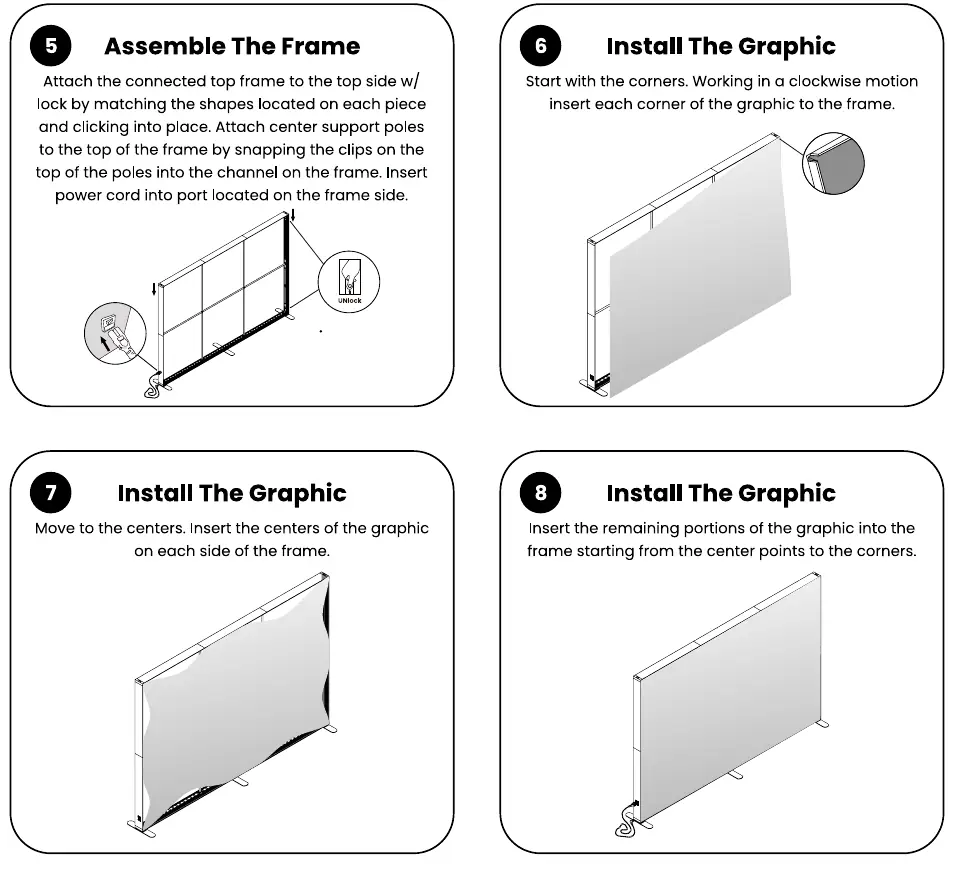
After the main frame is assembled, proceed to the top frame sections. Connect these to the vertical support poles, ensuring all clips snap firmly into the frame channels. Once the frame is fully locked, connect the power cord to the designated port on the side of the frame to activate the internal lighting system.
Installing the Graphics
The SEG graphic installation is designed for precision. Start by inserting the corners of the fabric graphic into the frame channels, working in a clockwise motion. Once the corners are secured, move to the center points of each side of the frame, pressing the silicone edge firmly into the channel. Finally, work from the center points outward toward the corners to ensure the fabric is taut and free of wrinkles. This method ensures a smooth, professional finish for your backlit display.
Storage and Maintenance
Proper care is essential to maintain the quality of your display. Store all hardware in a cool, dry location when not in use. Clean the metal frame components using a soft, damp cloth. The fabric graphics are machine washable; use cold water on a gentle cycle. Always air dry the graphics to prevent damage. If wrinkles appear, use a steamer to smooth the fabric. Never dry-clean the graphics, as this may damage the material and the silicone edges.
Manufacturer information
LookOurWay, LLC
Practical help
Common problems
Graphic appears wrinkled
Use a fabric steamer to gently remove wrinkles after installation.
Frame feels unstable
Verify that all locking mechanisms are fully clicked into place and that support poles are correctly snapped into the frame channels.
Before use
- Verify all 12 components are present including frame parts, poles, and power cord
- Ensure the assembly area is clean and flat
- Check that all locking mechanisms are in the unlocked position before assembly
- Confirm the power source is compatible with the lighting system
Images and diagrams
- Page 1 illustrates the initial frame assembly steps 1 through 4, focusing on connecting the base, support poles, and top frame sections.
- Page 2 continues with steps 5 through 8, detailing the final frame connection, power cord integration, and the specific sequence for inserting SEG graphics.
Model compatibility
- Graphics must be machine washed in cold water on a gentle cycle only.
- Never dry-clean the fabric graphics.

Manual page author
Emily Carter
User documentation editor
Prepares concise manual descriptions and highlights the most useful setup, operation, and maintenance information for readers.