Lighting / Outdoor Lighting
Mayfair 13EC Toilet Seat Installation Instructions
A comprehensive installation and maintenance guide for the Mayfair 13EC toilet seat. Includes step-by-step instructions for the one-button quick-release mechanism, cleaning tips, and essential care precautions to protect the soft-close...
Table of contents
Quick guide from the manual
The Mayfair 13EC toilet seat features a one-button quick-release mechanism designed for easy removal and cleaning. Before beginning installation, ensure the seat and hinge bolts are compatible with your specific toilet bowl. Retain these instructions for future reference.
Installation Steps
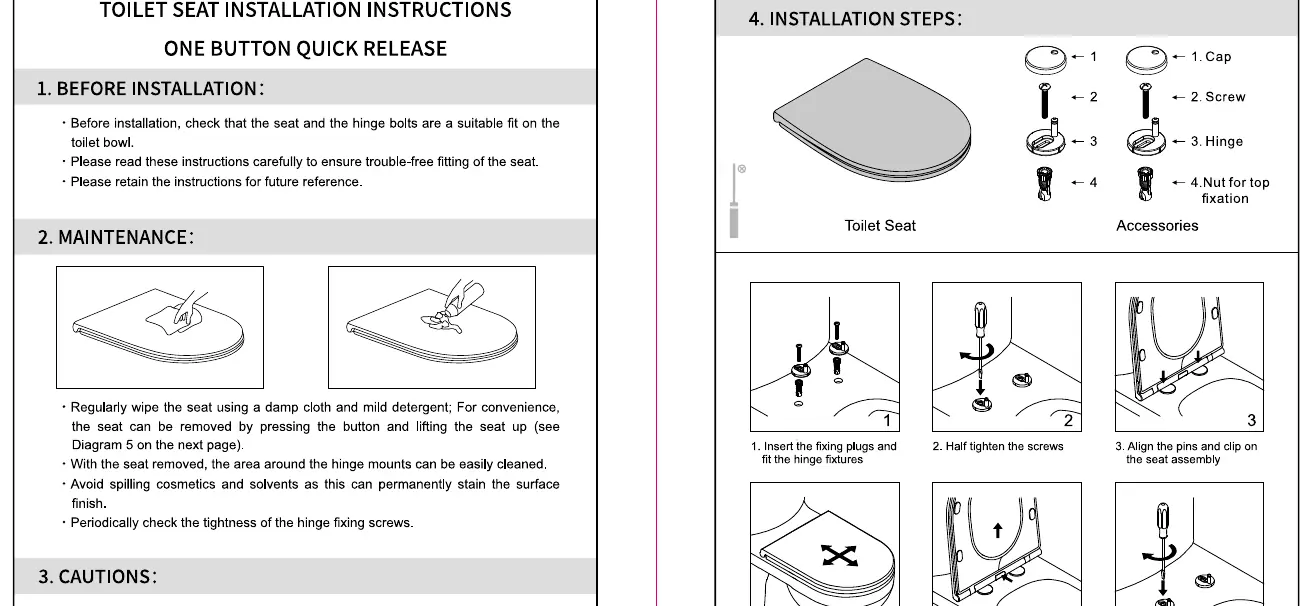
- Prepare: Ensure you have all components: Cap, Screw, Hinge, and Nut for top fixation.
- Insert: Insert the fixing plugs into the toilet bowl holes and fit the hinge fixtures.
- Position: Half-tighten the screws to allow for adjustment.
- Align: Place the seat onto the hinges and align the pins with the seat assembly.
- Secure: Once aligned, press the push button to remove the seat and cover, then fully tighten the screws.
- Finish: Fit the caps onto the hinge fixtures and clip the seat and cover back onto the hinges.
Maintenance and Care
To keep your toilet seat in optimal condition:
- Cleaning: Regularly wipe the seat using a damp cloth and mild detergent.
- Removal: For thorough cleaning, press the quick-release button and lift the seat off the hinges.
- Hinge Maintenance: Periodically check the tightness of the hinge fixing screws to ensure stability.
Cautions
- Chemicals: Do not use strong chemical cleaners, scouring abrasives, or stiff brushes, as these can permanently damage the polished surface.
- Weight: Do not place heavy objects on the cover.
- Impact: Avoid dropping items onto the seat or cover.
- Environment: Avoid installing in locations with direct sunlight or high temperatures.
- Soft-Close: Do not forcibly close the seat or cover, as this may damage the soft-close mechanism.
Practical help
Common problems
Seat feels loose or unstable
Periodically check the tightness of the hinge fixing screws and ensure they are fully tightened.
Surface finish is dull or scratched
Avoid using strong chemical cleaners, scouring abrasives, or stiff brushes. Use only a damp cloth and mild detergent.
Before use
- Verify that the seat and hinge bolts are a suitable fit for your toilet bowl.
- Ensure all parts (Cap, Screw, Hinge, Nut) are present.
- Check that the installation area is clean.
Images and diagrams
- The installation uses a top-fixation method where expanding plugs are inserted into the bowl holes before the hinges are secured.
- The quick-release button is located on the hinge assembly, allowing the seat to be detached vertically for cleaning.
Model compatibility
- Designed for standard toilet bowls; verify fitment before final installation.

Manual page author
David Miller
Documentation analyst
Organizes user manual content into clear summaries, with attention to model details, product context, and everyday usability.