Lighting / Stage Lighting
User Manual for Mega Lite Followbot 1000W LED Fixture
Comprehensive user guide for the Mega Lite Followbot 1000W LED fixture. This manual covers safety precautions, installation, DMX and rail controller connections, operation modes, gobo holder installation, and technical specifications.
Table of contents
Manual images
Click an image to enlargeQuick guide from the manual
The Mega Lite Followbot 1000W LED is a professional stage lighting fixture. Before operation, ensure the unit is at least 2 feet away from flames and heat sources. The fixture is for indoor use only and must be properly earthed. Always use a secondary safety attachment when mounting the unit.
Installation and Safety
Installation must be performed by an authorized dealer or trained professional. Ensure the mounting structure can support the fixture's weight (75lb). Always secure the fixture with a secondary safety attachment. The unit must be kept 24 inches away from flammable materials.
Connections
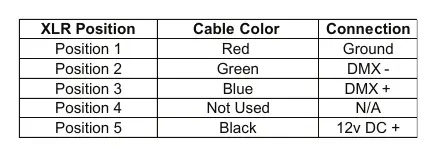
The fixture features 5-pin XLR sockets for DMX input and output. Use shielded twisted pair cable designed for RS-485. For the last fixture in a DMX chain, use a terminator (item #P-DMX-T). The power supply is auto-switching (100-240V AC). Do not connect to a dimmer system.
Rail Controller Operation
When using the included Rail Mounted Controller, connect it to the 5-pin Controller Connection port. Do not connect a DMX console simultaneously, as this may cause damage. Set the fixture to DMX Start address 001. Use the red record button to save scenes to presets 1-7.
Gobo Holder Installation
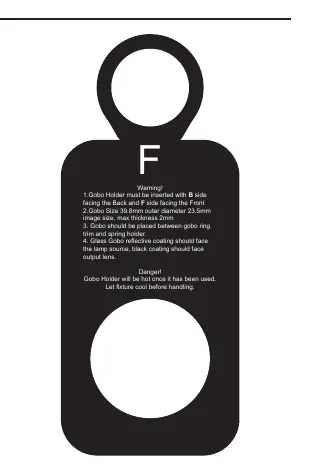
To install a gobo, insert the holder with the B side facing the back and the F side facing the front. The gobo must be placed between the gobo ring trim and the spring holder. Ensure the glass gobo reflective coating faces the lamp source and the black coating faces the output lens. Note that the holder becomes hot during use.
Display Settings
The LCD control board allows access to various functions:
- Fixture Address: Set the DMX start channel.
- Information: View power-on time, lamp temperature, and software version.
- Personality: Adjust display settings, iris reverse, color presetting, and system reset.
- Manual Mode: Control mechanical and electrical functions directly via the display.
Cleaning and Maintenance
The unit requires annual inspection by an expert. Ensure all screws are tight and there is no deformation on the housing. Clean the housing from the outside using only soap and water. If the fuse or power cable needs replacement, use only authorized parts and services.
Technical Specifications
- Light Source: 1 x 1000W LED
- Zoom: 3° to 6° Electronic Zoom
- DMX Protocol: DMX 512
- Weight: 75lb
- Power Consumption: 1109 Watts
Practical help
Common problems
Lamp does not turn on
Ensure the 'Lamp On' function is engaged in conjunction with the dimmer.
DMX signal issues
Ensure the last fixture in the chain has a terminator installed and use shielded twisted pair cable.
Controller not responding
Ensure the fixture is set to DMX Start address 001 and the controller is plugged into the dedicated 5-pin Controller Connection.
Before use
- Verify power supply is 100-240V AC.
- Ensure fixture is at least 2 feet from any flame.
- Check that the unit is properly earthed/grounded.
- Install a secondary safety attachment.
- Ensure all cables are properly secured.
- Check that the gobo holder is inserted correctly (B side back, F side front).
Specs in practice
- Light Source
- 1000W LED
- DMX Protocol
- DMX 512
Images and diagrams
- DMX Input/Output: 5-pin XLR sockets wired in parallel.
- Rail Controller: Connects via 5-pin XLR; do not connect DMX console simultaneously.
- Gobo Holder: Insert with B side facing back, F side facing front.
Model compatibility
- Not designed for outdoor use.
- Do not connect to a dimmer system.
- DMX signal takes precedence over Rail Controller signal.

Manual page author
Michael Turner
Technical manual editor
Reviews PDF manuals for structure, safety notes, and practical product details so readers can find the right information quickly.