Automotive / Car Audio
User Manual for Musway D8 V3 8-Channel Amplifier with 10-Channel DSP
Quick guide for the Musway D8 V3 8-channel amplifier with 10-channel DSP. Includes installation steps, wiring diagrams, software setup, and troubleshooting.
Table of contents
Manual images
Click an image to enlargeQuick guide from the manual
The Musway D8 V3 is an 8-channel Class D amplifier with an integrated 10-channel DSP. This guide provides essential information for installation, wiring, and software configuration. Always disconnect the ground connection from the vehicle battery before starting any installation to prevent short circuits.
Safety Instructions
- The device is designed for 12V vehicle electrical systems.
- Do not operate the sound system in a way that distracts from safe driving.
- Ensure sufficient ventilation for the amplifier; do not cover cooling vents or heat sinks.
- Do not open the device, as this voids the warranty.
- Use only fuses with the same rating (40A).
- Installation should be performed by skilled staff.
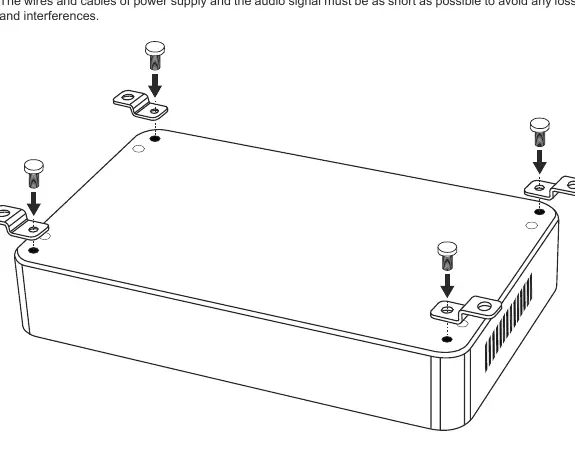
Mechanical Installation
Choose a location that provides sufficient air circulation. Avoid mounting the device on subwoofer boxes or other vibrating parts, as this can loosen internal components. Ensure that mounting holes do not damage vehicle components like fuel pipes, gas tanks, or electrical wiring.
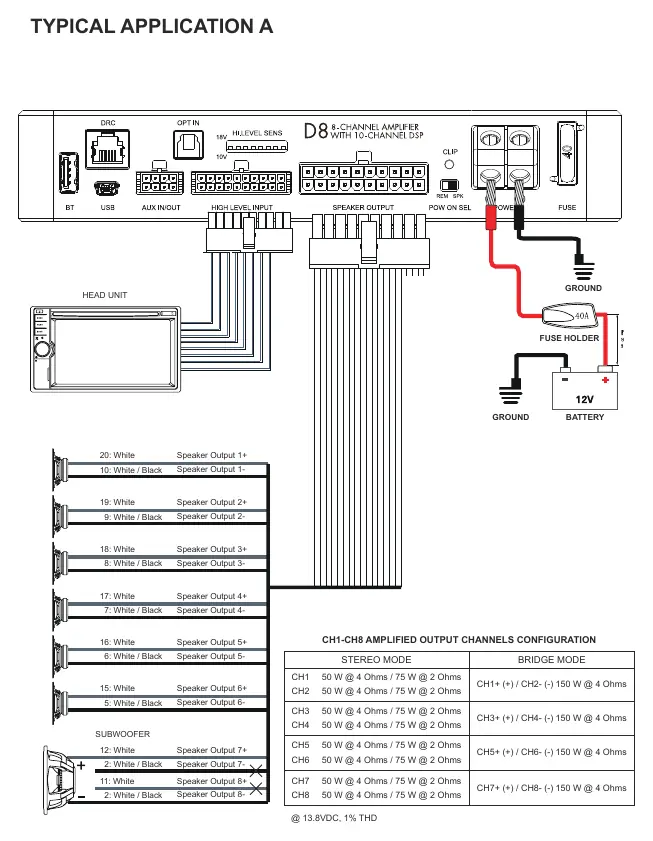
Electrical Interconnection
For professional installation, use appropriate wiring kits with a sufficient cross-section (at least 5 mm). Ensure all connections are tight and clean. Connect the POWER + terminal to the +12V battery pole and the POWER - terminal to a solid ground point on the vehicle chassis. The distance between the fuse block and the battery should be less than 30 cm.
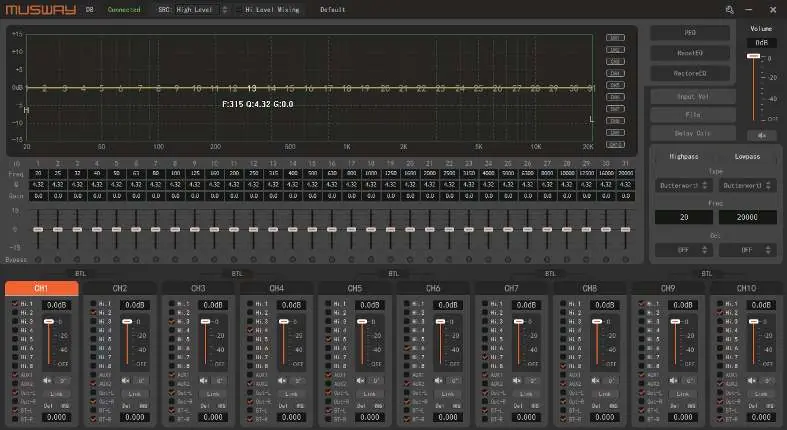
System Configuration
To configure the DSP, connect the amplifier to a PC using the provided USB cable. Download the DSP software from www.musway.de/dsp. Before turning on the system, set the head-unit output level to approximately 20% to avoid damaging speakers during calibration.
Trouble Shooting
- No function: Check power supply connections, cables, remote turn-on signal, and fuses.
- No signal on speakers: Check speaker/RCA connections, head unit settings, and DSP mute settings.
- Distortions: Reduce the level on the head unit or DSP software.
- Protection mode: Check for short circuits, overheating, or low speaker impedance.
Technical Specifications
- Voltage: 7.5 - 15 VDC
- Output Power (RMS) @ 4 Ohm: 50 W x 8
- Bridge Power (RMS) @ 4 Ohm: 150 W x 4
- DSP Clock Speed: 330 MHz
- PC Connection: Micro USB (1.1 / 2.0 / 3.0)
Official resources from the manual
Practical help
Common problems
No function
Recheck power supply connections, cables, remote turn-on connection, and replace defective fuses.
No signal on loudspeakers
Check speaker/RCA connections, head unit settings, and ensure 'Mute' is not activated in the DSP software.
Distortions on loudspeakers
Turn down the level on the head unit or DSP software, and switch off loudness.
Amplifier in protection mode
Check for short circuits, ensure speaker impedance is not too low, and improve air circulation.
Before use
- Disconnect the ground connection from the vehicle battery.
- Ensure the vehicle has a 12V electrical system.
- Use a 40A fuse.
- Download the DSP software from www.musway.de/dsp.
- Set head-unit output to 20% before initial calibration.
Specs in practice
- Output Power (RMS) @ 4 Ohm
- 50 W per channel for 8 channels.
- Bridge Power (RMS) @ 4 Ohm
- 150 W per channel for 4 channels.
- DSP Clock Speed
- 330 MHz for signal processing.
Images and diagrams
- Wiring Diagram A: Standard installation with head unit and subwoofer.
- Wiring Diagram B: Installation with external pre-amplifier source.
Model compatibility
- Requires Microsoft Windows XP, Vista, 7, 8, or 10.
- Compatible with USB 1.1, 2.0, and 3.0.

Manual page author
Michael Turner
Technical manual editor
Reviews PDF manuals for structure, safety notes, and practical product details so readers can find the right information quickly.