Electronics / Security Cameras
User Manual for Netvue Orb Cam
Quick guide for the Netvue Orb Cam. Includes installation steps, setup instructions, status light meanings, and technical specifications.
Table of contents
Manual images
Click an image to enlargeQuick Guide
This guide provides essential information for setting up and installing your Netvue Orb Cam. Please ensure you have a 2.4GHz Wi-Fi network available, as the camera is not compatible with 5GHz networks. Keep the device away from children and pets, and avoid placing it behind furniture or near microwave ovens to maintain a stable signal.
What's in the Box
- Mounting Bracket
- Drilling Template
- Anchors (x2)
- Screws (x2)
- Hex Bolt
- Power Adapter
Camera Structure
The camera features the following components:

- Front: Lens, Light Sensor, Infrared LEDs, Status Light, Microphone, Speaker.
- Rear/Bottom: Micro SD Card Slot, Power Port, Wi-Fi Configuration Button, Support Hole.
Installation
Follow these steps to mount your camera:
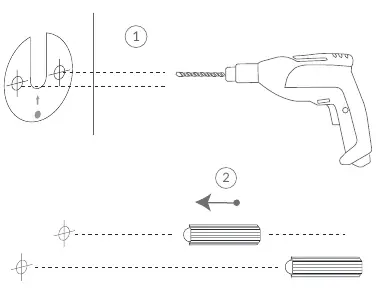
- Mark and Drill: Use the provided drilling template to mark the hole positions on the wall. Use a 15/64" (6mm) drill bit to drill two holes and insert the anchors.
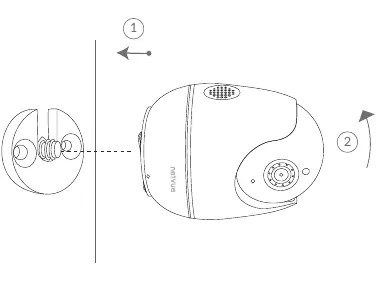
- Mounting Bracket: Secure the mounting bracket to the wall using the provided screws. Insert the Hex Bolt into the bracket.
- Attach Camera: Tighten the Orb Cam clockwise onto the Hex Bolt.
- Adjust: Once installed, you can adjust the camera's horizontal and vertical orientation using the Netvue App.
Setup
Download the Netvue App from the Apple App Store or Google Play Store. Follow the in-app instructions to complete the configuration process. Ensure your phone is connected to your 2.4GHz Wi-Fi network during setup.
Status Light
The status light indicates the camera's current state:
- Solid Green: Online
- Rapidly Flashing Green: Wi-Fi Configuration Mode
- None: Offline
Support
If you need additional help, you can contact Netvue via:
- Email: [email protected]
- Phone: 1(866)749-0567
- Netvue Forum
- In-App Chat
- Social Media: @NetvueTech
Practical help
Common problems
Camera is offline
Check your Wi-Fi connection and ensure the camera is within range of your router. Verify the status light is solid green.
Cannot scan QR code during setup
Ensure there is no strong light interfering with the camera lens or the screen displaying the QR code.
Wi-Fi connection issues
Ensure you are connecting to a 2.4GHz Wi-Fi network. The device does not support 5GHz networks.
Before use
- Ensure you have a 2.4GHz Wi-Fi network.
- Keep the camera and accessories out of reach of children and pets.
- Use the provided power adapter or a certified DC5V (>=1000mA) adapter.
- Avoid placing the device behind furniture or near microwaves.
- Ensure the operating temperature is between -10°C and 50°C (14°F to 122°F).
Specs in practice
- Operating Temperature
- -10°C to 50°C (14°F to 122°F)
- Operating Humidity
- 0-95%
- Power Supply
- DC5V (>=1000mA)
Images and diagrams
- The mounting bracket uses a drilling template to ensure correct hole alignment.
- The camera attaches to the mounting bracket using a hex bolt, which is then tightened clockwise.
Model compatibility
- Only compatible with 2.4GHz Wi-Fi networks.

Manual page author
David Miller
Documentation analyst
Organizes user manual content into clear summaries, with attention to model details, product context, and everyday usability.