Electronics / Security Cameras
User Manual for Netvue Vigil Camera
Quick guide for the Netvue Vigil Camera. Learn how to set up, install, insert an SD card, and troubleshoot your security camera.
Table of contents
Manual images
Click an image to enlargeQuick guide from the manual
This guide provides essential instructions for setting up and installing your Netvue Vigil Camera. Before beginning, ensure you have a stable Wi-Fi connection or an Ethernet cable for wired setup, and download the Netvue App. The camera requires a 12VDC (≥1000mA) power supply.
What's in the box
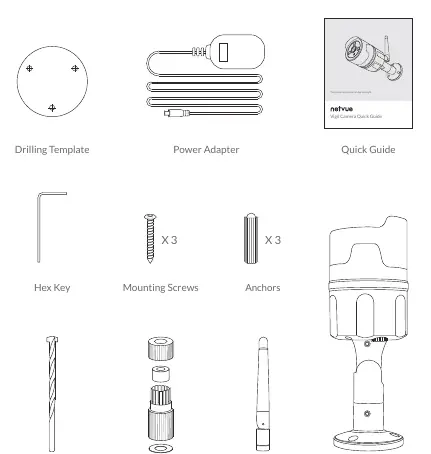
- Vigil Camera
- Drilling Template
- Power Adapter
- Hex Key
- Mounting Screws (x3)
- Anchors (x3)
- Drill Bit
- Weatherproof Tube
- Antenna
- Quick Guide
Device Overview
The camera features several key components for operation:
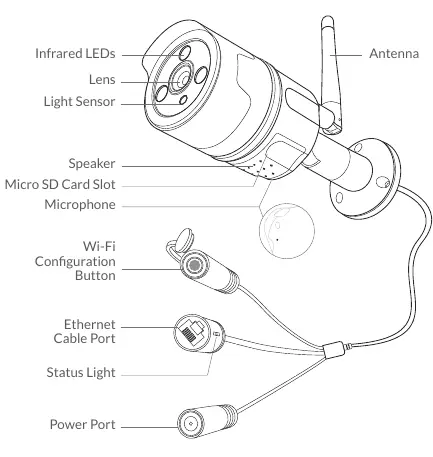
- Front: Infrared LEDs, Lens, Light Sensor.
- Body: Speaker, Microphone, Micro SD Card Slot.
- Cable Harness: Wi-Fi Configuration Button, Ethernet Cable Port, Power Port.
Inserting Micro SD Card
The camera supports Micro SD cards up to 128GB for local storage.
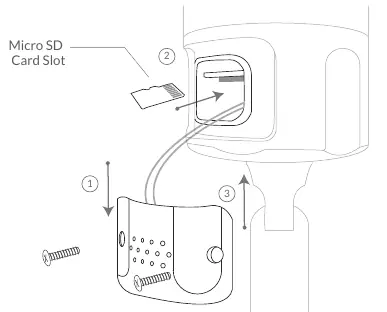
- Loosen the screws on the camera cover.
- Take off the cover gently, noting the attached wires.
- Insert the Micro SD card in the correct direction (back of the card facing up).
- Replace the cover and tighten the screws.
Safety and Installation Requirements
Before installing, observe the following precautions:
- Keep the camera and accessories out of reach of children and pets.
- Operating temperature: -20°C to 50°C (-4°F to 122°F).
- Operating humidity: 0-90%.
- Do not expose the lens to direct sunlight.
- Avoid installation locations likely to be struck by lightning.
- Ensure the power supply is 12VDC (≥1000mA).
App Setup
Add the camera to your Netvue account before mounting it outside.
- Power on the camera using the provided adapter. You should hear a chime.
- Download the Netvue App from the App Store or Google Play.
- Register or log in to your account.
- Tap the '+' icon in the top right corner to add a new device.
- Select 'Vigil Camera' from the product list.
- Choose your connection method: Wireless (Wi-Fi) or Wired (Ethernet).
- Follow the in-app instructions to complete the setup.
- Test the video streaming before proceeding to physical installation.
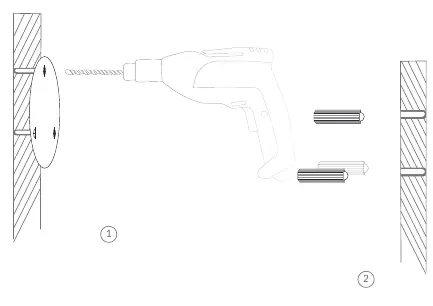
Installation
Check that the camera is added to the app and you have planned your cable route before drilling.
- Attach Antenna: Remove the anti-dust cap and attach the provided antenna.
- Choose Location: Recommended height is 7-10 feet (2-3 meters) above the ground. Ensure a power outlet is nearby and the view is unobstructed.
- Drilling: Use the drilling template to mark holes. Use the provided drill bit to drill holes and insert anchors.
- Mounting: Secure the camera to the wall using the provided screws.
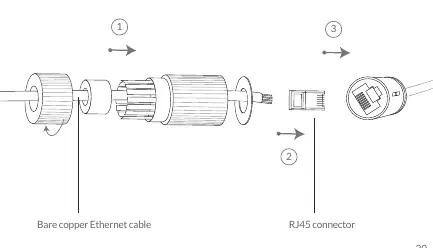
- Wired Connection (Optional): If using Ethernet, use the weatherproof tube to protect the cable connection.
- Adjust Angle: Use the hex key to loosen the hinge screws, point the camera as desired, and tighten the screws.
Status Light Indicators
- Green: Online.
- Blinking Green: Wi-Fi Configuration Mode.
- Slowly Blinking Green: Offline.
- None: Not working properly.
Support
For additional help, contact Netvue:
- Email: [email protected]
- Phone: 1(866)749-0567
- Website: www.netvue.com
- Social: @NetvueTech
Official resources from the manual
Practical help
Common problems
Weak Wi-Fi signal
If the signal is weak at the installation spot, use a wired Ethernet connection instead.
Camera not working
Check the status light. If there is no light, ensure the power adapter is connected and the outlet is working.
Video not recording
Ensure the Micro SD card is inserted correctly with the back of the card facing up.
Before use
- Check Wi-Fi signal strength at the installation location.
- Ensure power supply is 12VDC (≥1000mA).
- Plan the cable route and measure cable lengths.
- Download the Netvue App.
- Test video streaming in the app before mounting the camera.
- Verify you have all parts: camera, antenna, power adapter, screws, anchors, drill bit, and template.
Specs in practice
- Operating Temperature
- -20°C to 50°C (-4°F to 122°F)
- Operating Humidity
- 0-90%
- Micro SD Support
- Up to 128GB
- Power Requirement
- 12VDC (≥1000mA)
Images and diagrams
- The camera cable harness includes a Wi-Fi configuration button, Ethernet port, and power port.
- The Micro SD card slot is accessed by removing the cover on the camera body.
Model compatibility
- Requires Netvue App for setup and operation.
- Supports both wireless (Wi-Fi) and wired (Ethernet) network connections.

Manual page author
Michael Turner
Technical manual editor
Reviews PDF manuals for structure, safety notes, and practical product details so readers can find the right information quickly.