Plumbing / Toilets Urinals
Installation Guide for OVE Angara 1-Piece Toilet
Comprehensive installation and maintenance guide for the OVE Angara 1-Piece Toilet. Includes step-by-step setup instructions, parts list, water tank level adjustment, and care guidelines.
Table of contents
Manual images
Click an image to enlargeQuick guide from the manual
The OVE Angara is a 1-piece toilet designed for a standard 12-inch rough-in installation. Before beginning, ensure your water inlet and floor discharge drain meet the minimum measurements specified in the installation section. The installation process involves preparing the floor flange, securing the toilet, and applying a silicone seal at the base. Regular maintenance requires mild, non-abrasive soap and water; avoid using in-tank cleaners as they contain corrosive chemicals that can damage internal components.
Parts List
The following components are included with your toilet:
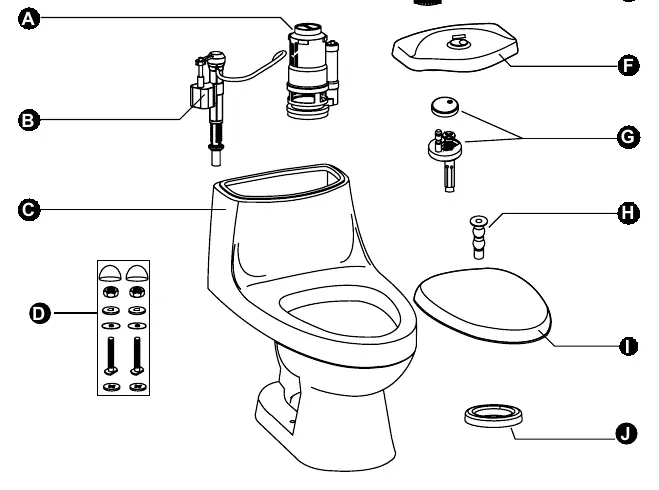
- Flush valve
- Fill valve
- Toilet tank
- Flange hardware
- Flush buttons
- Tank lid
- Seat hardware
- Rubber nuts
- Seat
- Toilet seal ring
Tools Required
The following tools are required for installation but are not supplied:
- Adjustable wrench
- Silicone sealant
- Measuring tape
- Screwdriver
Installation
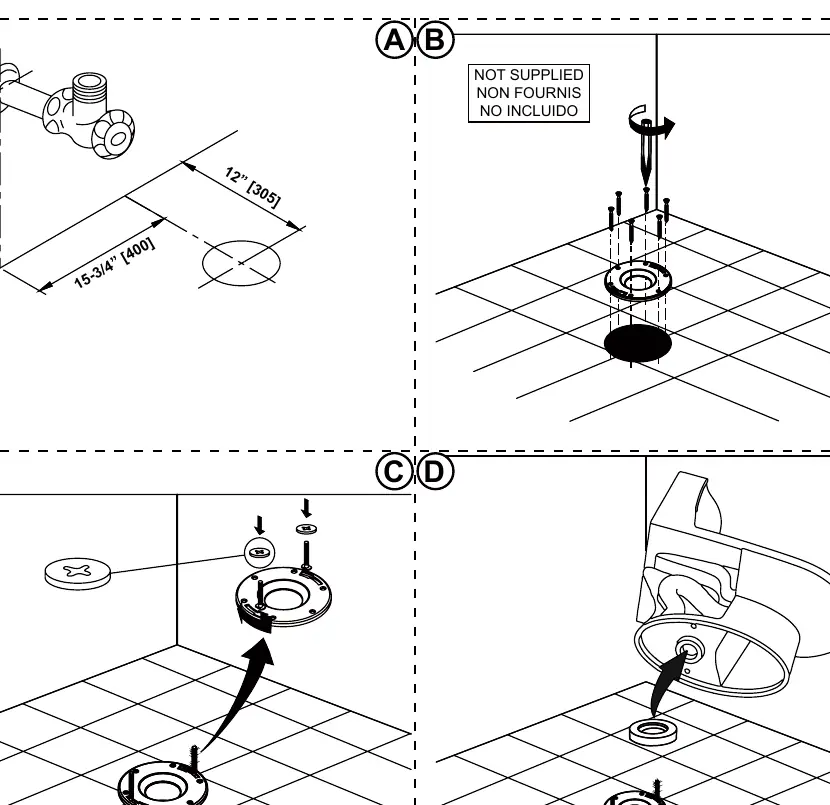
Step 1: Preparation and Flange
Ensure your water inlet pipe and floor discharge drain are installed according to the required measurements. Install the floor flange according to the manufacturer's recommendations. Position the two fixing bolts of the floor flange and use the provided plastic nuts to immobilize them. Firmly push the seal ring onto the toilet's drain to fix it to the ceramic.
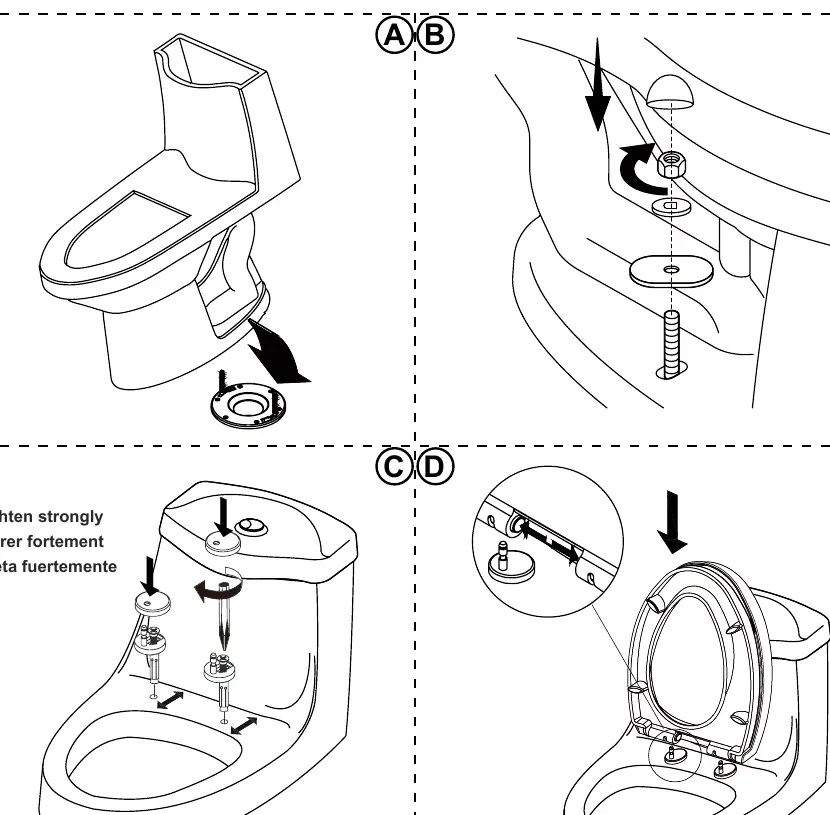
Step 2: Positioning and Securing
Position the toilet onto the floor flange. Using an adjustable wrench, reach beside the toilet and tightly screw the nut to the fixing bolts. Install the seat cover hardware, including the decorative cap. Before tightening, move the pegs front and back to achieve the desired seat position. Insert the seat onto the toilet by pushing the two buttons and securing it to the fixing pegs.
Step 3: Finishing
Apply silicone around the base of the toilet to create a watertight seal. Wait 24 hours for the silicone to dry completely before using the toilet.
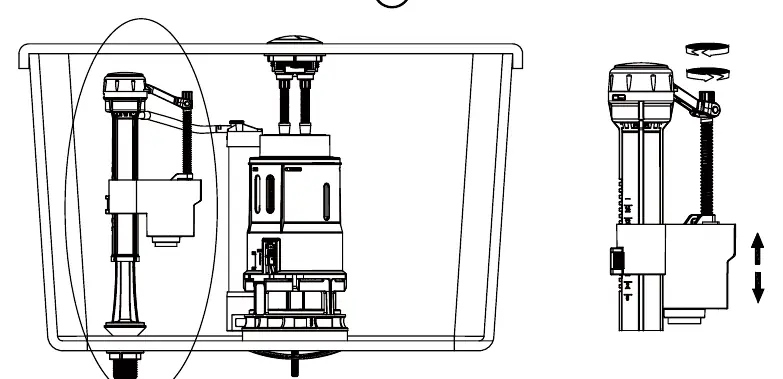
Step 4: Adjusting the Water Tank Level
If the water level in the tank needs adjustment, rotate the adjustable rod of the fill valve to change the height of the floater.
Care and Maintenance
For general cleaning, use mild, non-abrasive soap and warm water. Do not use abrasive cleaners, such as those containing sand or silica, as they will scratch the ceramic finish. Do not use in-tank bowl cleaners, as they contain corrosive chemicals that attack the tank's components.
Practical help
Common problems
Toilet wobbles after installation
Ensure the floor flange is installed correctly and the fixing bolts are tightened securely.
Water level in tank is too high or low
Rotate the adjustable rod on the fill valve to adjust the height of the floater.
Ceramic finish is scratched
Avoid using abrasive cleaners containing sand or silica. Use only mild, non-abrasive soap.
Before use
- Verify the rough-in distance is 12 inches from the wall to the center of the drain.
- Ensure the floor flange is properly installed.
- Have an adjustable wrench and silicone sealant ready.
- Check that all parts from the parts list are present.
Specs in practice
- 12 inch rough-in
- The distance from the finished wall to the center of the floor drain must be at least 12 inches.
Images and diagrams
- The installation diagrams illustrate the sequence of securing the floor flange, placing the toilet, and adjusting the fill valve.
- The parts diagram identifies all components included in the box for easy assembly.
Model compatibility
- Designed for standard 12-inch rough-in installations.
- Do not use in-tank bowl cleaners as they may damage internal components.

Manual page author
Emily Carter
User documentation editor
Prepares concise manual descriptions and highlights the most useful setup, operation, and maintenance information for readers.