Plumbing / Showers & Tubs
Installation Guide for OVE FELIX Freestanding Bathtub
Comprehensive installation guide for the OVE FELIX freestanding soaking bathtub. Includes specifications, floor tracing templates, three plumbing connection options (PVC, FLEX-H2, FLEX-P), sealing instructions, and maintenance tips.
Table of contents
Manual images
Click an image to enlargeImportant Information
This installation requires at least two people to handle the bathtub safely. Do not lift or support the bathtub by the rim; always provide support under the feet. It is highly recommended that the installation be performed by an experienced plumber to ensure compliance with local regulations. The distributor is not responsible for damage caused by improper installation.
Specifications
The OVE FELIX bathtub has the following specifications:
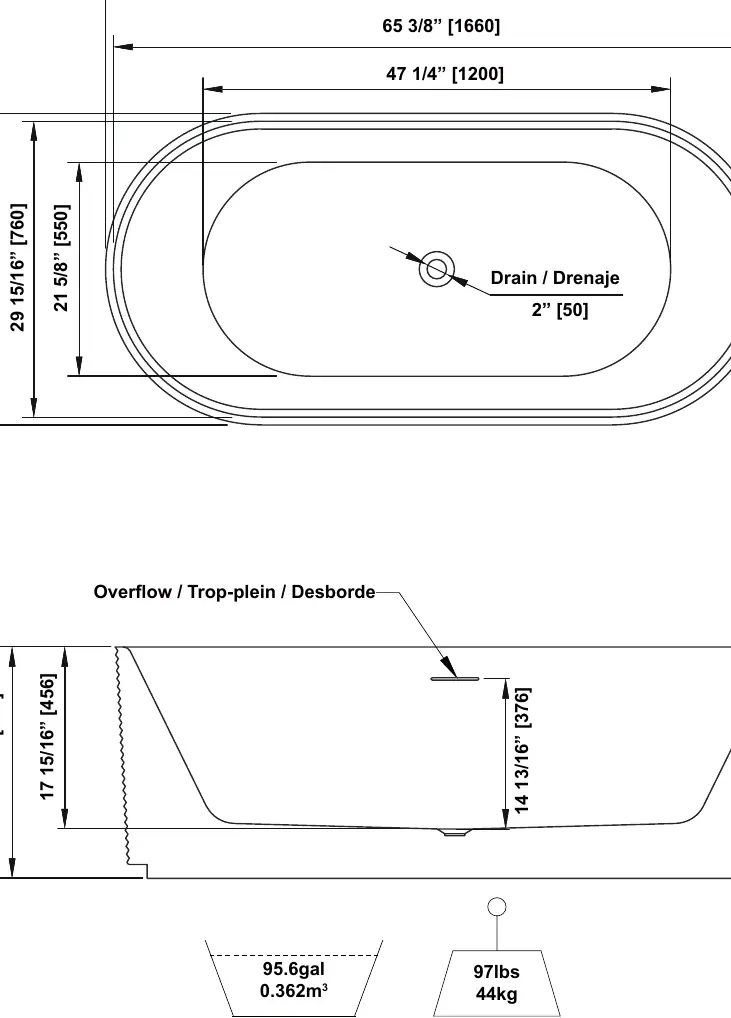
- Capacity: 95.6 gallons (0.362 m3)
- Weight: 97 lbs (44 kg)
- Drain Size: 2 inches (50 mm)
- Dimensions: 66 15/16 inches (1700 mm) length x 31 1/2 inches (800 mm) width
Tools Required
Before starting, ensure you have the following tools:
- Pencil
- Level
- Drill
- Silicone sealant
- Measuring tape
- Adjustable key
- Hole saw
- Fabric cloth (to protect the bath)
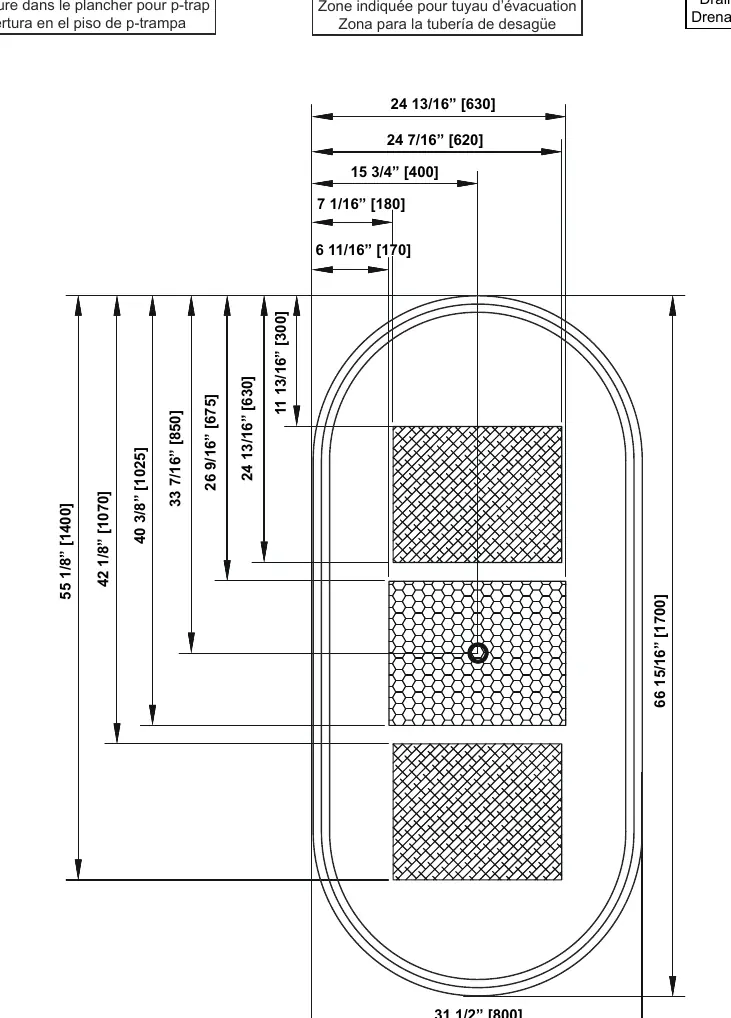
Floor Preparation
Use the provided floor tracing template to mark the exact position of your supply pipes, drain, and P-Trap rough-in. Alternatively, place the bathtub in the desired position, manually locate the plumbing, and trace the outline on the floor. Ensure the floor is level and adequately supported before proceeding.
Installation Options
The manual provides three methods for connecting the bathtub drain:
Option 1: Using Regular PVC Piping
Apply Teflon tape or thread sealant to the pre-installed drain. Screw the provided 1-1/2 NPSM to SCH40 Pipe Adapter to the drain. Cut a 1-1/2 PVC extension tube to the required length and connect it to the adapter using PVC pipe sealant. Connect the assembly to the existing floor waste pipe.
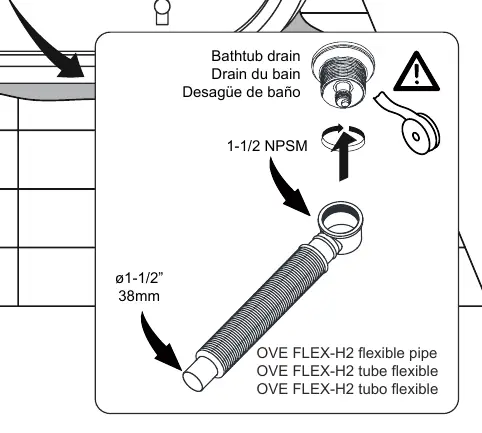
Option 2: Using OVE FLEX-H2
Screw the OVE FLEX-H2 flexible pipe to the pre-installed bathtub drain outlet using Teflon tape or thread sealant. Connect the other end of the flexible pipe to the existing floor drain using PVC pipe sealant.
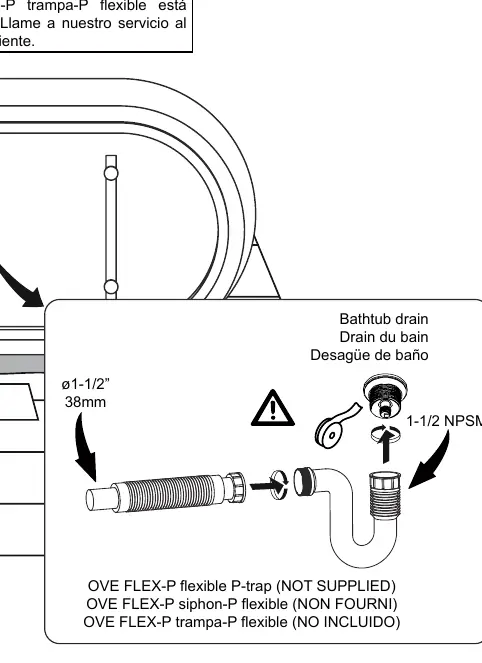
Option 3: Using OVE FLEX-P
Screw the OVE FLEX-P flexible P-Trap to the pre-installed bathtub drain outlet. Connect the P-Trap to the flexible tube, then connect the flexible tube to the existing floor drain using PVC pipe sealant.
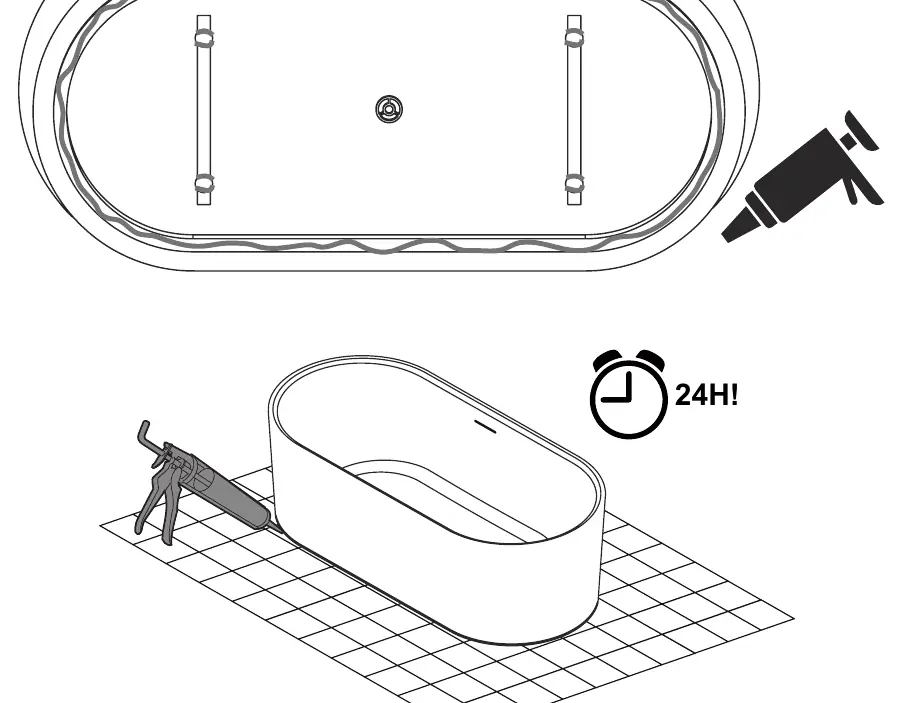
Sealing
Before fixing the tub to the floor, fill it with water to test for leaks and check all plumbing connections. Once verified, fix the bathtub to the floor by applying a strong Tub & Tile adhesive under the rim, lateral bars, and feet. Apply a bead of silicone around the base for a professional finish. Allow the sealant to dry for 24 hours before use.
Maintenance and Warranty
For daily maintenance, use a lukewarm wet cloth. Never use abrasive cleaners, bleach, scrapers, or metallic brushes, as these will damage the finish. The product includes a 25-year limited warranty covering defects in workmanship and materials under normal use. Modification of components may void the warranty.
Practical help
Common problems
Leaks after installation
Check all plumbing connections and ensure proper application of PVC pipe sealant or Teflon tape.
Bathtub is unstable or uneven
Ensure the floor is level and use the adjustable feet to level the bathtub properly.
Damage to the bathtub surface
Inspect the tub immediately upon unpacking. Do not use abrasive cleaners or harsh chemicals for maintenance.
Before use
- Ensure at least two people are available for installation.
- Inspect the bathtub for damage before starting.
- Verify that the floor is level and has adequate support.
- Ensure access to final plumbing connections is available.
- Confirm that the floor drain is installed and compliant with local regulations.
- Perform a leak test by filling the tub before sealing it to the floor.
Images and diagrams
- Floor tracing template shows the rough-in zone for the waste pipe and P-trap.
- Installation diagrams illustrate the connection sequence for PVC, FLEX-H2, and FLEX-P options.
- Sealing diagram shows where to apply adhesive under the tub base.
Model compatibility
- Requires professional plumbing installation.
- Piping and drain trap are not supplied with the unit.
- Installation must comply with local plumbing codes.

Manual page author
David Miller
Documentation analyst
Organizes user manual content into clear summaries, with attention to model details, product context, and everyday usability.