Lighting / Fixtures
Installation Manual for OVE Sumaya 1-Light Semi-Flush Mount Light
Quick installation guide for the OVE Sumaya 1-Light Semi-Flush Mount Light. Includes wiring instructions, parts list, safety warnings, and maintenance tips.
Table of contents
Manual images
Click an image to enlargeQuick guide from the manual
This document provides installation instructions for the OVE Sumaya 1-Light Semi-Flush Mount Light. Before beginning, ensure the power is disconnected at the circuit breaker or fuse box. Handle the fixture with care, especially the diffuser, which can break if overtightened. If you have any doubts regarding the installation, consult a qualified electrician.
Safety information
- Always disconnect power before starting installation or removing an existing fixture.
- Unpack the fixture carefully and place it on a soft surface to prevent scratching.
- Verify all parts are present before assembly.
- If any part is missing or damaged, do not attempt to assemble the product.
Tools required
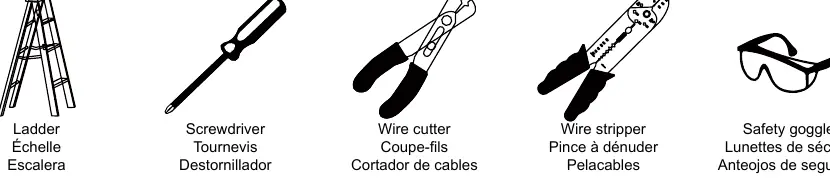
- Ladder
- Screwdriver
- Wire cutter
- Wire stripper
- Safety goggles
Parts list
- Mounting plate (A)
- Canopy (B)
- Nut (C)
- Diffuser (D)
- Bulb (E - not supplied)
- Hardware: Twist-cap connectors (AA), Bolts (BB), Cover (CC), Gloves (DD)
Installation
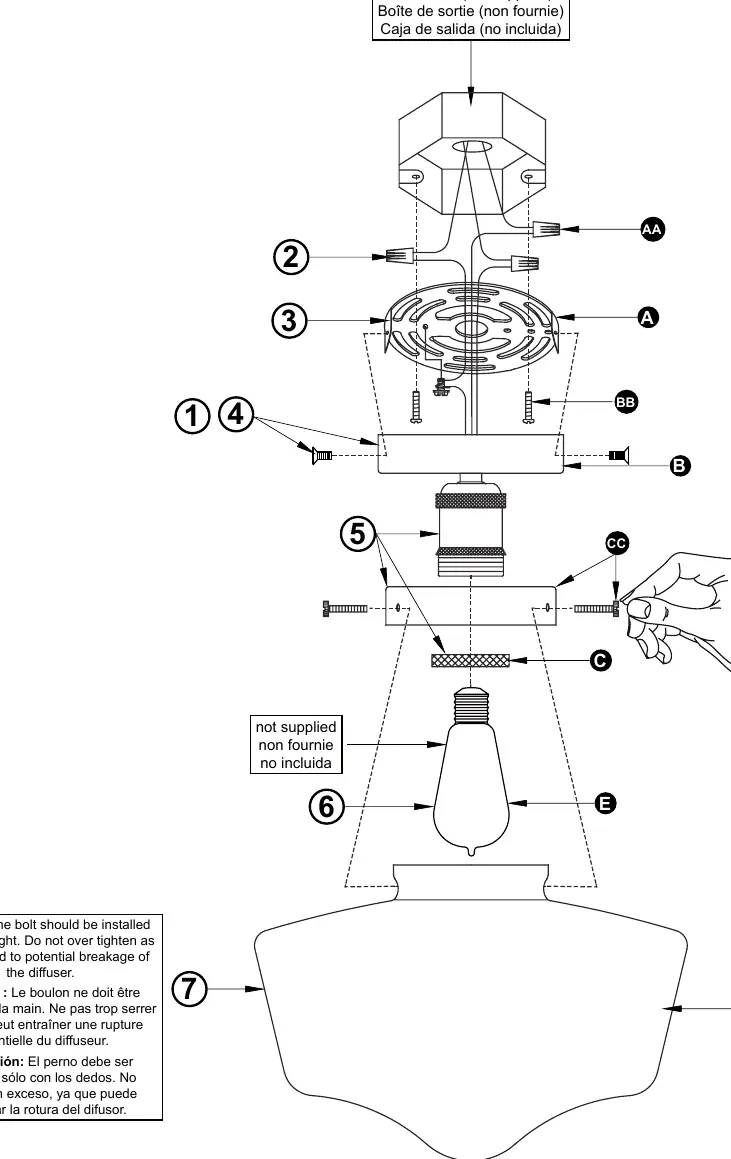
- Uninstall the canopy (B) from the mounting plate (A).
- Pass the electrical wires through the mounting plate (A). Connect the lamp's white wire to the white (neutral) wire from the outlet box using twist-cap connectors (AA). Connect the black wire to the black (live) wire using twist-cap connectors (AA). Secure the grounding wire to the mounting plate (A) by wrapping it around the bolt and tightening, then connect it to the outlet box grounding wire with a twist-cap connector (AA). Safely tuck wires into the outlet box.
- Install the mounting plate (A) to the outlet box using bolts (BB).
- Re-install the canopy (B) onto the mounting plate (A) and tighten the bolts securely.
- Uninstall the nut (C) from the lamp, install the cover (CC) onto the lamp, and secure with the nut (C).
- Carefully install the bulb (E).
- Install the diffuser (D) onto the cover (CC) using the provided bolts. Caution: The bolts should be installed only finger tight. Do not overtighten, as this can cause the diffuser to break.
Maintenance and warranty
For daily maintenance, use a dry cloth. Never use abrasive cleaners, bleach, scrapers, or metallic brushes, as these can damage the finish. The product includes a 1-year limited warranty for the original owner for household use. If a visual defect is found, return the product to the retailer in its original packaging before installation.
Practical help
Common problems
Diffuser breakage
Install the bolts securing the diffuser only finger tight. Do not overtighten.
Visual defect found
Return the product to the retailer in its original packaging BEFORE installation for a replacement.
Before use
- Turn off power at the circuit breaker or fuse box
- Ensure all parts listed in the parts list are present
- Have a ladder, screwdriver, wire cutter, wire stripper, and safety goggles ready
- Handle the fixture on a soft surface to prevent scratching
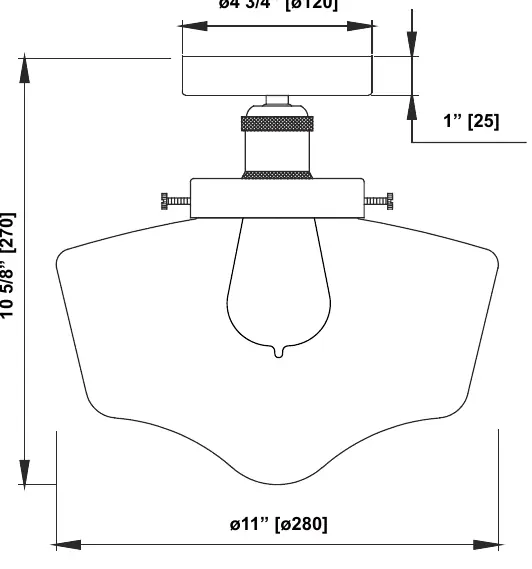
Specs in practice
- Mounting Type
- Semi-flush mount
Images and diagrams
- The installation diagram illustrates the connection of the mounting plate to the outlet box and the assembly sequence of the canopy, cover, and diffuser.
Model compatibility
- Requires 1 bulb (not supplied)

Manual page author
Emily Carter
User documentation editor
Prepares concise manual descriptions and highlights the most useful setup, operation, and maintenance information for readers.