Lighting / Fixtures
Installation Guide for OVE Romina Pendant Light
A complete installation and maintenance guide for the OVE Romina Pendant Light. Includes step-by-step wiring instructions, safety warnings, and care tips.
Table of contents
Quick Guide for Installation
This guide provides instructions for installing the OVE Romina Pendant Light. Before beginning, ensure the power is disconnected at the circuit breaker or fuse box. The installation involves mounting the plate to the outlet box, connecting the electrical wires, and securing the canopy and diffuser. Important: The nut (C) used to secure the diffuser must be installed finger-tight only to prevent breakage.
Tools and Parts
Before starting, ensure you have the following tools and that all parts are present.
Tools Required (Not Supplied)
- Ladder
- Screwdriver
- Wire cutter
- Wire stripper
- Safety goggles
Parts List
- Mounting plate (A)
- Canopy (B)
- Nut (C)
- Diffuser (D)
- Washer (F)
- Bulb (E) - Not supplied
Safety Information
Read the following carefully before starting the installation:
- Always disconnect power by turning off the circuit breaker or removing the fuse before starting installation or removing a previous fixture.
- If you have any doubts or questions, consult a qualified electrician.
- Unpack the fixture carefully and place it on a soft surface to prevent scratching.
- Verify all parts are present before beginning assembly. Do not attempt to assemble if any parts are missing or damaged.
Installation Steps
- Uninstall the canopy (B) from the mounting plate (A).
- Pass the electrical wires of the lamp through the mounting plate (A). Connect the lamp’s neutral (N) and live (L) wires to your supply wires using the provided twist-cap connectors (AA).
- Fix the lamp’s grounding wire to the mounting plate (A) by wrapping it around the bolt and tightening it. Connect the lamp’s grounding wire to your main grounding wire using a twist-cap connector (AA). Safely tuck the wires inside your outlet box.
- Install the mounting plate (A) to your outlet box using the provided bolts (BB).
- Re-install the canopy (B) onto the mounting plate (A) and tighten the bolts securely.
- Uninstall the nut (C) and washer (F) from the lamp. Install the diffuser (D) onto the lamp, then secure it with the nut (C) and washer (F). Caution: Install the nut (C) finger-tight only. Do not over-tighten.
- Carefully install the bulb (E) onto the lamp.
Maintenance
To keep your product in good condition for many years:
- For daily maintenance, use a dry cloth.
- Never use abrasive cleaners, strong bleach, scrapers, metallic brushes, or other objects that can graze or tarnish the surfaces.
- Avoid cleaners containing acetone or chlorine.
Practical help
Common problems
Diffuser breakage
The nut (C) must be installed finger-tight only. Do not over-tighten.
Missing parts
Compare parts with the package contents list before starting. Do not attempt to assemble if parts are missing.
Before use
- Turn off power at the circuit breaker or fuse box.
- Ensure you have a ladder, screwdriver, wire cutter, wire stripper, and safety goggles.
- Verify all parts (mounting plate, canopy, nut, diffuser, washer) are present.
- Work on a soft surface to prevent scratching the fixture.
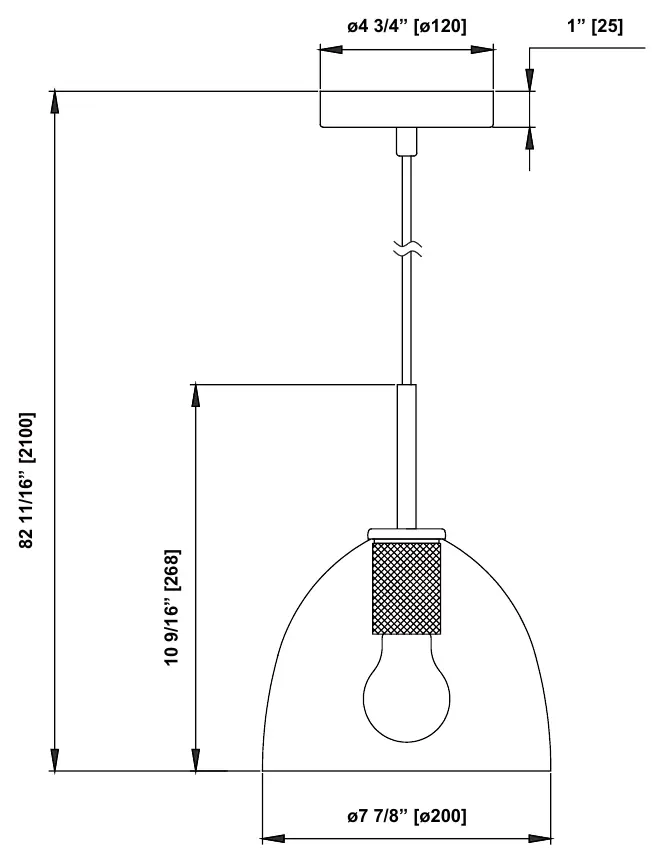
Images and diagrams
- The installation diagram illustrates the connection of the mounting plate to the outlet box and the wiring sequence using twist-cap connectors.
Model compatibility
- Bulb is not supplied.
- For indoor use only.

Manual page author
David Miller
Documentation analyst
Organizes user manual content into clear summaries, with attention to model details, product context, and everyday usability.