Industrial / Testing Equipment
PCE-LES 103 / 103UV Stroboscope User Manual
Quick guide for the PCE-LES 103 and 103UV stroboscope. Learn how to operate, adjust flash frequency, change settings, and update firmware.
Table of contents
Manual images
Click an image to enlargeQuick guide from the manual
This guide provides essential information for operating the PCE-LES 103 and 103UV stroboscopes. Always ensure the device is handled by qualified personnel and used within the specified environmental conditions.
Safety
- Do not use the device in explosive atmospheres.
- Avoid direct eye contact with the LED light.
- Do not expose the device to extreme temperatures, moisture, or strong vibrations.
- Only use accessories provided by PCE Instruments.
- The device case should only be opened by qualified PCE Instruments personnel.
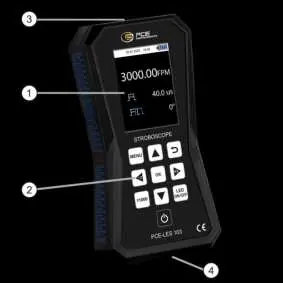
Device Overview
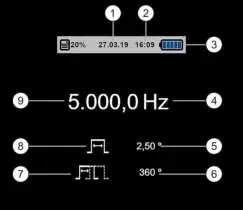
The device features a display, keypad, LED light source, and a USB-C charging port. The display provides real-time data including date, time, battery status, flash frequency, duty cycle, and phase shift.
Getting Started
The device is powered by a 7.4 V 2400 mAh Li-Ion battery. To charge, connect the USB-C cable to the device and a power source (USB charger or computer). The device can be operated while connected to power.
Operation
Powering On/Off
Press and hold the Power key for approximately 2 seconds to turn the device on or off. A countdown will appear on the screen when turning off.
Measurement
- Changing Flash Unit: Press the OK key on the main screen to toggle between Hertz (Hz) and Flashes per Minute (FPM).
- Adjusting Frequency: Use the arrow keys to increase or decrease the frequency. Use the Left/Right keys to halve or double the value.
- Quick Mode: Press the Quick key to activate fine adjustment mode. Use the arrow keys to adjust individual digits.
- LED Control: Press the LED ON/OFF key to toggle the LEDs on or off.
Settings
Access the settings menu by pressing the MENU key. You can configure:
- Decimal separator: Choose between comma or point.
- Date/Time: Set the current date and time and choose the display format.
- Sound: Enable or disable the key press beep.
- Brightness: Adjust TFT screen brightness in 10% increments.
- Language: Change the menu language.
- Auto Power Off: Set the automatic shutdown timer (2, 5, 10 minutes, or disabled).
- Auto Display Off: Set the timer for screen brightness reduction.
Software Update
To update the firmware, connect the device to a PC via USB. Power on the device in boot mode by pressing and holding both the Power and MENU keys simultaneously, then release the Power key followed by the MENU key. Use the update software available on the PCE Instruments website to flash the new firmware.
Practical help
Common problems
Device does not turn on
Ensure the battery is charged. Connect the device to a power source via USB.
LEDs are not flashing
Check if the LEDs are enabled by pressing the LED ON/OFF key.
Firmware update not working
Ensure the device is in boot mode by holding Power and MENU keys during startup.
Before use
- Inspect the device case for visible damage.
- Ensure the battery is sufficiently charged.
- Verify environmental conditions (temperature, humidity) are within specifications.
- Ensure the device is not used in an explosive atmosphere.
Images and diagrams
- The device layout includes the display, keypad, LED light source, and USB-C charging port.
- The display shows date, time, battery status, flash frequency, duty cycle, and phase shift.
Model compatibility
- Compatible with USB-C charging.
- Firmware updates require a PC and the update software from the manufacturer's website.

Manual page author
Emily Carter
User documentation editor
Prepares concise manual descriptions and highlights the most useful setup, operation, and maintenance information for readers.