Tools / Measuring Tools
Operating Manual for Senseca ECO 120-HayTemp Alarm Thermometer
Quick guide for the Senseca ECO 120-HayTemp alarm thermometer. Learn how to operate the device, configure alarm settings, perform sensor adjustments, replace batteries, and troubleshoot common errors.
Table of contents
Manual images
Click an image to enlargeQuick guide from the manual
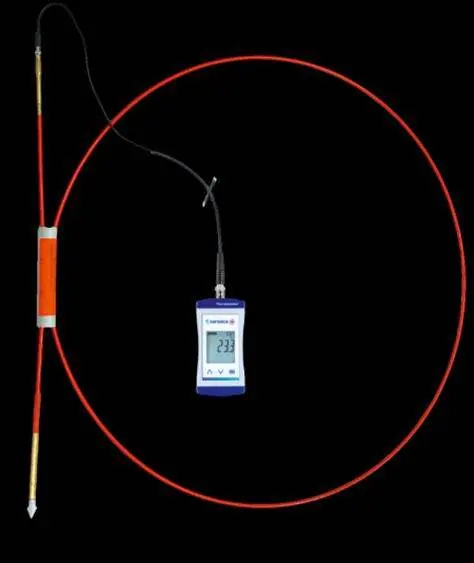
The Senseca ECO 120-HayTemp is a water-resistant alarm thermometer designed for measuring core temperatures in bulk goods, such as hay and straw. Before use, ensure the device is handled with care, the probe is correctly connected via the BNC connector, and the battery status is sufficient. The device features an alarm function that can be configured for minimum and maximum temperature limits.
Device overview
The device consists of a main unit with a 3-line LCD display and three control buttons:
- On/Off button: Briefly press to switch on or toggle lighting; long press to switch off.
- Up/Down button: Briefly press to view min/max values or change parameters; long press to reset min/max values. Press both simultaneously to rotate the display.
- Function button: Briefly press to freeze measurement (Hold) or call up parameters; long press (2s) to enter the configuration menu.
Operation and configuration
To access the configuration menu, press and hold the Function button for 2 seconds until ConF appears. Use the Up/Down buttons to navigate and change values:
- AL (Alarm): Enable or disable alarm functions (acoustic/visual).
- AL.Lo / AL.Hi: Set minimum and maximum alarm limits.
- PoFF: Configure automatic shut-off time.
- L.tE: Adjust backlight settings.
- Uni t: Select temperature unit (°C or °F).
- Init: Reset device to factory settings.
Adjustment of the measuring input
The device allows for zero point and gradient correction to adjust the temperature input:
- Switch the device off.
- Hold the Down button and press the On/Off button to enter the Adjustment menu.
- t.oF (Zero point correction): Adjust the offset.
- t.SL (Gradient correction): Adjust the slope in %.
Maintenance and battery replacement
The device uses two AA batteries. When the empty frame in the battery display blinks, replace the batteries. If BAT appears, the battery is fully depleted.
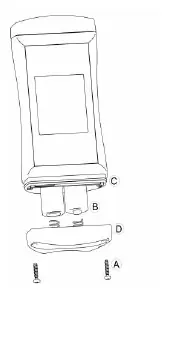
To replace batteries:
- Unscrew the Phillips screws on the back and remove the cover.
- Replace the two AA batteries, ensuring correct polarity.
- Check that the O-ring is clean, undamaged, and properly seated.
- Fit the cover evenly and tighten the screws.
Troubleshooting
- ----: No probe connected, or measurement is outside the range. Check probe connection.
- Err.1: Measuring range exceeded (value too high).
- Err.2: Measuring range undercut (value too low).
- SYS ERR: System error. Try switching the device off and on, or replace batteries.
Official resources from the manual
Practical help
Common problems
Display shows '----'
No suitable measuring probe connected or measurement is outside the allowable range. Connect a probe or stay within the range.
Display shows 'Err.1'
Measuring range exceeded. Ensure the temperature is within the device's limits.
Display shows 'Err.2'
Measuring range undercut. Ensure the temperature is within the device's limits.
No display or unclear characters
Battery is depleted. Replace with new high-quality alkaline batteries.
Before use
- Check battery status (replace if empty frame blinks).
- Ensure the temperature probe is securely connected via the BNC connector.
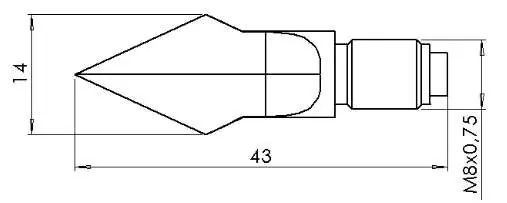
- Verify the probe is suitable for the intended medium (e.g., hay, straw).
- Ensure the device housing and probe are clean and dry.
- Check that the O-ring is properly seated if the battery cover was opened.
Images and diagrams
- The device features a BNC connector on top for the temperature probe.
- The battery compartment is located on the back, secured by Phillips screws and an O-ring for water tightness.
Model compatibility
- Compatible with Pt1000 temperature sensors.
- Designed for measuring core temperature in bulk goods like hay and straw.

Manual page author
Michael Turner
Technical manual editor
Reviews PDF manuals for structure, safety notes, and practical product details so readers can find the right information quickly.