Tools / Measuring Tools
User Manual for PCE-ISM 10ILEQ Impulse Integrating Sound Level Meter
Quick guide for the PCE-ISM 10ILEQ sound level meter. Learn how to perform sound measurements, configure Leq settings, calibrate the device, and manage data output via USB or Bluetooth.
Table of contents
Manual images
Click an image to enlargeQuick guide from the manual
The PCE-ISM 10ILEQ is an impulse integrating sound level meter designed for measuring exponential time-weighted sound levels, integrated average sound levels, and sound exposure. It supports data storage for up to 800 groups of measurements and features USB and Bluetooth connectivity for data analysis and printing.

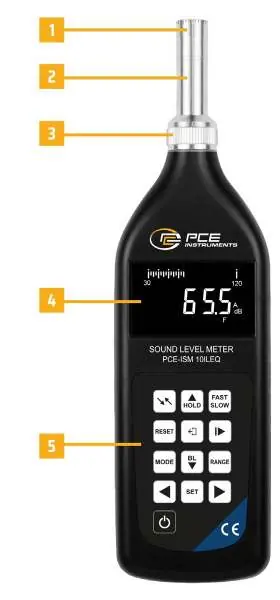
Device structure and controls
The device consists of a main unit with a detachable microphone and preamplifier. The front panel contains the LCD screen and control buttons, while the right side houses the sensitivity potentiometer, data cable interface, AC output port, and power input.
- WEIGHTING: Selects A, C, or Lin frequency weighting.
- UP/HOLD: Holds current measurement or increases values.
- FAST/SLOW: Selects time weighting (F, S, I).
- RESET: Resets system and data area.
- OUTPUT: Selects display, printer, or computer output.
- RUN/PAUSE: Controls measurement start/pause and confirms selections.
- MODE: Selects measurement mode (Leq, 1/1 filter, 1/3 filter).
- DOWN/BL: Toggles backlight and decreases values.
- RANGE: Cycles through measurement ranges.
- SET: Accesses parameter settings.
Preparation before use
Before using the instrument for the first time, perform an initialization of the data area. Check the battery status; if the 'batt' symbol appears on the LCD, replace the batteries. Ensure the microphone and preamplifier are securely installed in the head of the unit.
Parameter settings
The device allows configuration of Leq working states, real-time clock, and grid numbers.

- Leq Settings: Press SET in normal mode to enter Leq settings. Use keys to cycle through time intervals (e.g., 10s, 1m, 5m, 1h, 24h).
- Real-time Clock: Press SET twice in normal mode. Use UP/DOWN to modify time and LEFT/RIGHT to select fields.
- Grid Number: Press SET three times in normal mode to set the grid number for data organization.
Measurement procedures
The meter supports various measurement types:
- A, C, and Lin Sound Levels: Turn on the meter and use the WEIGHTING key to select the desired frequency weighting.
- Range Selection: Use the RANGE key to switch between low, medium, and high ranges. If 'OVER' flashes, switch to a higher range; if 'LOW' appears, switch to a lower range.
- Maximum Sound Level: Press UP/HOLD to enter hold mode; the display will update only when a louder sound is detected.
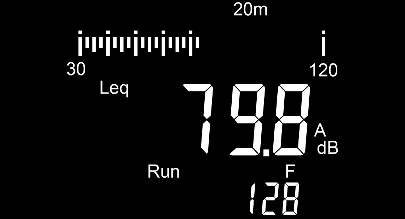
- Leq Measurement: Press MODE to select Leq measurement, then press RUN/PAUSE to start.
Data output
Data can be output to the screen, an optional Bluetooth printer, or a computer.
- Screen Output: Press OUTPUT to view stored data. Use LEFT/RIGHT to change groups and UP/DOWN to view specific parameters like Leq, Lmax, Lmin, and statistical levels.
- Printer Output: Connect the Bluetooth printer. Press OUTPUT to select printer mode and follow prompts to print single or regular data sets.
- Computer Output: Connect via USB. Use the 'TestRS232' software on a Windows PC to collect and analyze data.
Maintenance and calibration
The device is calibrated at the factory. If recalibration is required, use a class 1 sound level calibrator (94dB, 1kHz). Adjust the sensitivity potentiometer on the right side if the reading does not match 93.8dB. Always remove batteries if the device will not be used for an extended period to prevent leakage.
Troubleshooting
If the meter does not turn on, check battery installation and contact. If sound levels are low, inspect the microphone and preamplifier connections. For communication issues, verify the interface connection and restart the software.
Practical help
Common problems
Meter turns on but nothing is displayed
Check if batteries are installed correctly or if there is poor contact. Verify the POWER key is functioning.
Sound level reading is obviously low
The microphone or preamplifier may be damaged or disconnected from the main board.
No printing
Check if the printer connection indicator is on. Restart both the meter and the printer.
Unable to communicate with computer
Check the interface cable connection and ensure the TestRS232 software is running correctly.
Before use
- Check battery voltage and replace if necessary.
- Perform 'initialization of data area' before first use.
- Calibrate the device using a class 1 sound level calibrator if required.
- Install the wind shield when measuring in windy conditions.
- Ensure the microphone and preamplifier are securely attached.
Specs in practice
- Frequency weighting
- A, C, and Lin (Linear) settings for different sound analysis requirements.
- Time weighting
- Fast (F), Slow (S), and Impulse (I) modes to handle different sound characteristics.
- Measurement range
- 25dB to 130dB (A) with manual range control.
- Power supply
- Operates on 4 x 1.5V AAA batteries or 6V external power supply.
Images and diagrams
- Figure 1: Identifies the microphone, preamplifier, LCD screen, and side ports (calibration, data, output, power).
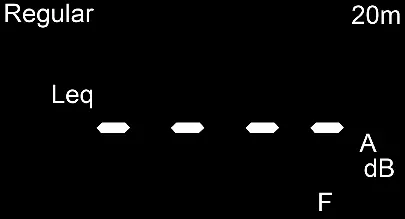
- Figure 2-4: Shows the LCD interface for configuring Leq working states, real-time clock, and grid numbers.
- Figure 5-7: Illustrates the measurement screens for sound levels and Leq data.
Model compatibility
- Requires TestRS232 software for computer data analysis.
- Supports optional Bluetooth printer for data printing.
- External power supply must be 6V (plug shell negative, core positive).

Manual page author
David Miller
Documentation analyst
Organizes user manual content into clear summaries, with attention to model details, product context, and everyday usability.