Plumbing / Showers & Tubs
Installation Instructions for Villeroy & Boch Freestanding Bathtubs
A comprehensive installation guide for Villeroy & Boch Quaryl freestanding bathtubs. This manual covers preparation, leveling, drain connection, and sealing procedures to ensure correct installation.
Quick answers from the manual
Quick answer
- This manual provides installation instructions for Villeroy & Boch Quaryl freestanding bathtubs, including leveling, drain connection, and sealing procedures. p. 1, 4, 5
Key actions
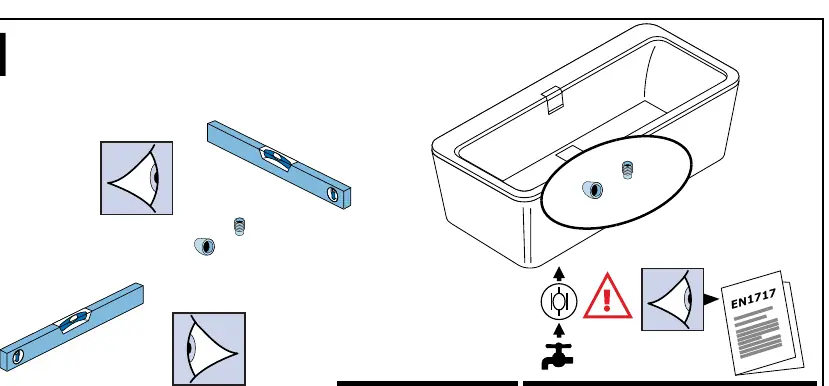
- Level the bathtub using a spirit level. p. 4, 7, 10, 14
- Apply silicone sealant and allow 24 hours to cure. p. 5, 8, 12, 15
Technical specifications
| Parameter | Value | Meaning | Pages |
|---|---|---|---|
| Max Temperature | 60°C | Maximum water temperature | p. 4, 7, 10, 14 |
| Max Pressure | 3 bar | Maximum water pressure | p. 4, 7, 10, 14 |
Where to find it in the PDF
- Safety and General Instructions p. 2
- Installation Steps p. 4, 5, 7, 8
Table of contents
Manual images
Click an image to enlargeQuick guide from the manual
This document provides installation instructions for Villeroy & Boch Quaryl freestanding bathtubs. Before beginning, ensure the floor is level and you have all necessary tools, including a spirit level, silicone sealant, and appropriate plumbing connections. Do not use power tools for installation to avoid damaging the tub surface.

Installation Preparation
Before starting the installation, verify that the floor is level and capable of supporting the weight of the bathtub when filled with water. Ensure the drain connection (DN 50 / DN 40) is correctly positioned according to the specific model dimensions.
- Check that all components are present in the packaging.
- Ensure the installation area is clean and dry.
- Verify that the water supply and drainage meet the technical specifications.
Installation Steps
The installation process generally follows these steps, though specific details may vary by model:
- Leveling: Place the bathtub in the desired location and use a spirit level to ensure it is perfectly horizontal. Adjust the feet if necessary.
- Marking: Mark the position of the bathtub on the floor.
- Sealing Preparation: Apply a bead of silicone sealant around the base perimeter as indicated in the diagrams.
- Drain Connection: Connect the drain pipe to the bathtub outlet. Ensure all connections are tight and leak-free.
- Final Positioning: Carefully place the bathtub into its final position, ensuring it aligns with the markings and the silicone seal.
- Sealing: Apply a final bead of silicone around the base of the tub to create a watertight seal.
Sealing and Maintenance
After installation, apply silicone sealant around the base of the bathtub. Important: Allow the silicone to cure for at least 24 hours before using the bathtub or exposing it to water. Do not use the bathtub during this curing period.
Technical Specifications
- Maximum Water Temperature: 60°C
- Maximum Water Pressure: 3 bar
- Flow Rate: Max 18 l/min at 2.5 bar
- Water PH: > 4
- Drain Connection: DN 50 / DN 40
Practical help
Common problems
Water leakage after installation
Ensure the silicone seal is applied continuously around the base and has cured for at least 24 hours before use.
Bathtub is unstable
Check that the floor is level and the bathtub feet are adjusted correctly using a spirit level.
Before use
- Verify the floor is level and stable
- Ensure the drain connection (DN 50 / DN 40) is secure
- Apply silicone sealant around the base
- Allow 24 hours for the silicone to cure before using the tub
Images and diagrams
- Steps show the use of a spirit level to ensure the tub is horizontal.
- Steps illustrate the application of a silicone bead around the base of the tub.
- Steps show the connection of the drain pipe to the tub outlet.
Model compatibility
- Compatible with standard DN 50 / DN 40 drain connections.
- Suitable for use with water temperatures up to 60°C.

Manual page author
Emily Carter
User documentation editor
Prepares concise manual descriptions and highlights the most useful setup, operation, and maintenance information for readers.