Computers / Storage
Sabrent Rocket 2230 NVMe SSD Installation Guide
A comprehensive installation guide for the Sabrent Rocket 2230 NVMe SSD. This manual covers installation as a primary or secondary drive, BIOS/UEFI configuration, disk initialization in Windows, and warranty information.
Quick answers from the manual
Quick answer
- The Sabrent Rocket 2230 is an M.2 NVMe SSD. Installation involves powering down the PC, inserting the drive into the M.2 slot, securing it with a screw, and configuring BIOS/UEFI settings or initializing it in Windows Disk Management. p. 3, 4, 5
Key actions
- Install the SSD into the M.2 slot and secure with a screw. p. 3
- Initialize the drive in Windows Disk Management. p. 5, 6
First start
- Power on the PC, enter BIOS/UEFI to configure boot options, and install the OS or initialize the drive. p. 4
Problems and fixes
Drive not recognized
Check physical connection and BIOS/UEFI settings.
p. 3, 4Technical specifications
| Parameter | Value | Meaning | Pages |
|---|---|---|---|
| Warranty | 1 Year (Standard) / 5 Years (Registered) | Standard warranty is 1 year; register within 90 days for 5 years. | p. 10 |
Where to find it in the PDF
- Installation (Primary) p. 3, 4
- Installation (Secondary) p. 5, 6
- Warranty Information p. 8, 9, 10
Table of contents
Manual images
Click an image to enlargeImportant Information
Before beginning the installation, it is recommended to have a professional desktop computer technician perform the work. Always back up your data to another storage device before starting. Ensure you have a compatible screwdriver and verify if your motherboard requires an M.2 standoff, which is typically provided with the motherboard.
Installation as Primary Drive
- Power Down: Turn off your PC and unplug it or flip the PSU switch. Consult your motherboard manual for the specific power-down process.
- Locate Slot: Identify the M.2 slot on your motherboard. Refer to your motherboard's user manual for the exact location and orientation.
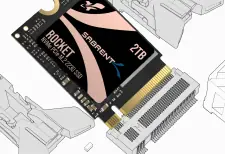
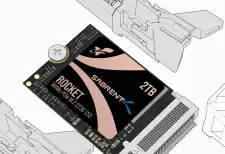
- Insert SSD: Insert the Sabrent Rocket 2230 NVMe SSD pin-side first into the M.2 slot.
- Secure: Fasten the opposite end of the SSD to the motherboard using the necessary screw or hardware.
- Configure BIOS/UEFI: Power on your PC and enter the BIOS/UEFI setup. Configure the boot options to recognize the new drive.
- Install OS: Insert your bootable installation media (e.g., Windows Installer) and follow the on-screen prompts to install your operating system.
Installation as Secondary Drive
- Install: Follow the physical installation steps 1-4 as described above.
- Boot: Boot into your existing Windows operating system.
- Initialize: In Windows 8 or later, right-click the Start icon and select Disk Management.
- Format: When prompted, initialize the SSD. Select MBR (for legacy compatibility) or GPT (recommended for modern systems).
- Create Volume: Right-click the "Unallocated" space, select New Simple Volume, and follow the wizard to assign a drive letter and format the partition.
Warranty and Support
The Sabrent Rocket 2230 comes with a standard 1-year warranty. You can extend this to a 5-year warranty by registering your product within 90 days of purchase at www.sabrent.com/product-registration/. The warranty does not cover damage caused by improper installation, misuse, or unauthorized disassembly.
Official resources from the manual
Manufacturer information
Sabrent
Practical help
Common problems
SSD not detected in BIOS/UEFI
Ensure the drive is fully seated in the M.2 slot and the screw is properly fastened. Check motherboard manual for M.2 slot compatibility.
Drive not visible in Windows
Open Disk Management to initialize the disk and create a new simple volume.
Before use
- Back up all existing data on your PC.
- Ensure you have a compatible screwdriver.
- Check motherboard manual for M.2 slot location.
- Verify if an M.2 standoff is required (usually provided with the motherboard).
- Ensure you are using Windows 8.1 or newer for proper NVMe boot support.
Specs in practice
- MBR (Master Boot Record)
- Partition style best for certain legacy software compatibility.
- GPT (GUID Partition Table)
- Partition style recommended for modern systems.
Images and diagrams
- The installation process requires inserting the SSD into the M.2 slot at an angle and securing the opposite end with a screw.
Model compatibility
- Windows 8.1 or newer is recommended for proper NVMe boot support.

Manual page author
David Miller
Documentation analyst
Organizes user manual content into clear summaries, with attention to model details, product context, and everyday usability.