Electronics / PA Systems
User Manual for SAL M 100USB USB Microphone Set
Quick guide for the SAL M 100USB microphone set. Learn how to assemble the stand, connect the device, adjust OS settings, and troubleshoot common sound issues.
Table of contents
Manual images
Click an image to enlargeQuick guide from the manual
The SAL M 100USB is a professional USB condenser microphone set designed for studio recording, streaming, and internet communication. It features a Plug & Play interface, meaning no driver installation is required on most computers. To ensure optimal performance, keep the microphone away from loudspeakers to prevent acoustic feedback (noise) and adjust the sensitivity settings in your computer's operating system to avoid picking up unwanted background noise.
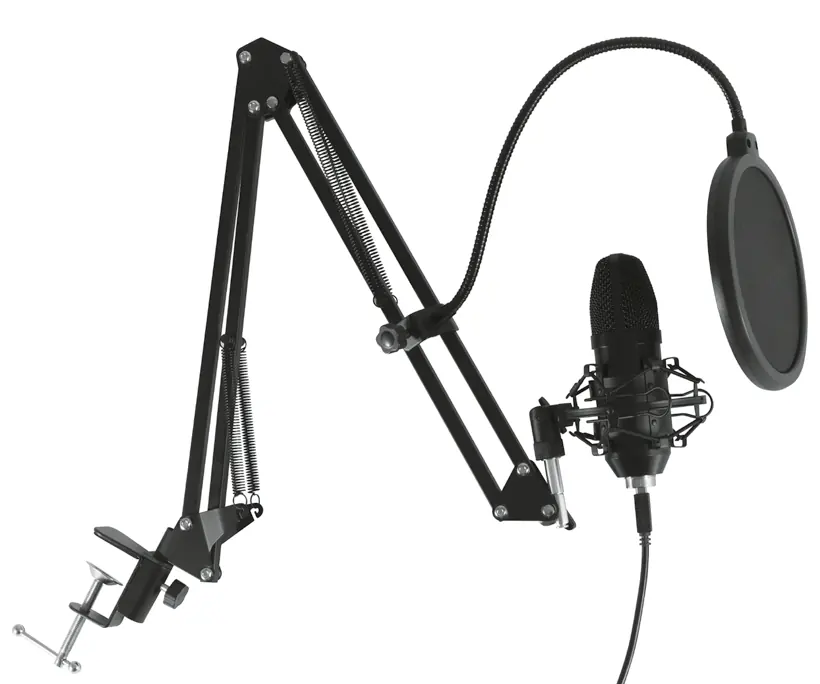
Assembly
- Fix the mounting base on a level surface of your desk.
- Insert the pin of the stand into the mounting base and tighten the plastic nut.
- Attach the microphone holding bracket to the threaded end of the stand.
- Loosen the inner ring of the bracket by pressing the metal clip together, insert the microphone, and release the clip.
- Attach the windscreen foam or the popup filter disk to the microphone.
- Tighten all nuts firmly by hand; do not use tools to avoid damaging the plastic components.
Commissioning and Setup
Connect the included USB cable to the microphone and then to your computer. The system should automatically recognize the device. Once connected, you must configure the microphone in your operating system settings:
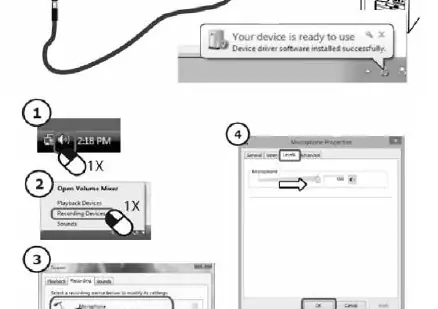
- Set the microphone as the default recording device.
- Adjust the input sensitivity (gain) in your computer's sound settings. It is recommended to start with a lower sensitivity level to avoid picking up distant sounds or noise.
- For some DELL computers, you may need to enable the microphone in the Device Manager.
- Always lower the volume level before connecting or disconnecting the microphone to protect your hearing and equipment.
Troubleshooting
If you experience no sound or noisy reception, check the following:
- Ensure the connection is secure and follows the instructions.
- Verify that the computer has recognized the microphone.
- Check that the USB cable is not damaged.
- Confirm that software settings in the operating system are correct.
- Ensure there are no nearby electronic appliances causing electromagnetic interference.
- Keep the microphone away from loudspeakers to prevent feedback.
Cleaning and Maintenance
- Keep connectors clean and avoid touching them with your hands to ensure perfect contact.
- Use a soft, dry cloth for cleaning. Do not use aggressive detergents.
- Prevent liquids or foreign materials from entering the device.
- Store the microphone at room temperature.
Technical Specifications
- Transducer: 16 mm pressure gradient
- Capsule Type: HQ large condenser
- Pattern: Cardioid
- Sensitivity: -42 dB ± 2 dB
- Frequency Range: 30–20,000 Hz
- Bit Rate: 16 bit
- Sample Rate: 48 kHz
- Power Requirement: 5 V DC (USB)
Practical help
Common problems
No sound or noisy reception
Check cable connections, verify the computer recognizes the device, ensure software settings are correct, and move away from other electronic devices causing interference.
Distorted sound
The volume level is set too high. Adjust the volume controls on your receiving device.
High background noise
The sensitivity (gain) is set too low, or the microphone is picking up distant sounds. Adjust sensitivity in the OS settings.
Acoustic feedback (whistling/noise)
The microphone is too close to a loudspeaker. Move the microphone further away or place it behind the soundbox.
Before use
- Inspect the product for shipping damage after unpacking.
- Ensure the environment is dry and indoors.
- Keep packaging materials away from children.
- Run audio cables separately from network cables to avoid interference.
- Set volume to minimum before connecting the device.
Specs in practice
- Cardioid pattern
- The microphone is most sensitive to sound coming from the front, helping to reduce background noise.
- 16 mm pressure gradient
- The size and type of the microphone capsule, determining sound capture quality.
Images and diagrams
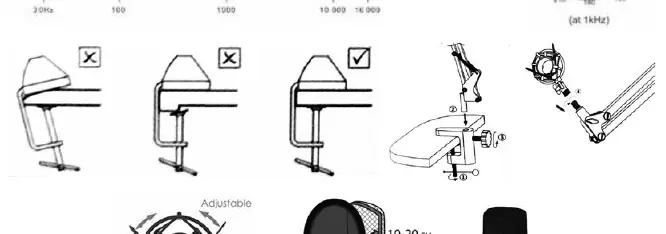
- Assembly diagram shows the correct way to clamp the stand to a desk and attach the shock mount.
- Software setup diagram illustrates accessing the Windows Volume Mixer and Microphone Properties.
Model compatibility
- Compatible with desktop and portable computers.
- Some DELL computers require enabling the microphone in the Device Manager.

Manual page author
David Miller
Documentation analyst
Organizes user manual content into clear summaries, with attention to model details, product context, and everyday usability.