Computers / Storage
Quick-Start Guide for StarTech.com USB-C/USB-A 2-in-1 M.2 NVMe Dock Adapter
Learn how to set up and use your StarTech.com 1USB3-NVME-DOCK adapter. This guide covers installation, connection, safety warnings, and LED status indicators.
Quick answers from the manual
Quick answer
- To use the adapter, insert your M.2 NVMe drive vertically into the slot and connect the integrated USB-C cable to your computer. If your computer only has USB-A ports, attach the included USB-A adapter to the cable. p. 1
Key actions
- Insert M.2 NVMe Drive p. 1
- Connect to Host Computer p. 1
Problems and fixes
Drive overheating
Allow the drive to cool down before removing or handling.
p. 1Technical specifications
| Parameter | Value | Meaning | Pages |
|---|---|---|---|
| Data Transfer Speed | 10Gbps | Maximum throughput | p. 1 |
Where to find it in the PDF
- Quick-Start Guide p. 1
Table of contents
Quick guide from the manual
This document provides instructions for the StarTech.com 1USB3-NVME-DOCK. This device is a toaster-style adapter designed for M.2 NVMe drives, supporting data transfer speeds up to 10Gbps. It features a versatile design that connects to both USB-C and USB-A host ports.
Product components
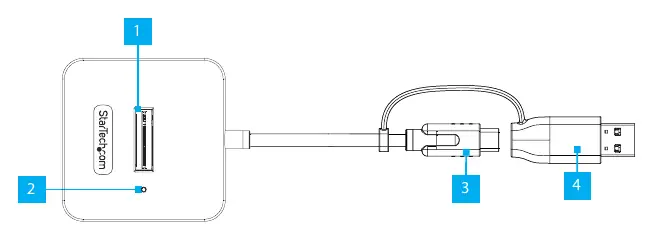
- M.2 NVMe Drive Slot: Toaster-style design for heat dissipation.
- LED Indicator: Solid light indicates the drive is detected; flashing light indicates read/write activity.
- USB-C Host Connector: 10Gbps connector for USB-C ports.
- USB-A Adapter: Detachable adapter for connecting to USB-A ports.
Requirements
- M.2 NVMe Drive.
- Computer with an available USB-C or USB-A port.
Operation and installation
- Insert the drive: Insert the M.2 NVMe Drive vertically into the dock adapter slot.
- Connect to host: Connect the integrated USB-C cable to an available USB-C port on your host computer.
- Using USB-A: If your computer only has USB-A ports, attach the included USB-C to USB-A adapter to the integrated USB-C cable before connecting.
Safety warnings
Warning: M.2 drives can become hot during prolonged data transfer sessions. Avoid touching the drive immediately after use to prevent burns. Allow the drive to cool down before removing or handling.
Warning: Always eject the drive safely through your operating system before disconnecting the device. Avoid hot-swapping drives to prevent data loss or device damage.
Official resources from the manual
Practical help
Common problems
Drive is hot to the touch
Allow the drive to cool down before removing or handling it to prevent burns.
Risk of data loss
Always eject the drive safely through the Operating System before disconnecting the adapter.
Before use
- Ensure you have an M.2 NVMe Drive.
- Verify your computer has an available USB-C or USB-A port.
- Ensure the drive is inserted vertically into the slot.
Specs in practice
- LED Flashing
- Indicates that read/write activity is occurring.
Images and diagrams
- The diagram illustrates the vertical insertion slot for the M.2 NVMe drive.
- The diagram shows the integrated USB-C cable and the detachable USB-A adapter.
Model compatibility
- Compatible with M.2 NVMe drives.
- Works with both USB-C and USB-A host ports via the included adapter.

Manual page author
Michael Turner
Technical manual editor
Reviews PDF manuals for structure, safety notes, and practical product details so readers can find the right information quickly.