Automotive / Bicycle Carriers
Saris Grand Slam 180S/181S Bike Rack User Manual
Quick guide for the Saris Grand Slam bike rack. Includes assembly steps, vehicle installation, bike loading instructions, maintenance tips, and technical specifications for the 180S and 181S models.
Quick answers from the manual
Quick answer
- The Saris Grand Slam is a hitch-mounted bike rack available in 3-bike (180S) and 4-bike (181S) versions. It requires assembly and installation into a 1.25" or 2" hitch receiver. p. 1, 4
Key actions
- Assemble the vertical tubes and brackets using the provided bolts and nuts. p. 6, 7, 8, 9
- Install the rack into the vehicle hitch receiver, using the adapter block if necessary for 2" hitches. p. 12, 13
- Load bikes, placing the heaviest one closest to the vehicle, and secure with straps. p. 15, 16, 17
Problems and fixes
Bolt threads not engaging
Check adapter block placement on the receiver tube.
p. 12Maintenance and reset
- Clean with water and mild soap every 90 days. Lubricate locks (oil-based, no WD-40) and grease hitch bolt threads. p. 21
Technical specifications
| Parameter | Value | Meaning | Pages |
|---|---|---|---|
| Max bike weight | 35 lbs | 16 kg | Maximum weight per individual bike | p. 20 |
| 180S Load Capacity | 105 lbs | 48 kg | Total weight capacity for 3-bike rack | p. 20 |
| 181S Load Capacity | 140 lbs | 63 kg | Total weight capacity for 4-bike rack | p. 20 |
Where to find it in the PDF
- Assembly Instructions p. 6, 7, 8, 9
- Installation p. 12, 13
- Specifications & Maintenance p. 20, 21
Table of contents
Manual images
Click an image to enlargeImportant Information
The Saris Grand Slam is a hitch-mounted bike rack designed for standard bike frames. It is available in two models: the 180S (3-bike capacity) and the 181S (4-bike capacity). Always follow the Saris vehicle/carrier compatibility guide before installation.
Assembly Instructions
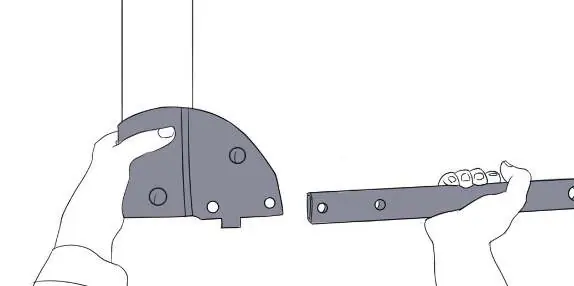
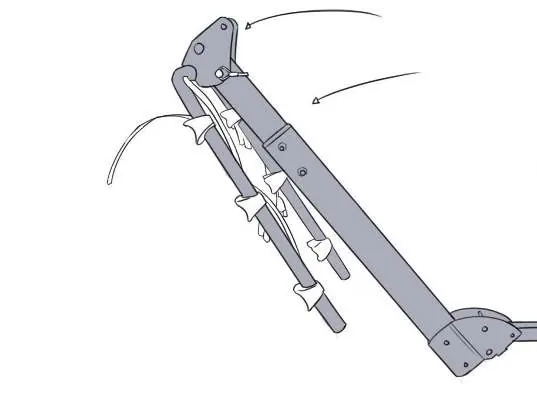
- Vertical Tube Assembly: Insert the larger vertical tube (P) into the bottom bracket (L). Secure with yellow carriage bolts (B) and nuts (H).
- Upper Tube Assembly: Insert the smaller vertical tube (O) and spacers (K) into the larger vertical tube (P). Secure with carriage bolts (C) and nuts (D).
- Bracket Attachment: Secure the upper bolt (C) into the bottom bracket (L) by hand.
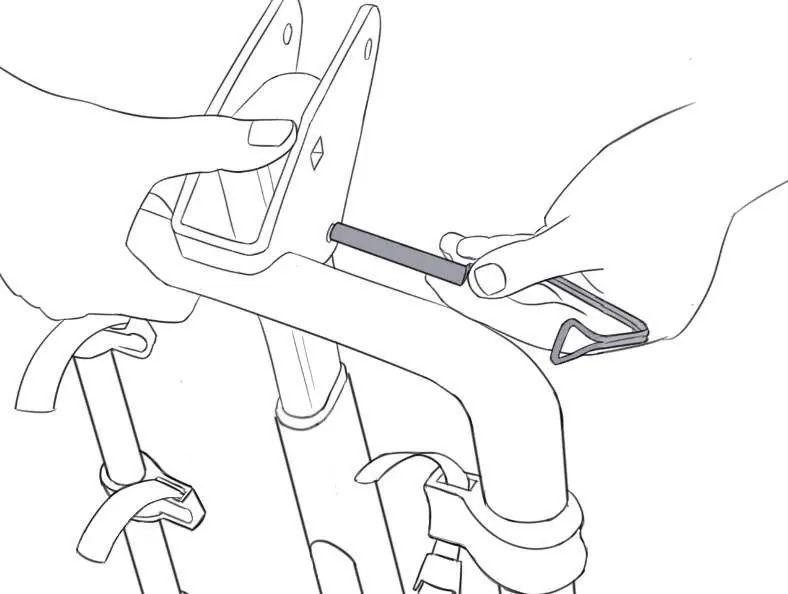
- Hitch Receiver Tube: Insert the hitch receiver tube (M) into the bottom bracket (L). Secure with carriage bolt (C), washer (H), and nut (D). Tighten fully with a 9/16" wrench.
- Pin and Cage: Insert the pin and cage (G) into the inner receiver (M) hole and secure.
- Arm Assembly: Place the arm tube and bracket (N) onto the vertical tube (O). Secure with pin and cage (Q) and carriage bolt (C), washer (H), and nut (D).
Installing the Rack to Your Vehicle
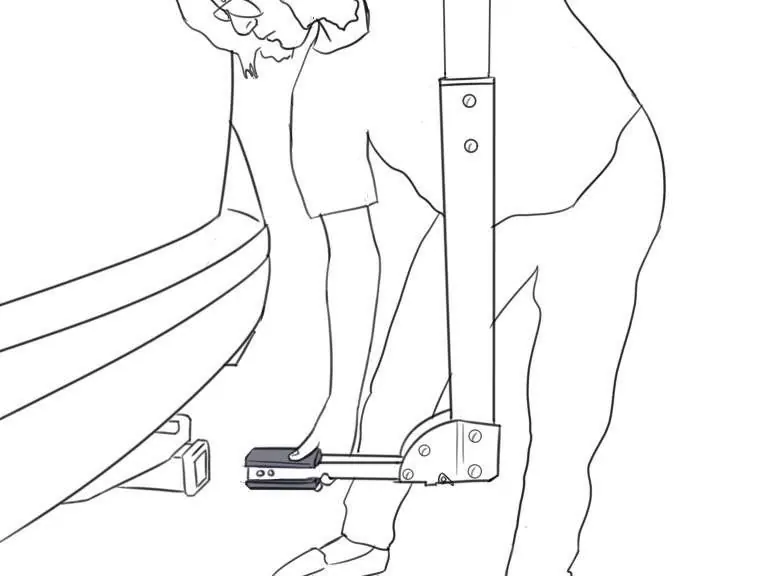
- Hitch Size: Determine if your hitch is 1.25" or 2". If using a 2" hitch, you must use the adapter block (J).
- Attachment: Insert the rack into the vehicle receiver. Use a 3/4" wrench to tighten the rack using bolt (A). Secure with the cotter pin (E).
Bike Loading and Usage
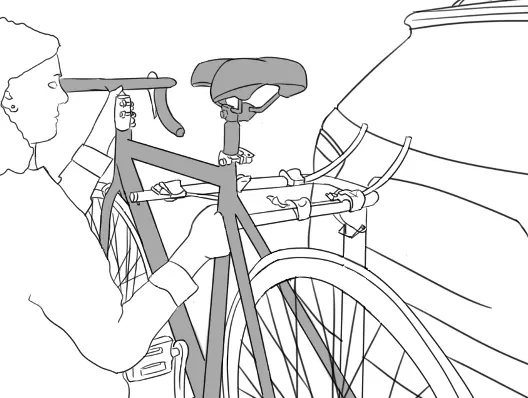
- Preparation: Remove the pin and raise the arms to a horizontal position. Replace the pin.
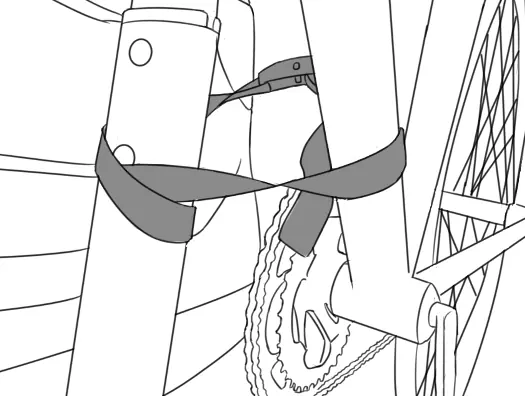
- Loading: Load the heaviest bike closest to the vehicle. Bikes should face opposite directions to avoid handlebar conflict.
- Securing: Secure bikes using the hold-down straps. Wrap the buckle strap (I) around the vertical tube of the rack and through the frame of all bikes. Secure the strap in the buckle and tie a knot close to the buckle.
- Tilting: To tilt the rack away from the vehicle, remove the pin from the bottom bracket. Do not tilt the rack while bikes are loaded.
Maintenance and Care
- Each Use: Wipe down trunk rack feet, avoid ground contact with feet, check straps for wear, check bike cradles/wheel scoops, and check for loose bolts.
- Every 90 Days: Clean with water and mild soap, lubricate locks (use wet, oil-based lubricant; NO WD-40), grease hitch bolt threads, and check for paint scratches.
Technical Specifications
- 180S (3-Bike): 105 lbs (48 kg) total load capacity; 35 lbs (16 kg) max per bike.
- 181S (4-Bike): 140 lbs (63 kg) total load capacity; 35 lbs (16 kg) max per bike.
- Carrier Weight: 23 lbs (10.4 kg).
Safety Warnings
- Do not use on RVs, trailers, or Class B vehicles.
- Max speed: 70 mph (113 km/h).
- Remove all loose parts from bicycles (child seats, baskets, pumps, etc.) before road use.
- Not intended for tandem or recumbent bicycles.
- Driving characteristics will change; reduce speed on bends and allow for longer braking distances.
Practical help
Common problems
Rack does not fit 2" hitch
Use the included adapter block (J) to fit the 2" receiver hitch.
Bike wheels are not parallel to the ground
Use the optional Bike Beam (3040) accessory.
Bolt threads won't engage during installation
Ensure the adapter block is placed correctly on the receiver tube.
Before use
- Check straps for signs of wear
- Ensure all bolts are tightened
- Verify bike tires are not behind the exhaust pipe
- Remove loose parts from bikes (child seats, baskets, etc.)
- Ensure the rack is installed directly into the hitch receiver
Specs in practice
- Max bike weight
- 35 lbs (16 kg) per bike
- 180S Load Capacity
- 105 lbs (48 kg) total
- 181S Load Capacity
- 140 lbs (63 kg) total
Images and diagrams
- Assembly steps show the sequence of inserting tubes and securing with bolts.
- Installation steps demonstrate hitch receiver attachment.
- Loading steps show how to secure bikes with straps.
Model compatibility
- Not for use on RVs or trailers (including Class B vehicles).
- Not intended for tandem or recumbent bicycles.
- Requires adapter block for 2" hitch receivers.

Manual page author
Emily Carter
User documentation editor
Prepares concise manual descriptions and highlights the most useful setup, operation, and maintenance information for readers.