Automotive / Bicycle Carriers
Assembly and User Manual for Saris SuperClamp 2-Bike + Cargo
Comprehensive assembly and user guide for the Saris SuperClamp 2-Bike + Cargo rack. Includes installation steps, loading instructions, maintenance tips, and safety guidelines.
Quick answers from the manual
Quick answer
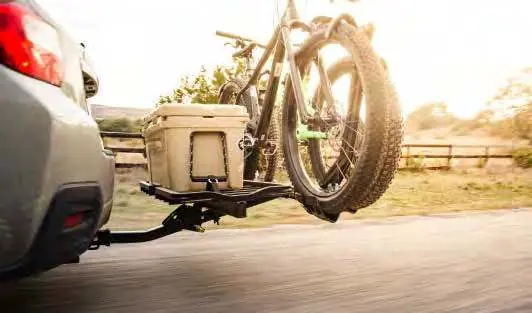
- The Saris SuperClamp 2-Bike + Cargo is a hitch-mounted rack for 2-inch receivers. It supports a maximum cargo weight of 120 lbs and a maximum bike weight of 35 lbs per bike. p. 4, 19
Key actions
- Install rack into 2-inch hitch receiver p. 6
- Load bikes p. 10, 11, 12
- Access hatch p. 15, 16, 17
First start
- Assemble the rack using the provided hardware (M10 bolts) and tools (17mm/19mm wrench, 6mm/8mm hex keys). p. 5, 6, 7, 8
Maintenance and reset
- Perform maintenance every 90 days: clean with water/mild soap, lubricate locks (no WD-40), grease hitch bolt threads, and check for paint scratches. p. 22
Technical specifications
| Parameter | Value | Meaning | Pages |
|---|---|---|---|
| Max Cargo Capacity | 120 lbs / 54.4 kg | Maximum weight allowed on the cargo platform. | p. 4, 19 |
| Max Bike Weight | 35 lbs / 16 kg | Maximum weight per individual bike. | p. 4, 19 |
Where to find it in the PDF
- Assembly p. 6, 7, 8, 9
- Loading Bikes p. 10, 11, 12, 13
- Hatch Access p. 15, 16, 17
- Maintenance p. 22
Table of contents
Manual images
Click an image to enlargeQuick guide from the manual
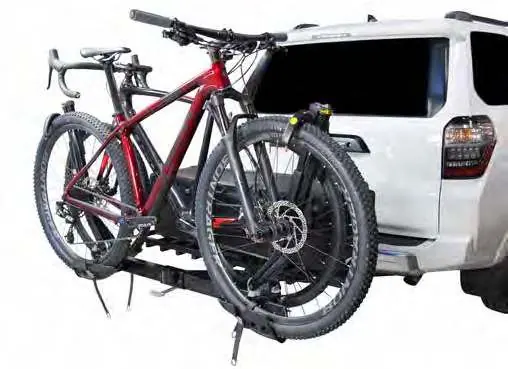
The Saris SuperClamp 2-Bike + Cargo is a hitch-mounted rack designed for 2-inch receivers. It features a cargo platform and adjustable wheel trays to accommodate different bike sizes. Always ensure the heaviest bike is loaded closest to the vehicle and that the cargo weight is centered on the platform.
Assembly
Before beginning, ensure you have the necessary tools: an adjustable wrench or 19mm and 17mm wrenches, and 6mm and 8mm hex keys. Follow these steps to assemble the rack:
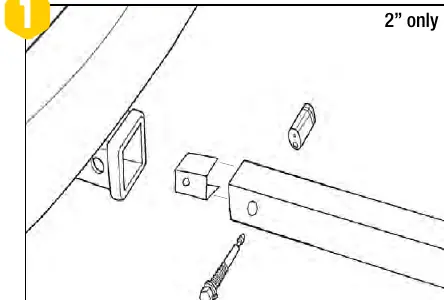
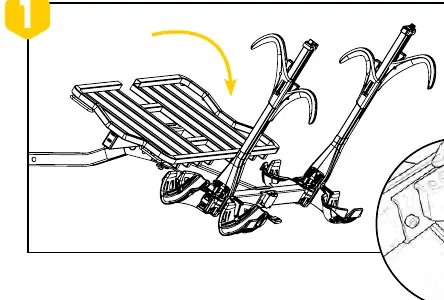
- Hitch Installation: Insert the hitchtite into the receiver, align the holes, and secure it with the provided pin and lock.
- Bracket and Cargo Bar: Align the bracket with the cargo bar and receiver. Ensure the cutout in the cargo tray faces the vehicle. Secure using 60mm bolts and nuts (17mm wrench, 8mm hex key). Clamp the bracket and backing plate to the receiver using 75mm bolts and nuts (17mm wrench, 6mm hex key). Recommended torque is 15ft-lb.
- Front Plate: Align the front plate with the bar and receiver. Remove rubber tips and secure with bolts and nuts using a 17mm wrench and 8mm hex key.
- Wheel Trays: Slide the outer wheel trays onto the rack. The tray with white reflectors should be installed on the passenger side, facing away from the vehicle.
Loading Bikes
- Prepare Arms: Push and hold the button on top of the arm to open it. Push and hold the button on the top of the hook to slide it up.
- Load Bikes: Place the heaviest bike closest to the vehicle. Adjust the wheel tray if necessary and tighten the wheel tray knob. Position arms at 10:00 and 2:00 positions, ensuring they do not contact bike frame components.
- Secure: Press hooks down onto the tires until you hear an additional click. Ensure tires are properly inflated.
- Locking: To lock bikes, press and hold the button, pull out the lock cable, route it through the bike frame, and insert the cable ends into the lock shank. Turn the key to the lock position.
- Straps: Use straps to secure front and rear wheels to the trays.
Hatch Access
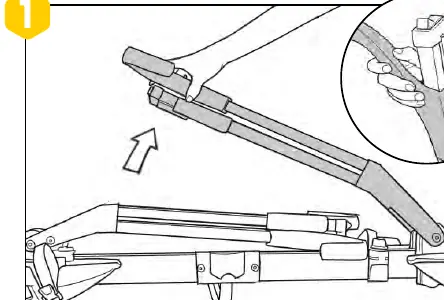
To access the vehicle hatch while the rack is loaded:
- Remove the pin with the lanyard at the base of the rack.
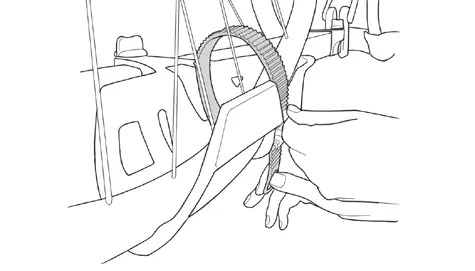
- Push the handle and tilt the rack away from the vehicle. Caution: Hold the bikes with your available hand while tilting.
- To return to the upright position, push the rack back until you hear an audible click, then reinstall the pin.
Rack Storage
To store the rack in an upright position, push the handle and fold the rack toward the vehicle until you hear an audible click.
Maintenance
Each use: Wipe down trunk rack feet, check straps for wear, check bike cradles and wheel scoops, and check for loose bolts.
Every 90 days: Clean with water and mild soap, lubricate locks (use wet, oil-based lubricant; NO WD-40), grease hitch bolt threads, and check for scratches in the paint.
Safety
- Do not exceed 120 lbs (54 kg) total cargo capacity or 35 lbs (16 kg) per bike.
- Not for use with tandem or recumbent bicycles.
- Do not mount to trailers or RVs (including Class B vehicles).
- Drive slowly over speed bumps (5-10 mph max).
- Remove loose parts from bikes (child seats, baskets, etc.) before road use.
- Do not use for off-road driving or at speeds exceeding 70 mph (113 km/h).
Practical help
Common problems
Rack does not fit vehicle
Check the Saris Fit Guide for compatibility. Do not modify the hitch receiver or use hitch extenders.
Difficulty loading bikes
Ensure the heaviest bike is loaded closest to the vehicle. Adjust wheel trays if necessary.
Rack feels loose
Check for loose bolts and tighten wheel tray knobs. Ensure the hitch bolt is secure.
Before use
- Verify hitch receiver size is 2 inches.
- Ensure all bolts are tightened to 15ft-lb torque.
- Check that bike tires are properly inflated.
- Remove all loose items from bicycles (child seats, baskets, pumps, etc.).
- Ensure bike tires are not directly behind the exhaust pipe.
Specs in practice
- Max Cargo Capacity
- 120 lbs / 54 kg total weight allowed on the cargo platform.
- Max Bike Weight
- 35 lbs / 16 kg maximum weight per individual bike.
Images and diagrams
- Assembly diagrams show bolt placement and tool requirements.
- Loading diagrams illustrate the arm and hook operation.
- Hatch access diagrams show the pin removal and tilting mechanism.
Model compatibility
- Not intended for use with tandem or recumbent bicycles.
- Do not mount to any type of trailer or RV, including Class B vehicles.
- Requires a 2-inch hitch receiver.

Manual page author
Michael Turner
Technical manual editor
Reviews PDF manuals for structure, safety notes, and practical product details so readers can find the right information quickly.