Garden / Outdoor Storage
User Manual for Toboli 62832 Floor-Mounted 2-Bike Rack
A comprehensive assembly and usage guide for the Toboli 62832 floor-mounted 2-bike rack. This manual includes a detailed parts list, two assembly configuration options, and safety guidelines.
Quick answers from the manual
Quick answer
- The Toboli 62832 is a floor-mounted 2-bike rack. Assembly requires a 10 mm and 14 mm wrench. There are two assembly options: one for storing both bikes on the same side, and one for storing bikes on opposite sides. p. 3, 4, 5
Key actions
- Assemble the base legs and tire loops using the provided screws (F) and wrenches. p. 4, 5
First start
- Inspect all parts against the parts list, then assemble using a 10 mm and 14 mm wrench. p. 3, 4
Where to find it in the PDF
- Parts List p. 3
- Assembly Instructions p. 4, 5, 6
Table of contents
Manual images
Click an image to enlargeQuick guide from the manual
The Toboli 62832 is a floor-mounted rack designed to hold up to two bicycles. Before beginning assembly, ensure you have a 10 mm and a 14 mm wrench. The rack offers two assembly options depending on your storage preference: storing both bikes on one side or storing bikes on opposite sides. Always inspect the product for defects before use and ensure all bolts are securely tightened.
Product description and parts
The package includes the following components:
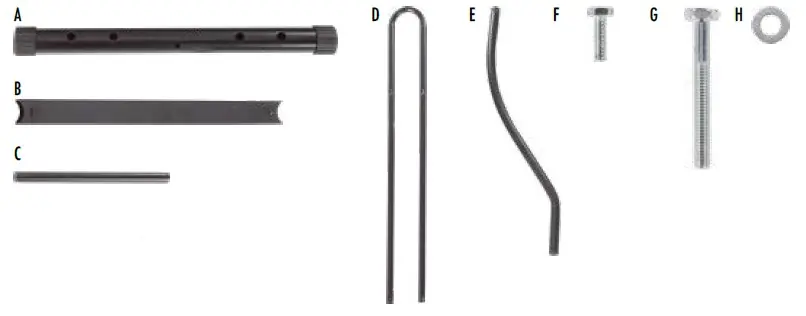
- A: Base leg (2)
- B: Base support leg (1)
- C: Connection bar (1)
- D: Tire loop (2)
- E: Tire loop support (4)
- F: M6×20 screw (14)
- G: M6×65 screw (2)
- H: M8 washer (2)
Assembly instructions
General Assembly Tip: Tighten all bolts by hand until the entire part is fitted. Once all parts are in place, securely tighten all bolts using the required wrenches.
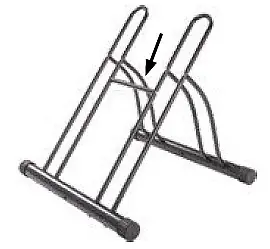

Option 1: Both bicycles on one side
- Attach the tire loop (D) to one base leg (A) using M6×20 screws (F).
- Attach the tire loop supports (E) to the other base leg (A) using M6×20 screws (F).
- Fit the two base leg assemblies together and secure with M6×20 screws (F).
- Fit the connector bar (C) between the two tire loops (D) and secure with M6×20 bolts (F).
- Fit the base support bar (B) between the two base legs (A) and secure with M6×65 screws (G) and washers (H).
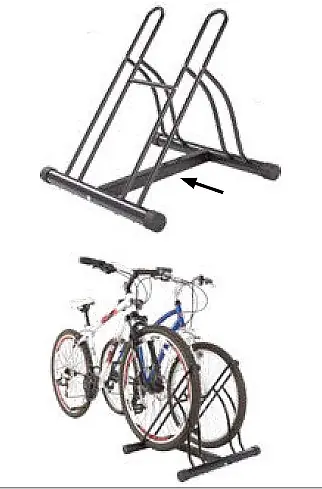
Option 2: One bicycle on either side
- Attach one tire loop (D) and one tire loop support (E) to one of the base legs (A) using M6×20 bolts (F).
- Repeat the previous step on the other base leg.
- Fit the two base leg assemblies together and secure with M6×20 bolts (F).
- Fit the connector bar (C) between the two tire loops (D) and secure with M6×20 bolts (F).
- Fit the base support bar (B) between the two base legs (A) and secure with M6×65 bolts (G) and washers (H).
Safety and maintenance
- It is the user's responsibility to read and follow all instructions.
- Inspect the product before use to ensure it is properly assembled, functions safely, and is free from defects.
- Never modify this product in any way.
- Use the appliance properly and follow general safety precautions.
Practical help
Common problems
Rack feels unstable or wobbly
Ensure all bolts were tightened with the required 10 mm and 14 mm wrenches after the initial hand-tightening phase.
Missing components
Verify all parts (A-H) are present according to the parts list before starting assembly. If parts are missing, contact customer service.
Before use
- Verify all parts (A-H) are present.
- Ensure you have a 10 mm wrench and a 14 mm wrench.
- Inspect the product for any defects or damage.
- Ensure the rack is placed on a flat, stable surface.
- Tighten all bolts securely after initial assembly.
Images and diagrams
- The manual provides two distinct assembly options.
- Option 1 is for storing both bikes on the same side of the rack.
- Option 2 is for storing bikes on opposite sides of the rack.
Model compatibility
- Designed for floor-mounted storage of up to 2 bicycles.

Manual page author
Emily Carter
User documentation editor
Prepares concise manual descriptions and highlights the most useful setup, operation, and maintenance information for readers.