Industrial / Valves
User Manual for Sauter SP 200K Digital Light Meter
Quick guide for the Sauter SP 200K digital light meter. Learn how to operate the device, change batteries, understand measurement ranges, and view recommended illuminance levels.
Quick answers from the manual
Quick answer
- The Sauter SP 200K is a digital light meter for measuring illuminance. To use it, remove the sensor cap, turn it on, select the unit (Lux or FC), and hold the sensor horizontally toward the light source. p. 5
Key actions
- Commissioning the device p. 5
- Replacing the battery p. 6
First start
- Remove the sensor cover, turn on the device, select the unit, and hold the sensor horizontally. p. 5
Problems and fixes
Display shows '1'
Measuring range exceeded; select a higher range.
p. 5Maintenance and reset
- Wipe the sensor cap with a damp cloth and perform periodic calibration. p. 6
Technical specifications
| Parameter | Value | Meaning | Pages |
|---|---|---|---|
| Measuring range | 0-200,000 Lux / 0-20,000 FC | Range of light intensity measurement | p. 3 |
| Battery | 9V block battery (6F22) | Power source | p. 4 |
Where to find it in the PDF
- Device Diagram p. 4
- Commissioning Steps p. 5
Table of contents
Manual images
Click an image to enlargeQuick guide from the manual
The Sauter SP 200K is a precision digital illuminance meter designed to measure light levels in work areas. It features a silicon diode sensor with full cosine correction, making it suitable for various light sources, including LED lighting. The device offers a measurement range of 0 to 200,000 lux or 0 to 20,000 FC (foot candles).
Device overview
The device consists of the following main components:
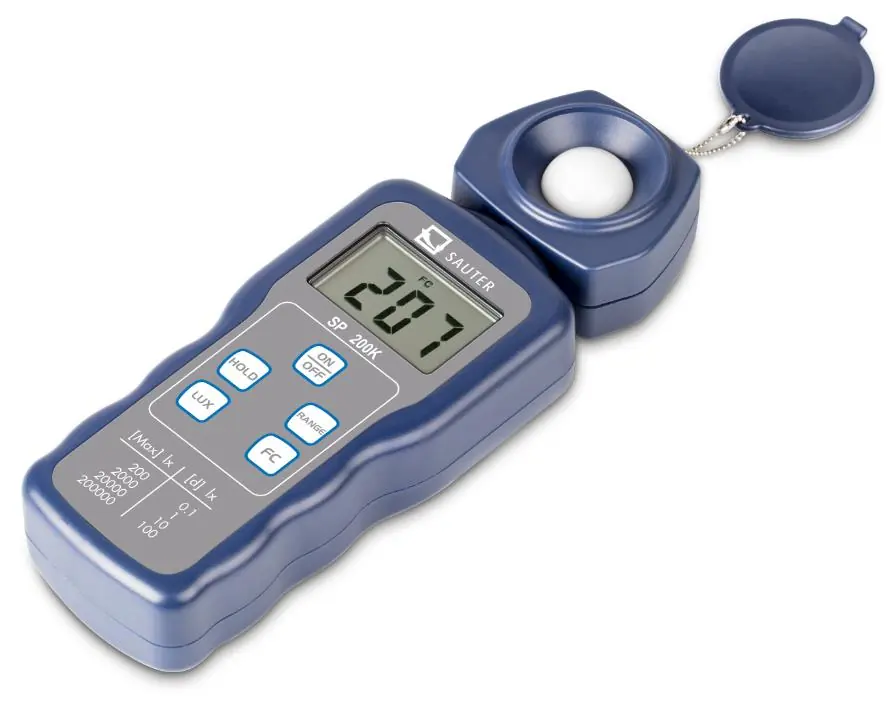
- LCD Display: Shows the measured value.
- ON/OFF button: Powers the device on and off.
- Hold key: Freezes the current reading on the display.
- Range button: Switches between different measuring ranges.
- Lux/FC Unit button: Toggles between Lux and Foot Candle units.
- Photo sensor: The light-sensitive component.
- Sensor cover: Protects the sensor when not in use.
Commissioning
- Remove the protective cover from the photo sensor.
- Turn on the device using the ON/OFF button.
- Select the desired measurement unit (Lux or FC) using the unit button.
- Hold the photo sensor in a horizontal position against the light source.
- Read the illuminance value from the LCD display.
- If the display shows a '1', the measuring range is exceeded; select a higher range.
- Use the HOLD button to freeze the reading if necessary.
- After use, replace the protective cap and switch off the device.
Battery replacement
When the battery symbol appears on the LCD display, the 9V block battery (6F22) must be replaced:
- Switch off the device.
- Open the battery compartment cover on the back by pressing and sliding it in the direction of the arrow.
- Remove the old battery and insert a new 9V block battery.
- Reattach the battery cover.
Maintenance
- Wipe the white protective cap on the photo sensor with a damp cloth periodically.
- Avoid storing the device in areas with excessive temperature or humidity.
- Periodic calibration is recommended to maintain accuracy, as light sensitivity may decrease over time.
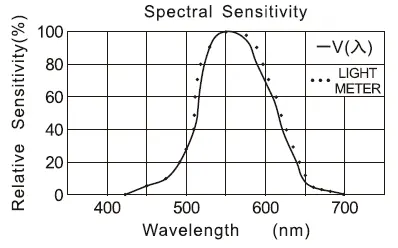
Influencing variables of the spectral sensitivity
The photodiode used with filters in this device closely matches the C.I.E. standard of spectral sensitivity test characteristics. The photometric curve V(λ) is provided in the manual to illustrate the sensor's response across different wavelengths.
Technical specifications
- Measuring range: 200 to 200,000 Lux / 20 to 20,000 FC.
- Accuracy: ± 4% to ± 5% depending on the range.
- Measuring rate: 2 times per second.
- Operating temperature: 0°C to 40°C (32°F to 104°F).
- Power source: 1 x 9V block battery (6F22).
- Dimensions: 185mm x 68mm x 38mm.
- Weight: 130g.
Recommended illuminance levels
The manual provides reference ranges for various environments:
- Office: 200-2000 lux depending on the task.
- School: 100-1500 lux depending on the room type.
- Hospital: 100-1500 lux depending on the area.
- Factory: 150-3000 lux depending on the work type.
- Retail shop: 150-3000 lux depending on the area.
Practical help
Common problems
Display shows '1'
The measuring range is exceeded. Select a higher range using the Range button.
Display shows '0.00' continuously with cap on
This is normal operation. Do not adjust the potentiometer on the back of the housing.
Low battery symbol on display
Replace the 9V block battery.
Before use
- Remove the photo sensor protective cover.
- Ensure the battery is charged (check for low battery symbol).
- Select the correct unit (Lux or FC).
- Hold the sensor in a horizontal position.
Specs in practice
- Measuring range
- The span of light intensity the device can measure (0-200,000 Lux).
- Measuring rate
- How often the device updates the reading (2 times per second).
Images and diagrams
- 1: LCD Display
- 2: ON/OFF button
- 4: Range button
- 5: Lux/FC Unit button
- 6: Photo sensor
Model compatibility
- Suitable for LED lighting.
- Calibrated with a standard incandescent lamp at 2856K.

Manual page author
Emily Carter
User documentation editor
Prepares concise manual descriptions and highlights the most useful setup, operation, and maintenance information for readers.