Industrial / Communication Modules
User Manual for Sealevel SeaLINK+16/232.RJ Serial Interface Adapter
Quick guide for the Sealevel SeaLINK+16/232.RJ serial interface adapter. Includes installation steps, hardware setup, pinout diagrams, and troubleshooting tips.
Table of contents
Manual images
Click an image to enlargeQuick guide from the manual
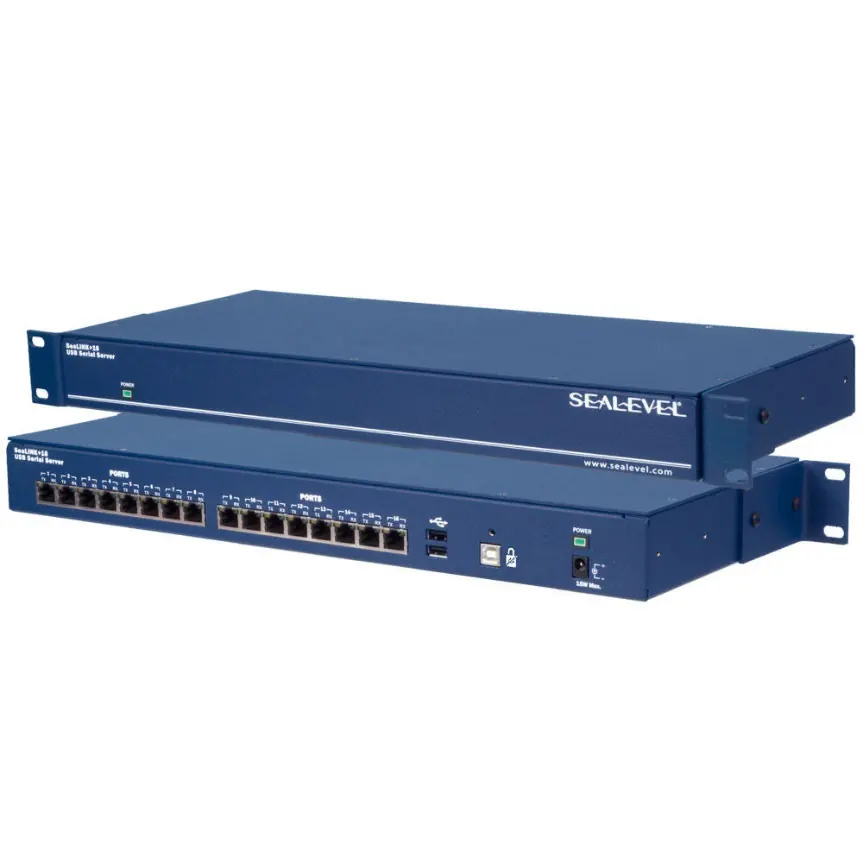
The Sealevel SeaLINK+16/232.RJ (Item# 2161) is a USB device that provides 16 RS-232 asynchronous serial ports. It is designed for use with Windows operating systems. Important: Do not connect the device to a USB port until the software drivers have been fully installed.
What is included
- SeaLINK+16/232.RJ USB 16-Port Serial Device
- USB A to B Device Cable (CA179)
- 5VDC @ 3A Power Supply (TR101)
- RS-232 RJ45 Serial Loopback (LB116)
Software installation
Only users running Windows 7 or newer should use the standard driver installation instructions. If using an operating system prior to Windows 7, contact Sealevel support.
- Locate and install the correct software from the Sealevel software driver database.
- Select Part Number 2161 from the listing.
- Click the Install Drivers button.
- The setup file will automatically detect the operating environment and install the necessary components.
To confirm installation, click the Start button and look for the SeaCOM program folder.
Hardware installation
- Connect the device to external power using the included TR101 power supply.
- Connect the device to a USB port using the supplied CA179 cable.
- The system will automatically recognize the device. You may see multiple New Hardware Found windows as Windows installs the serial ports.
- Verify the installation in the Device Manager under Ports (COM & LPT).
- Use the Sealevel WinSSD diagnostic utility to verify operation.
Technical description
The device utilizes sixteen USB UARTs with programmable baud rates up to 115.2K bps. The RJ45 connector pin assignments are as follows:
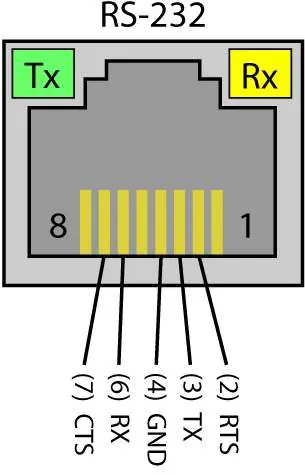

- Pin 1: NC (No Connect)
- Pin 2: RTS (Output)
- Pin 3: TX (Output)
- Pin 4: GND (Ground)
- Pin 5: NC (No Connect)
- Pin 6: RX (Input)
- Pin 7: CTS (Input)
- Pin 8: NC (No Connect)
Troubleshooting
If the adapter is not functioning correctly:
- Ensure USB support is enabled in the system BIOS.
- Verify that the Sealevel software is correctly installed.
- Use the WinSSD utility and a loopback plug to test communications.
- If testing in loopback mode, you should see both TD and RD echoed on the screen.
For further assistance, contact Sealevel Systems Technical Support at 864-843-4343 or email [email protected].
Specifications
- Operating Temperature: 0 to 70 degrees Celsius
- Storage Temperature: -50 to 105 degrees Celsius
- Power Requirements: +5 VDC, 2A
- Dimensions: 7.0 x 16.8 x 1.7 inches
Practical help
Common problems
Adapter not working
Check that USB support is enabled in the system BIOS and that the Sealevel software drivers are correctly installed.
Communication failure
Use the WinSSD diagnostic utility and a loopback plug to test the TX and RX pins. If the loopback test passes, the hardware is ready for use.
Before use
- Install software drivers before connecting the device to a USB port.
- Ensure the TR101 power supply is connected.
- Verify that your operating system is Windows 7 or newer.
- Check Device Manager to confirm COM ports are listed.
Specs in practice
- Power Supply
- Requires +5 VDC at 2A.
- Operating Temperature
- 0 to 70 degrees Celsius.
Images and diagrams
- RJ45 Pinout: Shows the signal mapping for pins 1-8, identifying RTS, TX, GND, RX, and CTS.
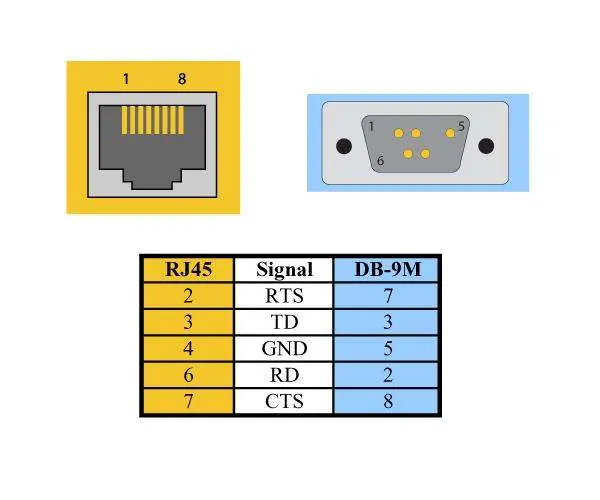
- RJ45 to DB9 Adapter: Illustrates how to convert the RJ45 pinout to a standard DB9 male serial port.
Model compatibility
- Windows NT is not supported.
- Requires Windows 7 or newer for standard driver installation.

Manual page author
Emily Carter
User documentation editor
Prepares concise manual descriptions and highlights the most useful setup, operation, and maintenance information for readers.