Power / Batteries & Chargers
User Manual for Sealey SPI3S.V2 3A 12V Intelligent Battery Charger
Quick guide for the Sealey SPI3S.V2 3A 12V Intelligent Lithium Battery Charger & Maintainer. Includes setup, connection steps, safety warnings, and troubleshooting.
Table of contents
Manual images
Click an image to enlargeQuick guide from the manual
The Sealey SPI3S.V2 is an intelligent battery charger and maintainer designed for 12V lead-acid and lithium LiFePO4 batteries. It features an auto-start function and does not have an ON/OFF switch; operation begins once connected to an AC outlet. Always ensure the battery type is selected correctly using the battery type button.
Safety Instructions
- Risk of Electric Shock: Do not expose the charger to rain or snow. Unplug before maintenance.
- Risk of Explosive Gases: Batteries generate explosive gases. Work in a well-ventilated area, away from sparks and flames.
- Placement: Locate the charger as far away from the battery as DC cables permit. Never place the charger directly above the battery.
- Battery Compatibility: Use only with 6-celled lead-acid or 4-celled lithium LiFePO4 rechargeable batteries. Do not use with non-rechargeable batteries.
Preparation and Connection
Before charging, clean battery terminals and ensure the area is well-ventilated. If removing the battery from the vehicle, always remove the grounded terminal first.
Connecting to a Vehicle Battery
- Identify the grounded battery post (connected to the chassis).
- For negative-grounded vehicles: Connect the RED (POSITIVE) connector to the positive battery post. Connect the BLACK (NEGATIVE) connector to the vehicle chassis, away from the battery and fuel lines.
- For positive-grounded vehicles: Connect the BLACK (NEGATIVE) connector to the negative battery post. Connect the RED (POSITIVE) connector to the vehicle chassis, away from the battery and fuel lines.
- Plug the AC cord into an electrical outlet.
Connecting Outside the Vehicle
- Attach a 24-inch (61 cm) long 7 AWG insulated battery cable to the negative battery post.
- Connect the RED (POSITIVE) charger connector to the positive battery post.
- Connect the BLACK (NEGATIVE) charger connector to the free end of the cable attached to the negative post.
Operation
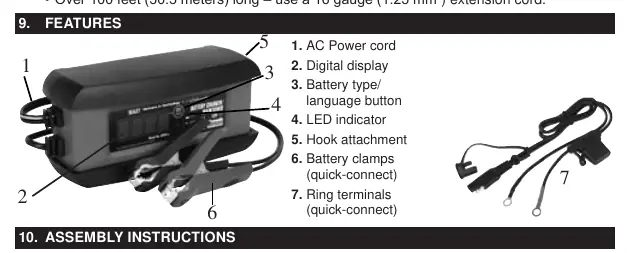
The charger features a digital display and a battery type/language button. Press the button once to select lead-acid, twice for lithium-ion. If no button is pressed, charging starts automatically in ten minutes. To change the display language, press and hold the button for 5 seconds (EN, DE, FR).
LED Indicators
- Green LED solid: Charging.
- Green LED pulsing: Fully charged, in Maintain Mode.
- Green LED flashing: Charge aborted.
Maintenance and Storage
Store the charger unplugged in an upright position in a cool, dry place. Use a dry cloth to wipe corrosion and dirt from connectors and the case. There are no user-serviceable parts inside.
Manufacturer information
Sealey Group
Practical help
Common problems
Charger will not turn on
Check the AC outlet, fuse, or circuit breaker. Ensure the power cord and extension cord are securely plugged in.
Display shows CONNECT CLAMPS
Ensure the charger is connected to the battery and that connection points are clean and making good contact.
Display shows CHARGE ABORTED-BAD BATTERY
The battery may be too large, severely sulfated, or have a shorted cell. Have the battery checked or replaced.
Battery connectors do not spark when touched
This is normal. The charger has an auto-start feature and will not supply current until a battery is properly connected.
Before use
- Verify battery is 12V (lead-acid or LiFePO4).
- Clean battery terminals.
- Ensure the area is well-ventilated.
- Check that the charger is not placed directly above the battery.
- Ensure all vehicle accessories are turned off.
Specs in practice
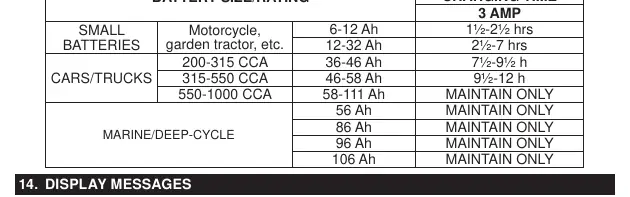
- Battery Range
- Lead Acid 12-59Ah, LiFePO4 3-50Ah
- Ingress Protection
- IP64 (Dust tight and protected against splashing water)
Images and diagrams
- 1. AC Power cord
- 2. Digital display
- 3. Battery type/language button
- 4. LED indicator
- 5. Hook attachment
Model compatibility
- Compatible with 6-celled lead-acid and 4-celled lithium LiFePO4 batteries.
- Not intended for dry-cell batteries used in home appliances.
- Not intended to supply power to low voltage electrical systems other than starter-motor applications.

Manual page author
Emily Carter
User documentation editor
Prepares concise manual descriptions and highlights the most useful setup, operation, and maintenance information for readers.