Power / Batteries & Chargers
User Manual for Sealey Superboost 140.V4 and 160.V5 Starter/Charger
Comprehensive user guide for the Sealey Superboost 140.V4 and 160.V5 starter/charger. Includes safety instructions, charging procedures, engine starting steps, fuse replacement, and technical specifications.
Table of contents
Manual images
Click an image to enlargeQuick Guide from the Manual
The Sealey Superboost series are combination units designed for charging lead-acid batteries and providing boost power to start vehicles. Important: The charger does not switch off automatically. You must monitor the state of charge and disconnect the unit manually to prevent damage to the battery.
- Safety First: Always use in a well-ventilated area. Lead-acid batteries generate explosive gases.
- Connection Order: Always connect the charger to the battery before plugging it into the mains.
- Starting Procedure: Do not attempt to start the engine with the battery disconnected from the vehicle. Crank for a maximum of 3 seconds, wait 2 minutes, and repeat for a maximum of 5 cycles.
Safety Precautions
Operating this equipment involves risks associated with lead-acid batteries and electrical currents. Follow these guidelines:
- Wear safety eye protection and protective clothing.
- Remove all personal metallic items (rings, watches, etc.) to prevent short circuits.
- Ensure the charger is placed on a stable surface and is not covered.
- Do not smoke or allow sparks/flames near the battery or engine.
- If battery acid contacts skin or eyes, wash immediately with soap and water or flush with cool water for 15 minutes and seek medical attention.
Operating Instructions
Preparation
Before charging, ensure the battery is compatible with the charger output. Check that the battery electrolyte covers the plates by 5-10mm (if applicable). Ensure the battery terminals are clean and free from oxidation.
Connecting the Charger
- Ensure the charger is unplugged from the mains.
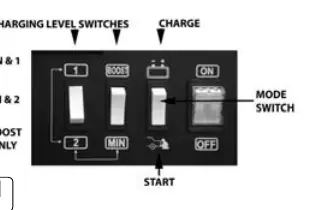
- Set the charger voltage (12V or 24V) to match the battery by connecting the red clamp to the appropriate terminal.
- Set the mode switch to "Charge" (indicated by the battery symbol).
- Set the charge rate using the charge level switches.
- Connect the POSITIVE (Red) clamp to the POSITIVE (+) battery terminal.
- Connect the NEGATIVE (Black) clamp to the NEGATIVE (-) battery terminal.
Charging the Battery
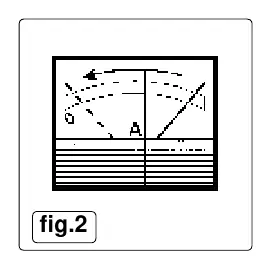
Connect the charger to the mains and switch it on. Monitor the ammeter on the front panel. As the battery charges, the pointer will slowly move to the left. When the reading reaches "0", the battery is fully charged. Stop charging immediately to prevent damage to the battery plates.
Starting the Engine
To use the unit as a starter:
- Ensure the charger is disconnected from the mains.
- Set the output voltage to match the vehicle battery (12V or 24V).
- Connect the clamps to the battery terminals.
- Give the battery a short charge (set to "Charge", not "Boost") for 2-3 minutes.
- Move the switch to the "START" position.
- Turn the vehicle ignition on and crank for a maximum of 3 seconds.
- If the vehicle does not start, wait 2 minutes before trying again.
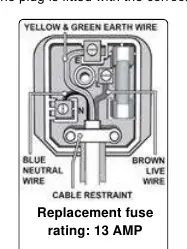
Safety Fuse
The unit is protected by a fuse located on the control panel. It protects against overload, short circuits, and prolonged starting attempts. If the fuse blows, turn off the unit, disconnect from the mains, allow it to cool, and replace the fuse with an identical type and rating. Do not use a copper bridge or similar makeshift repair.
Manufacturer information
Sealey Group
Practical help
Common problems
Charger does not switch off automatically
The charger is manual. You must monitor the ammeter and disconnect the unit when the battery is fully charged to avoid damage.
Fuse blows
Check for overload (too high current), short circuit (clamps touching), or prolonged starting attempts. Replace with an identical fuse.
Vehicle will not start
Ensure the battery is connected to the vehicle. Do not attempt to start with the battery disconnected. Check for vehicle faults.
Before use
- Verify the battery voltage (12V or 24V) matches the charger setting.
- Ensure the battery electrolyte level is sufficient (plates covered by 5-10mm).
- Check that battery terminals are clean and free from oxidation.
- Ensure the charger is placed in a well-ventilated area.
- Verify that the charger is disconnected from the mains before attaching clamps.
Specs in practice
- Charge Current Peak (EN)
- The maximum current output during charging mode (21A for 140.V4, 30A for 160.V5).
- Start Current Peak (EN)
- The maximum current available for engine starting (140A for 140.V4, 160A for 160.V5).
- Battery Range
- The capacity range of batteries the charger is designed to handle (15-240Ah or 15-300Ah).
Images and diagrams
- Fig 1: Shows the control panel layout, including charge level switches, mode switch, and ON/OFF switch.
- Fig 2: Shows the ammeter dial, which indicates the current delivery to the battery.
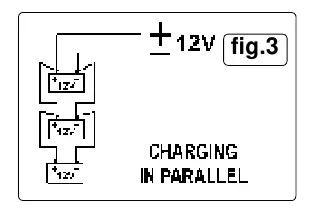
- Fig 3: Illustrates parallel connection for charging multiple batteries.
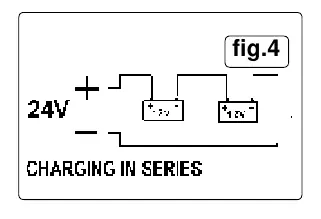
- Fig 4: Illustrates series connection for charging two 12V batteries using a 24V output.
Model compatibility
- Do not simultaneously charge batteries of different capacities or discharge levels.
- Only use for lead-acid batteries.
- Ensure the charger voltage matches the battery voltage (12V or 24V).

Manual page author
Emily Carter
User documentation editor
Prepares concise manual descriptions and highlights the most useful setup, operation, and maintenance information for readers.