Tools / Automotive Tools
Sealey VS217 Digital Oil Pressure Test Kit User Manual
Quick guide for the Sealey VS217 Digital Oil Pressure Test Kit. Includes setup, operation, button functions, maintenance, and safety instructions.
Quick answers from the manual
Quick answer
- The Sealey VS217 is a digital oil pressure test kit. To operate, install 4x AAA batteries, select the appropriate adaptor, connect to the engine, and use the interface buttons to measure, lock, or clear data. p. 1, 2
Key actions
- Power on/off p. 2
- Zero pressure p. 2
- Clear data p. 2
First start
- Install 4x AAA batteries by unscrewing the rear battery cover. p. 2
Problems and fixes
Device inactive
The device automatically powers off after 5 minutes of inactivity.
p. 2Maintenance and reset
- Regularly check parts for tightness and treat internal/external parts in contact with chemicals with anti-corrosion treatment. p. 2
Technical specifications
| Parameter | Value | Meaning | Pages |
|---|---|---|---|
| Operating Voltage | 6V | Requires 4x AAA batteries | p. 1 |
| Pressure Range | 0 to 435psi | Measurement range | p. 1 |
Where to find it in the PDF
- Safety and Specifications p. 1
- Operation and Maintenance p. 2
- Regulatory and Contact p. 3
Table of contents
Manual images
Click an image to enlargeQuick guide from the manual
The Sealey VS217 is a digital oil pressure test kit designed for passenger vehicles, light commercial vehicles, and motorcycles. Before use, ensure you have 4x AAA batteries (not supplied) and that you have selected the correct adaptor for your vehicle. Always wear eye protection and ensure the vehicle is safely supported on axle stands before connecting the device.
Product Overview
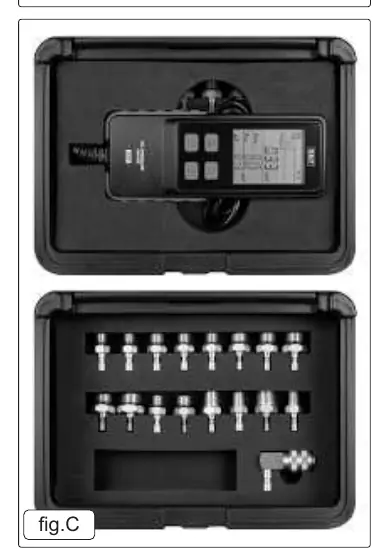
The kit includes a digital gauge with a 2.8-inch backlit display, 16 adaptors, a 90-degree quick-release connector, and an oil-resistant hose. The device features auto-power-off functionality to conserve battery life.
Button Functions
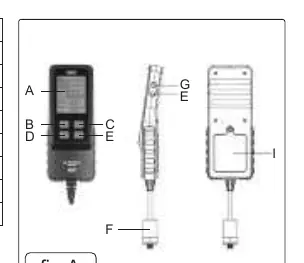
- A: Display
- B: Lock/unlock interface
- C: Pressure units convert
- D: Reset testing time; Long press to zero pressure
- E: Switch Chinese/English mode; Long press to turn On/Off
- F: Measuring Probe
- G: Turn On/Off key tone
- H: Turn On/Off backlight
- I: Battery Cover
Operation
Battery Installation
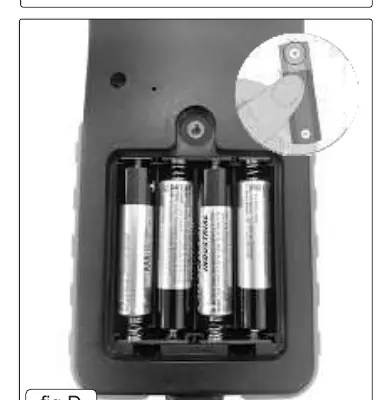
- Unscrew the rear battery cover.
- Insert 4x 1.5V AAA batteries, ensuring correct polarity.
- Close the cover securely and replace the screw.
Measuring Procedure
- Press button (E) for more than 2 seconds to start the instrument.
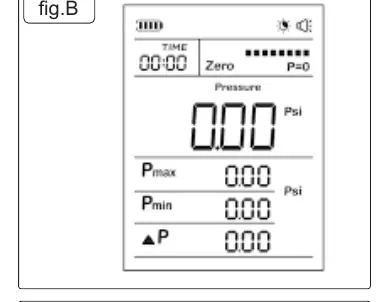
- Press button (D) to perform a pressure zero setting (display should show 0).
- Select the appropriate connector for the vehicle and connect it to the hardware cable.
- Connect the assembly to the engine.
- Press button (D) to clear previous data and timing.
- Use button (C) to select the desired pressure units (psi, bar, kg/cm²).
- Read the pressure on the digital display.
Maintenance and Storage
To maintain performance, regularly check that all parts are tightened and connected. If parts are loose, tighten them immediately. Treat any external or internal parts that come into contact with chemicals with anti-corrosion treatment, such as rust removal. When not in use, store the product in a dry, childproof place. Do not store in hot, humid, or non-ventilated areas.
Safety
Always release pressure from the gauge before disconnecting the coupling. Do not use tools if seals or threads are damaged; replace defective seals before use. Do not overload the equipment.
Manufacturer information
Sealey Group
Practical help
Common problems
Device does not turn on
Ensure 4x AAA batteries are installed with correct polarity.
Incorrect pressure readings
Check for damaged seals or threads on the adaptors and ensure the correct connector is used for the vehicle.
Device turns off unexpectedly
The device has an auto-power-off feature that activates after 5 minutes of inactivity.
Before use
- Wear approved eye protection.
- Ensure the vehicle is jacked up and supported by axle stands.
- Check that seals and threads are not damaged.
- Install 4x AAA batteries.
- Select the correct connector for the vehicle engine.
Specs in practice
- Pressure Range
- 0 to 435psi (0 to 30 bar).
- Operating Temperature
- -10 to 60°C.
Images and diagrams
- Fig A: Overview of the device interface and button layout.
- Fig B: Digital display screen showing pressure and time data.
- Fig C: Adaptor kit contents.
- Fig D: Battery compartment location and installation.
Model compatibility
- Suitable for passenger vehicles, light commercial vehicles, and motorcycles.

Manual page author
David Miller
Documentation analyst
Organizes user manual content into clear summaries, with attention to model details, product context, and everyday usability.