Automotive / Garage Equipment
User Manual for Sealey PFC101 and PFC201 Engine Crane
Comprehensive user guide for the Sealey PFC101 and PFC201 folding engine cranes. Includes assembly instructions, safety guidelines, hydraulic system operation, maintenance procedures, and technical specifications.
Quick answers from the manual
Quick answer
- The Sealey PFC101 and PFC201 are folding engine cranes. They require assembly of the wheel brackets, hydraulic unit, and legs. Before use, the hydraulic circuit must be bled of air. p. 1, 2
Key actions
- Bleed the hydraulic circuit p. 2
- Assemble the crane p. 2
First start
- Bleed the hydraulic system before first use. p. 2
Problems and fixes
Crane does not lift properly
Bleed the hydraulic circuit to remove air.
p. 2Maintenance and reset
- Refill hydraulic oil p. 3
Technical specifications
| Parameter | Value | Meaning | Pages |
|---|---|---|---|
| PFC101 Lifting Capacity | 1000kg (Pos 1) - 700kg (Pos 4) | Maximum load capacity based on jib extension. | p. 2 |
| PFC201 Lifting Capacity | 2000kg (Pos 1) - 1250kg (Pos 4) | Maximum load capacity based on jib extension. | p. 2 |
Where to find it in the PDF
- Safety and Introduction p. 1
- Specifications, Assembly, and Operation p. 2
- Maintenance p. 3
Table of contents
Manual images
Click an image to enlargeQuick guide from the manual
The Sealey PFC101 and PFC201 are professional folding engine cranes designed for workshop use. Before operation, ensure the hydraulic circuit is bled of air. Always verify that the crane legs and arms are locked in position before lifting. The crane features a dead man's control for safety and a swivel pump for operation in limited spaces.
Safety precautions
- Surface: Use only on a level, firm surface (concrete recommended). Never use on tarmac or soft surfaces.
- Capacity: Do not exceed the maximum lifting capacity for the specific jib extension position. Capacity decreases as the jib is extended.
- Operation: Do not stand under the load. Do not allow the load to swing or drop suddenly.
- Storage: When not in use, fold the crane and store in a safe, dry, childproof area.
- Prohibitions: Do not use the crane to transport loads (lifting device only), do not apply sideways pressure, and do not climb on the crane.
Assembly
Assembly should be carried out with the help of other people.
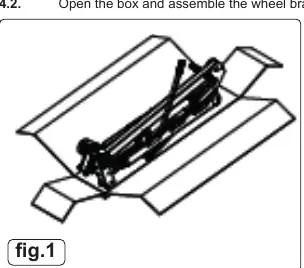

- Wheel Brackets: Assemble the wheel brackets on the column as shown in figures 1 and 2.
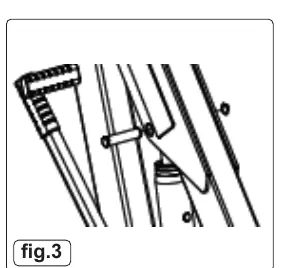
- Hydraulic Unit: Lift the crane and attach the hydraulic unit to the arm using the provided pin and circlips (figure 3).
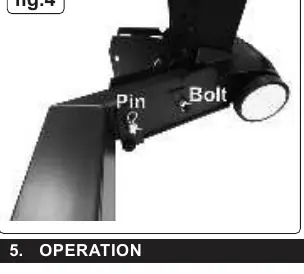
- Legs: Place the crane on the ground and fit the leg pin and bolt in the correct holes as indicated in figures 4 and 5.
- Auxiliary Wheel: Attach the auxiliary wheel bracket using the pin and circlip (figure 6).
Operation
Bleeding the hydraulic circuit: Prior to first use, turn the hydraulic release knob 90° and pump the lever several times to eliminate air. Return the knob to its original position.
Lifting: Pump the lever to lift. If lifting an engine, secure it at the points recommended by the manufacturer.
Lowering: Turn the release knob. The system allows for regulated, controlled lowering. The crane is fitted with an LCS system to prevent jerky lowering.
Maintenance
- Lubrication: Clean and lubricate the axes of moving parts at regular intervals.
- Oil Level: If refilling, dismantle the hydraulic unit and drain contents. Refill with the required volume: 530ml for PFC101 or 1025ml for PFC201.
- Oil Type: Use hydraulic oil, HL or HM type, with an ISO grade of cinematic viscosity of 30cST at 40°C. Never use brake fluid.
- Storage: Keep the piston fully retracted in the lowest position to minimize corrosion.
Manufacturer information
Sealey Group
Practical help
Common problems
Crane fails to lift or feels spongy
The hydraulic circuit likely contains air. Bleed the system by turning the release knob 90° and pumping the lever several times.
Jerky lowering
The crane is equipped with an LCS system. Ensure the release knob is being operated smoothly. If the issue persists, check for air in the system.
Piston corrosion
Always store the crane with the piston fully retracted in the lowest position and apply an anti-corrosion product to the main piston and pump.
Before use
- Ensure the crane legs and arms are locked in position.
- Verify the surface is level, firm, and capable of supporting the load.
- Check that the load does not exceed the rated capacity for the current jib extension.
- Ensure the area above the jib is clear of obstacles.
- Bleed the hydraulic circuit if the crane has been stored for a long period.
Specs in practice
- Lifting Capacity
- Maximum weight the crane can lift at specific jib positions (1-4). Capacity decreases as the jib extends.
- Hydraulic Oil
- Use HL or HM type oil with ISO grade 30cST at 40°C. Never use brake fluid.
Images and diagrams
- Figures 1-2: Assembly of wheel brackets onto the main column.
- Figure 3: Attachment of the hydraulic unit to the arm using pins and circlips.
- Figures 4-5: Assembly of the legs to the main frame.
- Figure 6: Attachment of the auxiliary wheel bracket.
Model compatibility
- PFC101: 1000kg max capacity (Position 1), 530ml oil capacity.
- PFC201: 2000kg max capacity (Position 1), 1025ml oil capacity.

Manual page author
Michael Turner
Technical manual editor
Reviews PDF manuals for structure, safety notes, and practical product details so readers can find the right information quickly.