Furniture / Storage Cabinets
User Manual for Sealey 1.2M Workstation with Drawers AP12600.V4
Quick guide for the Sealey 1.2M Workstation with Drawers (AP12600.V4). Includes assembly instructions, safety warnings, load capacities, and component list.
Table of contents
Manual images
Click an image to enlargeQuick Guide
This workstation is designed for workshop use. It features a boltless frame, a pegboard for tool storage, two half-drawers with ball-bearing slides, and multiple shelves. Assembly requires minimal tools. Always ensure the unit is placed on a level, solid surface, preferably concrete.
Safety Warnings
- Load Limits: Do not exceed the maximum load of 100kg per level. The top shelf is limited to 20kg.
- Surface Care: Avoid heavy impacts when placing objects on surfaces. Do not clean with solvents that may damage the protective coating.
- Usage: Use only for intended purposes. Do not use outdoors or in damp/wet locations.
- Workpiece Security: Always secure workpieces using clamps or a vice (not included) before working on the bench.
- Personal Safety: Wear protective gloves during assembly. Keep children and unauthorized persons away from the work area.
Specifications
- Model No: AP12600.V4
- Overall Size (W x D x H): 1215 x 610 x 1500/900mm
- Worktop Size: 1205 x 600mm
- Max Capacity per level: 100kg
- Top Shelf Capacity: 20kg
Assembly Instructions
The workstation uses a boltless design where structural members have flat-headed, waisted rivets that pass through keyholes in the uprights and are pushed down to secure them.
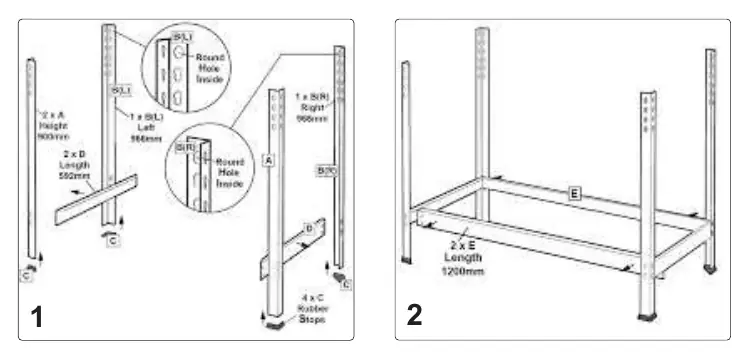
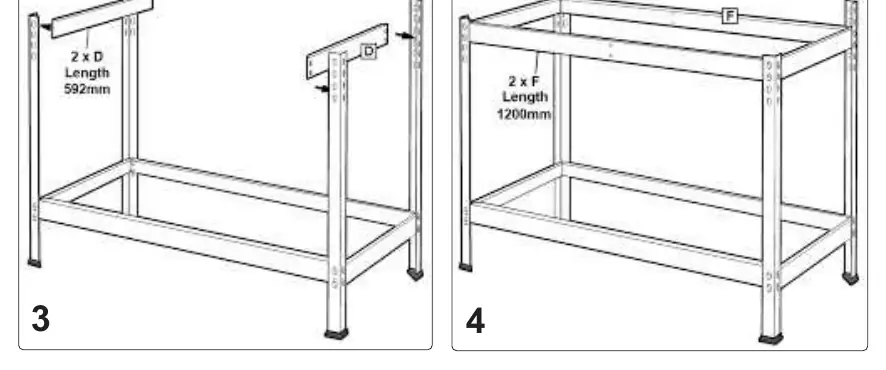

- Frame Assembly: Build the basic frame by connecting the posts and beams as shown in diagrams 1 through 4.
- Drawer Supports: Attach the drawer mounts to the basic frame as detailed in diagrams 5 and 6.
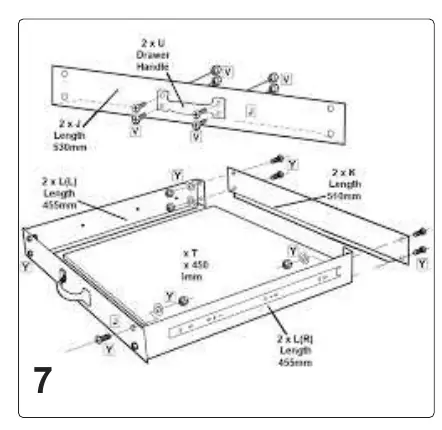
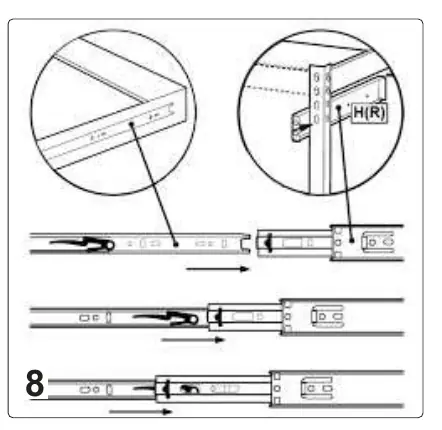
- Drawer Construction: Bolt the two drawers together using the provided hardware and fit them onto the drawer runners (diagram 7 and 8).
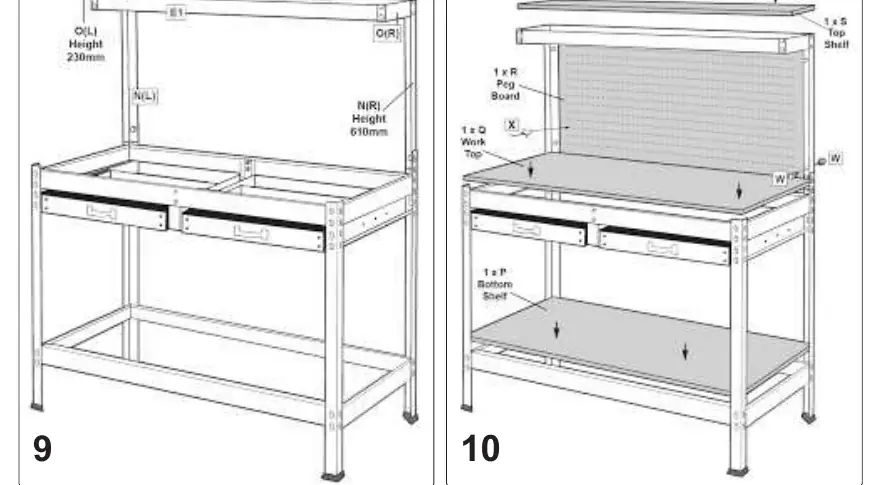
- Final Assembly: Attach the extension posts to the back uprights and mount the top shelf frame (diagram 9).
- Finishing: Attach the pegboard to the back of the uprights and position the top shelf, worktop, and bottom shelf (diagram 10). Attach tool hooks as required.
Maintenance and Environment
Recycle unwanted materials instead of disposing of them as waste. All tools, accessories, and packaging should be sorted and taken to a recycling center. If the product becomes unserviceable, drain any fluids into approved containers and dispose of according to local regulations. For technical support, contact Sealey at 01284 757500 or email [email protected].
Manufacturer information
Sealey Group
Practical help
Common problems
Missing or damaged parts
Contact your Sealey Stockist immediately.
Unstable structure
Ensure all rivets are fully pushed down into the keyholes and that the floor surface is level and solid.
Surface damage
Do not use solvents for cleaning; use mild, non-abrasive cleaners.
Before use
- Check all components against the contents list provided in the manual.
- Ensure you have a level, solid floor area (preferably concrete).
- Wear protective gloves during the assembly process.
- Verify that all rivets are properly seated in the keyholes.
- Ensure you have clamps or a vice available for securing workpieces.
Specs in practice
- Max Capacity per level
- The maximum weight the work surface or bottom shelf can support (100kg).
- Top Shelf Capacity
- The maximum weight the upper storage shelf can support (20kg).
- Overall Dimensions
- The total footprint and height of the unit (1215mm width, 610mm depth, 1500mm total height).
Images and diagrams
- Diagrams 1-4: Basic frame assembly steps.
- Diagrams 5-6: Installation of drawer mounts.
- Diagram 7: Assembly of the drawer components.
- Diagram 8: Installation of drawer runners.
- Diagram 9-10: Final assembly of shelves and pegboard.
Model compatibility
- Designed for indoor workshop use only.
- Not suitable for outdoor use or damp environments.

Manual page author
Michael Turner
Technical manual editor
Reviews PDF manuals for structure, safety notes, and practical product details so readers can find the right information quickly.