Electronics / Security Cameras
User Manual for Smart 1080P Battery Camera
Quick start guide and user manual for the Smart 1080P Battery Camera. Includes setup instructions, Wi-Fi configuration, app usage, and troubleshooting tips.
Table of contents
Manual images
Click an image to enlargeQuick guide from the manual
This guide provides essential steps to set up and operate your Smart 1080P Battery Camera. Before installation, ensure you charge the batteries for 8-10 hours using a USB charger. The camera requires a 2.4GHz Wi-Fi network for operation and is managed via the CloudEdge app.
What's in the box
- Battery camera
- USB cable
- Bracket
- Screw & Tools
- User Guide
Meet the Battery camera
The camera features several key components for operation:
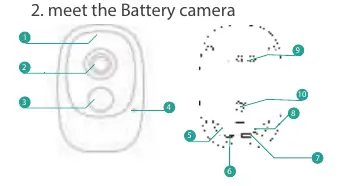
- Indicating LED: Shows status.
- PIR Motion Sensor: Detects movement.
- Microphone & Speakers: Enable two-way audio.
- SD Card Slot: For local storage.
- Reset Button: Used to reset the device.
- Micro USB Port: For charging.
Battery charging
The batteries are not fully charged upon arrival. Use a USB-compatible wall charger (not included) and the provided USB cable to charge the batteries for approximately 8 to 10 hours before installation.
App setup and Wi-Fi configuration
Follow these steps to connect your camera:
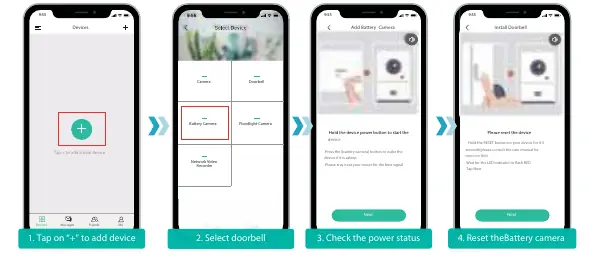

- Download and install the CloudEdge app from Google Play or the App Store.
- Register an account in the app using your phone number or email.
- Tap the + icon to add a new device.
- Select Battery Camera.
- Ensure your phone is connected to a 2.4GHz Wi-Fi network (5GHz is not supported).
- Follow the in-app instructions to reset the camera (hold the reset button for 4-5 seconds until the LED flashes red).
- Scan the QR code displayed on your phone with the camera lens at a distance of 5-8 inches.
Live view interface
The CloudEdge app provides a live view interface where you can:
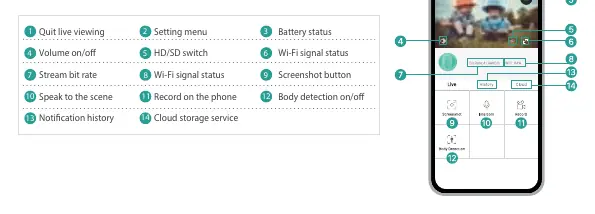
- View live video and switch between HD/SD quality.
- Use the intercom feature to speak through the camera.
- Record video directly to your phone.
- Access notification history and cloud storage services.
- Toggle body detection settings.
Troubleshooting
- Wi-Fi Setup Failure: Ensure you are using a 2.4GHz network, check for special characters in your Wi-Fi password, and keep the camera near the router during setup.
- Poor Video Quality: Move the router closer to the camera or install a Wi-Fi extender.
- Motion Detection: You can adjust sensitivity or disable motion detection in the app settings.
- Storage: The camera supports Micro SD cards up to 128GB. When full, it automatically overwrites the oldest footage.
Specifications
- Resolution: 1920 x 1080 px
- Angle of View: 130°
- Power Source: 2x Lithium 18650 Batteries (3.5V, 3000mAh)
- Operating Temperature: -20°C to 50°C
- Storage: Micro SD Card (Max 128G)
Practical help
Common problems
Failed Wi-Fi setup
Ensure you are using a 2.4GHz network (5GHz is not supported), check for special characters in the Wi-Fi password, and keep the camera near the router during setup.
Poor video quality
Move the router closer to the installation spot or use a Wi-Fi extender.
Device not connecting
Reset the device by holding the RESET button for 4-5 seconds until the LED flashes red.
Before use
- Charge the batteries for 8-10 hours using a USB charger.
- Download the 'CloudEdge' app.
- Ensure your Wi-Fi network is 2.4GHz.
- Remove all film from the camera lens.
Specs in practice
- Operating Temp
- -20°C to 50°C.
Images and diagrams
- The camera features a PIR motion sensor, microphone, speaker, and a reset button.
- The app interface allows for live viewing, two-way audio, and recording playback.
Model compatibility
- Works with 2.4GHz Wi-Fi only.
- Does not support Google Home or Alexa.

Manual page author
Michael Turner
Technical manual editor
Reviews PDF manuals for structure, safety notes, and practical product details so readers can find the right information quickly.