Electronics / Security Cameras
User Manual for Swann Wireless Camera RS-CH222M6UN-WTL-L36W
Quick guide for the Swann Wireless Camera RS-CH222M6UN-WTL-L36W. Learn how to connect, pair, mount, and optimize your security camera for the best performance.
Table of contents
Manual images
Click an image to enlargeQuick guide from the manual
This document provides essential instructions for setting up and installing your Swann Wireless Camera. The camera features 1080p Full HD video, SwannNet technology for optimized Wi-Fi, controllable sensor spotlights, sirens, and True Detect heat and motion sensing. Ensure the camera is fixed securely and that cables are protected from weather and electrical interference.
Connecting the Camera
Follow these steps to power your camera:
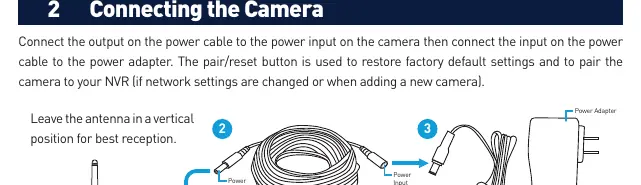
- Connect the output on the power cable to the power input on the camera.
- Connect the input on the power cable to the power adapter.
- Connect the power adapter to a power outlet and switch it to the ON position.
- Ensure the antenna is in a vertical position for the best reception.
Pairing the Camera
To pair the camera with your NVR:
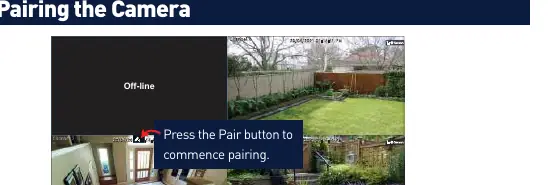
- In Live View mode on your NVR, click the channel you want to pair the camera to.
- Select the Pair button that appears on the screen.
- Remove the cap covering the pair button on the camera.
- Press and hold the pair button for 3 seconds, then release. The camera's IR LEDs will start flashing.
- The camera will pair automatically; if it fails, repeat the process.
Mounting the Camera
The camera can be mounted on flat surfaces using the provided screws and wall plugs.
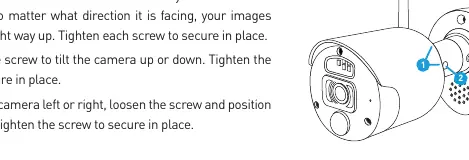
- Positioning: Mark the screw holes using the included mounting template.
- Surface types: For wooden surfaces, screw directly. For masonry (bricks, concrete), use the provided wall plugs.
- Aiming: Loosen the screws to adjust the camera's orientation, tilt, and pan. Tighten the screws securely once the desired angle is achieved.
Camera Location Tips
- Choose a location that provides the best view of the area you want to monitor.
- Mount the camera at an elevated position (approx. 4m/13ft high) looking slightly down.
- Keep the camera close to the area of interest.
- Avoid pointing the camera directly at the sky to prevent dark foregrounds in daylight.
- Run cables inside wall cavities or protected enclosures to shield them from moisture.
- Keep cables away from live electrical wiring to avoid radio noise interference.
Important Safety & Warranty
The camera is weather and water-resistant, but prolonged exposure to extreme conditions may affect performance. Unauthorized modifications will void the warranty. Swann provides a one-year warranty against defects in workmanship and material. For support, visit support.swann.com.
Official resources from the manual
Practical help
Common problems
Camera fails to pair
Repeat the pairing instructions: ensure you press and hold the pair button on the camera for 3 seconds until the IR LEDs flash.
Poor signal or interference
Ensure the antenna is vertical. Keep cables away from live electrical wiring, as AC electricity generates radio noise.
Dark foreground in daylight
Adjust the camera angle to minimize the amount of sky in the field of view.
Before use
- Ensure the camera is fixed correctly and stable.
- Check that wires and terminals are not exposed.
- Verify the mounting surface has sufficient strength.
- Keep cables and connections protected from weather.
- Ensure the antenna is in a vertical position.
Specs in practice
- 1080p Full HD
- High-definition video resolution transmitted wirelessly.
Images and diagrams
- Connecting the Camera: Illustrates the connection path from the power adapter to the power cable and the camera input.
- Mounting the Camera: Shows how to adjust the camera orientation, tilt, and pan using the adjustment screws.
Model compatibility
- Requires a compatible Swann Wi-Fi NVR system.
- Check local laws and regulations regarding camera usage in your jurisdiction.

Manual page author
Michael Turner
Technical manual editor
Reviews PDF manuals for structure, safety notes, and practical product details so readers can find the right information quickly.