Lighting / Stage Lighting
User Manual for Stairville Tri Flat PAR Profile 18x3W RGB LED PAR
Quick guide for the Stairville Tri Flat PAR Profile 18x3W RGB LED PAR. Learn about installation, DMX configuration, remote control operation, and troubleshooting.
Quick answers from the manual
Quick answer
- The Stairville Tri Flat PAR Profile 18x3W is an LED lighting effect for professional use. It can be controlled via DMX (3, 5, or 7 channels), the included infrared remote, or built-in automatic/sound-activated programs. p. 16, 37, 48
Key actions
- Reset to factory defaults p. 39
- Set DMX address p. 37
First start
- Connect to power p. 34
- Remove battery protection p. 21
Problems and fixes
No light
Check mains connection and main fuse.
p. 53Maintenance and reset
- Reset to factory defaults p. 39
Technical specifications
| Parameter | Value | Meaning | Pages |
|---|---|---|---|
| Power consumption | 60 W | Power usage | p. 48 |
| DMX channels | 3, 5, 7 | Available DMX modes | p. 48 |
Where to find it in the PDF
- Safety instructions p. 10, 11, 12, 13
- Installation p. 17, 18, 19, 20
- Operating p. 34, 35, 36, 37
- Technical specifications p. 48, 49, 50
Table of contents
Manual images
Click an image to enlargeQuick Guide
The Stairville Tri Flat PAR Profile 18x3W is a professional LED lighting effect. Before first use, remove the plastic foil from the remote control battery. The device can be operated in stand-alone mode, master/slave configuration, or via DMX controller. Always ensure proper ventilation and do not connect to a dimmer.
Safety Instructions
- Electrical Safety: Ensure input voltage matches the device rating. Use only proper, insulated DMX cables. Never remove covers; there are no user-serviceable parts inside.
- Operational Safety: Do not look directly into the light source. Strobe lighting can trigger seizures in photosensitive individuals.
- Installation Safety: Always secure the device with a secondary safety attachment (safety cable or chain) when hanging. Maintain a distance of at least 1.5m from the illuminated surface.
Installation
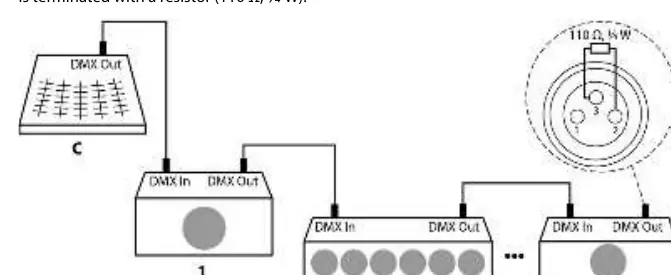
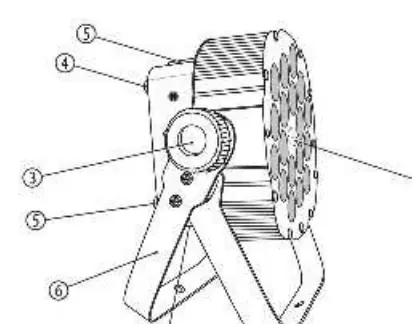
The unit can be installed in hanging or standing positions. Use the two-piece bracket for mounting. Ensure the mounting surface is stable and the stand can support the weight of the device. When using DMX, connect the controller to the first unit and daisy-chain subsequent units, terminating the last device with a 110 Ohm resistor.
Operating
The device features a main menu accessible via the [Mode] button. Use [Setup] to select options and [Up]/[Down] to adjust values. Settings are retained after power-off.

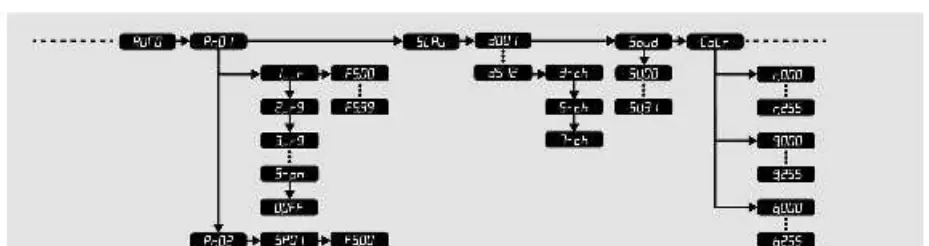
Operating Modes
- Automatic: Preprogrammed shows (Pr.01–Pr.09) with adjustable speed and strobe frequency.
- Sound Control: Sound-activated show with adjustable sensitivity (SV.00–SV.31).
- DMX Mode: Supports 3, 5, or 7-channel modes. Set the DMX address (d.001–d.512) via the menu.
- Constant Colour: Mix individual RGB intensities (0–255) to create custom static colours.
Remote Control
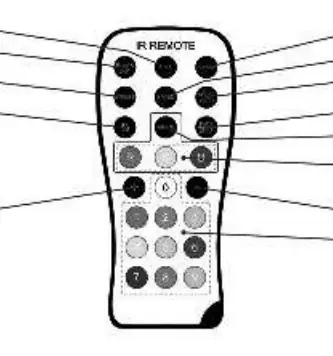
The included IR remote allows for quick access to blackout, auto mode, sound control, strobe effects, and direct colour selection.
Technical Specifications
- Light Source: 18 x 3W RGB LEDs
- DMX Channels: 3, 5, 7
- Power Consumption: 60 W
- Supply Voltage: 100–240 V, 50/60 Hz
- Dimensions: 210 mm x 270 mm x 135 mm (without bracket)
- Weight: 2.9 kg
Troubleshooting
If the unit does not work, check the mains connection and the main fuse. If there is no DMX response, verify that the controller is on, cables are connected properly, and the DMX address is set correctly. If the remote is unresponsive, check the battery and ensure a clear line of sight to the infrared receiver.
Cleaning
Regularly clean the optical lenses with a soft cloth and lens cleaner. Clean fan grids of dust to prevent overheating. Always switch off and disconnect the device before cleaning.
Practical help
Common problems
Unit does not work, no light
Check the mains connection and the main fuse.
No response to DMX controller
Ensure DMX controller is on, check DMX cables/connectors, verify address settings and DMX polarity.
No response to remote control
Check remote battery, move closer to the unit, or try a different angle to the infrared receiver.
Before use
- Check for transportation damage
- Ensure input voltage matches device rating
- Use dedicated DMX cables (not microphone cables)
- Remove plastic foil from remote control battery
Specs in practice
- Light source
- 18 x 3W RGB LEDs
- DMX channels
- 3, 5, or 7 channels
- Power consumption
- 60 W
- Degree of protection
- IP20 (indoor use only)
Images and diagrams
- The DMX daisy chain diagram shows how to connect the controller to the first unit and subsequent units, ending with a 110 Ohm terminator.
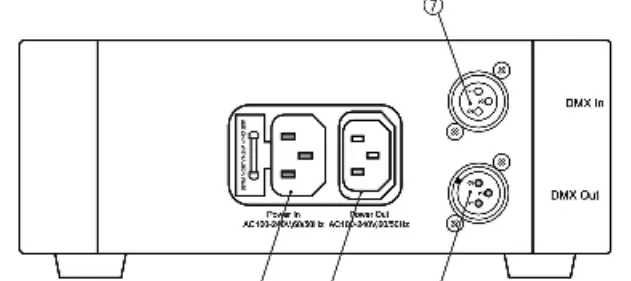
- The connection panel shows DMX In/Out and Power In/Out ports.
- The remote control diagram identifies buttons for blackout, auto mode, sound control, and color selection.
Model compatibility
- Not suitable for household use.
- Must not be connected to a dimmer.
- Indoor use only.

Manual page author
David Miller
Documentation analyst
Organizes user manual content into clear summaries, with attention to model details, product context, and everyday usability.