Electronics / Cables & Adapters
User Manual for StarTech 1USB4-NVME-ENCLOSURE M.2 NVMe SSD Enclosure
Quick start guide for the StarTech 1USB4-NVME-ENCLOSURE. Learn how to install your M.2 NVMe SSD, connect the device to your computer, and optimize performance settings in Windows.
Quick answers from the manual
Quick answer
- To install the drive, unscrew the enclosure cover, remove the rubber standoff, insert the M.2 drive, secure it with the standoff, and re-attach the cover. Connect to your PC via the included USB-C cable. p. 1, 2
Key actions
- Install M.2 NVMe Drive p. 2
- Enable Write Cache (Windows) p. 2
First start
- Connect the enclosure to a USB-C port on your host computer. p. 2
Problems and fixes
Drive overheating
Allow the drive to cool down before removing or handling.
p. 2Technical specifications
| Parameter | Value | Meaning | Pages |
|---|---|---|---|
| Interface | USB4 | 40Gbps data transfer speed | p. 1 |
| Drive Lengths | 2230/2242/2260/2280 | Supported M.2 drive form factors | p. 1 |
Where to find it in the PDF
- Components and Requirements p. 1
- Installation and Operation p. 2
Table of contents
Manual images
Click an image to enlargeQuick Start Guide
This guide provides instructions for the StarTech 1USB4-NVME-ENCLOSURE. This device is an M.2 NVMe SSD enclosure supporting USB4 (40Gbps) speeds. It is designed to house M-key M.2 NVMe SSDs of various lengths (2230, 2242, 2260, 2280).
Package Contents
- 1 x M.2 NVMe Enclosure
- 1 x Thermal Pad (Pre-installed)
- 1 x USB-C Cable
- 1 x Philips Head Screwdriver
- 1 x Quick-Start Guide
Installation
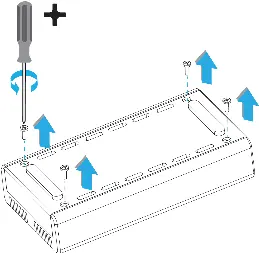
- Open the Enclosure: Loosen and remove all four Enclosure Cover Screws using the included Philips Head Screwdriver. Lift the Enclosure Cover to separate the Drive Tray. Warning: The Thermal Pad under the Enclosure Cover has a pink top layer that is not removable. Do not peel off or remove this layer.
- Install the Drive: Remove the M.2 Rubber Standoff from the Drive Tray. Gently insert your M.2 NVMe Drive into the M.2 NVMe Drive Slot.
- Secure the Drive: Use the M.2 Rubber Standoff to secure the M.2 NVMe Drive into the corresponding mounting hole on the Drive Tray.
- Close the Enclosure: Re-attach the Enclosure Cover to the Drive Tray and tighten all four screws using the Philips Head Screwdriver.
Operation
Connect the included USB-C Cable from the USB-C Port on the front of the enclosure to a USB-C Port on your Host Computer. The computer will automatically detect and install the required drivers.
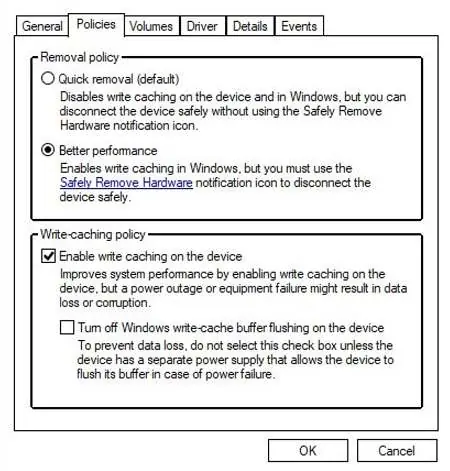
Optimizing Performance in Windows
For best performance, enable Write Cache settings:
- Right-click the Windows Start Icon and select Disk Management.
- Right-click the drive associated with the M.2 Enclosure and select Properties.
- Click the Policies tab.
- Select Better Performance under Removal Policy.
- Check Enable Write Caching on the Device under Write-caching policy, then click OK.
Important Warnings
- Heat: M.2 Drives can become hot during prolonged data transfer sessions. Avoid touching the drive immediately after use to prevent burns or damage. Allow the drive to cool down before removing or handling.
- Thermal Pad: Do not remove the pink top layer of the pre-installed thermal pad.
Practical help
Common problems
Drive gets hot during use
Avoid touching the drive immediately after use. Allow the drive to cool down before removing or handling it.
Drive not detected
Ensure the USB-C cable is securely connected to both the enclosure and the host computer. Verify the drive is properly seated in the M.2 slot.
Before use
- Ensure you have a compatible M.2 NVMe SSD (M-key).
- Verify you have the included Philips Head Screwdriver.
- Do not remove the pink layer on the thermal pad.
- Ensure your computer has a USB-C port.
Specs in practice
- Drive Support
- Supports M-key M.2 NVMe SSDs in lengths 2230, 2242, 2260, and 2280.
Images and diagrams
- The enclosure features a heatsink-style design for heat dissipation.
- The Drive LED indicates status: Solid for detected, Quick-Flashing for Read/Write activity.
- Silicone foot pads provide grip and protect desk surfaces.
Model compatibility
- Supports M-key M.2 NVMe SSDs only.
- Compatible with 2230, 2242, 2260, and 2280 drive lengths.

Manual page author
David Miller
Documentation analyst
Organizes user manual content into clear summaries, with attention to model details, product context, and everyday usability.