Accessories / Mounts & Stands
StarTech 1B-WALL-MOUNT-SHELF / 2B-WALL-MOUNT-SHELF Wall-Mount Floating Shelf User Guide
Quick guide for installing and using the StarTech wall-mount floating shelf. Includes assembly steps, wall mounting instructions for wood and concrete, and weight capacity limits.
Quick answers from the manual
Quick answer
- The StarTech wall-mount floating shelf supports up to 7kg (15.4lb) of equipment and is designed for installation on wooden studs, solid concrete, or cinder block walls. p. 2
Key actions
- Assemble the shelf by attaching side covers and brackets. p. 2
- Mount the wall bracket using appropriate hardware for your wall type. p. 2, 3
First start
- Ensure the wall is capable of supporting at least four times the weight of the equipment before installation. p. 2
Technical specifications
| Parameter | Value | Meaning | Pages |
|---|---|---|---|
| Weight Capacity | 7kg (15.4lb) | Maximum load per shelf | p. 2 |
Where to find it in the PDF
- Package Contents and Warnings p. 1
- Assembly and Wood Wall Mounting p. 2
- Concrete Wall Mounting and Shelf Mounting p. 3
Table of contents
Manual images
Click an image to enlargeQuick guide from the manual
The StarTech wall-mount floating shelf is designed for A/V accessories. It supports a maximum weight of 7kg (15.4lb) per unit. The shelf must be installed on wooden studs, solid concrete, or cinder block walls. Ensure the wall structure is capable of supporting at least four times the weight of the mounted equipment.
Assembly
Before mounting to the wall, assemble the shelf components:
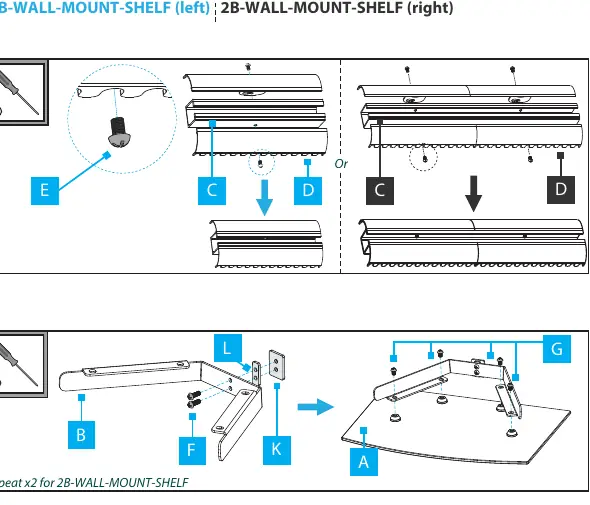
- Attach the side covers to the wall bracket using the provided screws.
- Assemble the support brackets and mounting plates to the glass shelf.
- Ensure all screws are tightened securely.
Wall Mounting
The installation process differs based on the wall type:
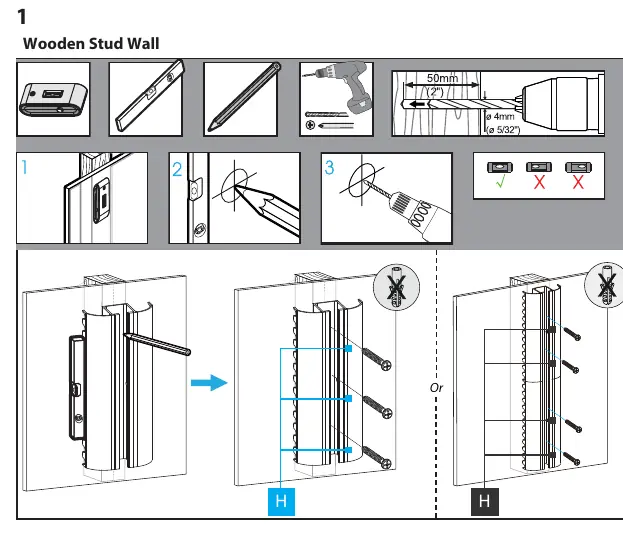
Wooden Stud Wall
- Use an electronic stud finder to locate the studs.
- Mark the mounting holes using a pencil and level.
- Drill pilot holes using a 5/32in (4mm) drill bit.
- Secure the wall bracket to the studs using the provided wall mounting screws.
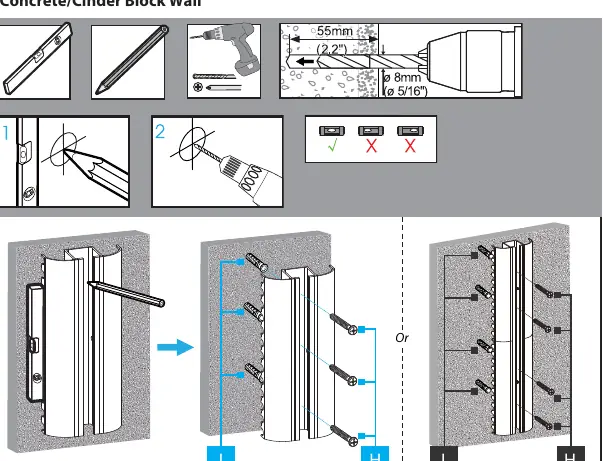
Concrete/Cinder Block Wall
- Mark the mounting holes using a pencil and level.
- Drill holes using an 8mm (5/16in) drill bit.
- Insert wall anchors into the holes.
- Secure the wall bracket to the wall using the provided wall mounting screws.
Shelf Mounting
Once the wall bracket is securely mounted:
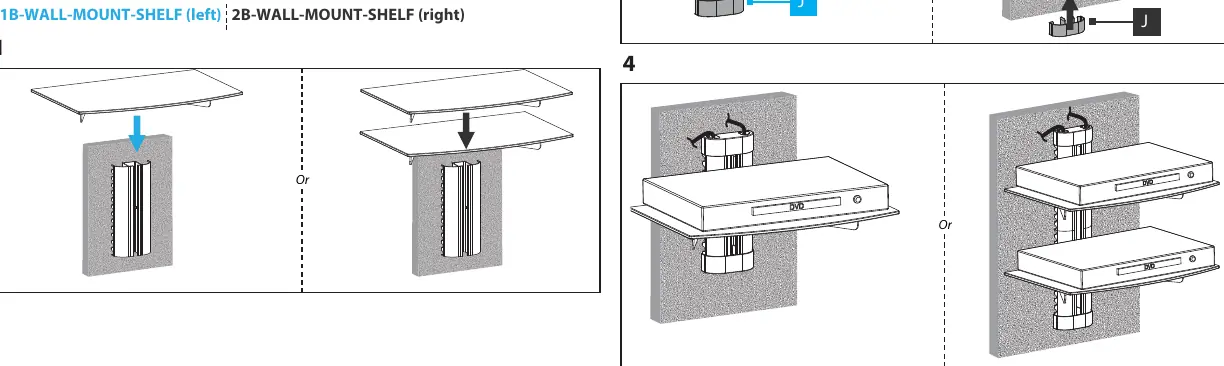
- Slide the assembled glass shelf onto the wall bracket.
- Adjust the height as needed along the wall bracket.
- Attach the end caps to the top and bottom of the side covers.
- Small tabs on the end caps can be broken off to allow for cable pass-through.
Safety and Maintenance
- Never operate the product if parts are missing or damaged.
- Do not exceed the weight capacity of 7kg (15.4lb).
- If you lack the expertise to wall mount this product, contact a construction professional.
- The mounting hardware included may not be adequate for all wall structures.
Practical help
Common problems
Shelf sagging or unstable
Ensure the wall structure can support at least four times the weight of the equipment. Verify that all screws are tightened properly.
Cannot find studs
Use an electronic stud finder to locate wooden studs before drilling.
Before use
- Verify wall type (wooden stud, solid concrete, or cinder block)
- Check weight of equipment (max 7kg)
- Gather tools: Phillips screwdriver, drill, level, pencil
- Ensure all parts from package contents are present
Specs in practice
- Weight Capacity
- Maximum 7kg (15.4lb) per shelf unit.
- Wall Compatibility
- Wooden studs, solid concrete, or cinder block walls only.
Images and diagrams
- Assembly: Shows how to attach side covers and brackets to the glass shelf.
- Wall Mounting: Illustrates drilling holes and securing the wall bracket to the wall.
Model compatibility
- Not suitable for drywall-only installations without studs.
- Ensure wall structure supports at least 4x the weight of the equipment.

Manual page author
Michael Turner
Technical manual editor
Reviews PDF manuals for structure, safety notes, and practical product details so readers can find the right information quickly.