Computers / PC Components
User Guide for StarTech 20/55-bit Precision Electric Screwdriver
Quick-start guide for the StarTech 20/55-bit Precision Electric Screwdriver. Learn how to operate the device, change bits, use the demagnetizer, and replace batteries.
Quick answers from the manual
Quick answer
- The StarTech Precision Electric Screwdriver is a battery-operated tool for small screws. Insert 2 AAA batteries, select a bit, and use the Forward/Reverse buttons to operate. p. 1, 2
Key actions
- Insert bit p. 2
- Replace batteries p. 2
First start
- Install 2 AAA batteries, select the appropriate bit, and press the Forward or Reverse button. p. 1, 2
Problems and fixes
Bit not holding screws
Move the bit around the inside of the square portion of the Demagnetizing Tool.
p. 1Maintenance and reset
- Use the Demagnetizing Tool to magnetize or demagnetize bits. p. 1
Technical specifications
| Parameter | Value | Meaning | Pages |
|---|---|---|---|
| Torque | 0.25-0.35 N.m | Output torque | p. 2 |
| Power | 3V DC | Battery requirement | p. 1, 2 |
Where to find it in the PDF
- Product Diagram and Contents p. 1
- Operation and Requirements p. 2
Table of contents
Quick guide from the manual
This guide covers the operation and maintenance of the StarTech Precision Electric Screwdriver. The device is designed for precision tasks and requires 2 AAA batteries for operation. Ensure you select the correct bit for your screw type before beginning work.
Package Contents
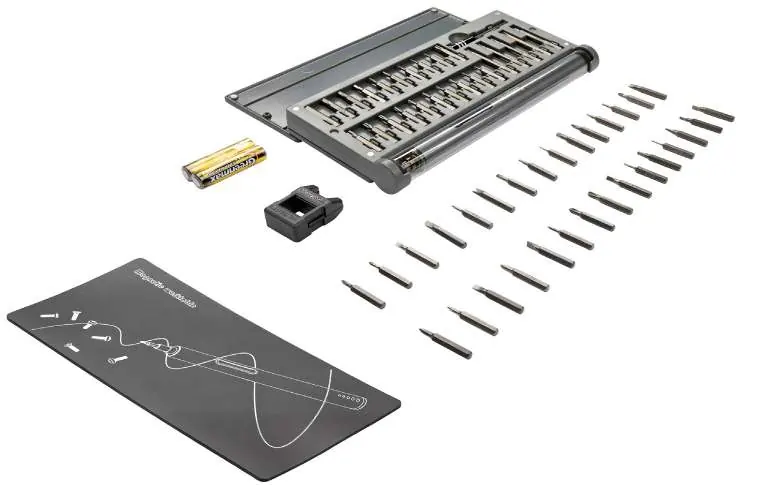
The package includes the precision screwdriver, a bit set (20 or 55 pieces depending on the model), a demagnetizer, and 2 AAA batteries. The CTK55PCEDRIVE model also includes a magnetic work pad, a bit extender, and a storage tube.
Operation
To operate the screwdriver:
- Insert the desired bit into the end of the electric screwdriver.
- Press the Forward button to drive screws.
- Press the Reverse button to remove screws.
- The device provides a torque output of 0.25-0.35 N.m.
Bit Management
The included Demagnetizing Tool allows you to manage the magnetic properties of your bits:
- Magnetize Bits: Move the bit around the inside of the square portion of the Demagnetizing Tool.
- Demagnetize Bits: Move the bit around the inside of the U-shaped portion of the Demagnetizing Tool.
Battery Replacement
To replace the batteries:
- Locate the end cap on the screwdriver.
- Remove the end cap.
- Insert or replace the 2 AAA batteries.
- Secure the end cap back onto the device.
Safety Measures
If the product has an exposed circuit board, do not touch the product while it is under power.
Practical help
Common problems
Bit does not hold screws
Use the Demagnetizing Tool to magnetize the bit by moving it around the square portion.
Screwdriver does not operate
Check that the 2 AAA batteries are installed correctly and have sufficient charge.
Before use
- Ensure 2 AAA batteries are installed.
- Select the appropriate bit for the screw type.
- Insert the bit into the screwdriver head.
- Verify the direction (Forward/Reverse) before starting.
Specs in practice
- Torque Output
- 0.25-0.35 N.m, suitable for precision tasks.
- Power Source
- 3V DC using 2 AAA batteries.
Images and diagrams
- The diagram identifies the screwdriver, bit extender, storage tube, and demagnetizing tool.
- Ports 1-11 identify the case, batteries, demagnetizing tool, bit set, magnetic work pad, bit extender, storage tube, screwdriver, forward button, reverse button, and end cap.
Model compatibility
- CTK55PCEDRIVE includes a magnetic work pad, bit extender, and storage tube.
- CTK20PCEDRIVE features a soft-shell case.

Manual page author
Michael Turner
Technical manual editor
Reviews PDF manuals for structure, safety notes, and practical product details so readers can find the right information quickly.