Lighting / Fixtures
Sunco Lighting Disk 15W LED Downlight User Manual
Quick guide for installing the Sunco Lighting Disk 15W LED Downlight. Includes instructions for surface mount and retrofit installation, wiring diagrams, and technical specifications.
Table of contents
Manual images
Click an image to enlargeQuick guide from the manual
The Sunco Lighting Disk 15W LED Downlight is designed for two types of installation: Surface Mount (Junction Box) and Retrofit (Recessed Can). Before starting any installation, ensure the circuit breaker providing power to the light switch is turned off. If you are unfamiliar with electrical wiring, consult a qualified electrician.
Components
- TP24 Connector
- Clips
- Wire Nuts
- Screws
Surface Mount Installation
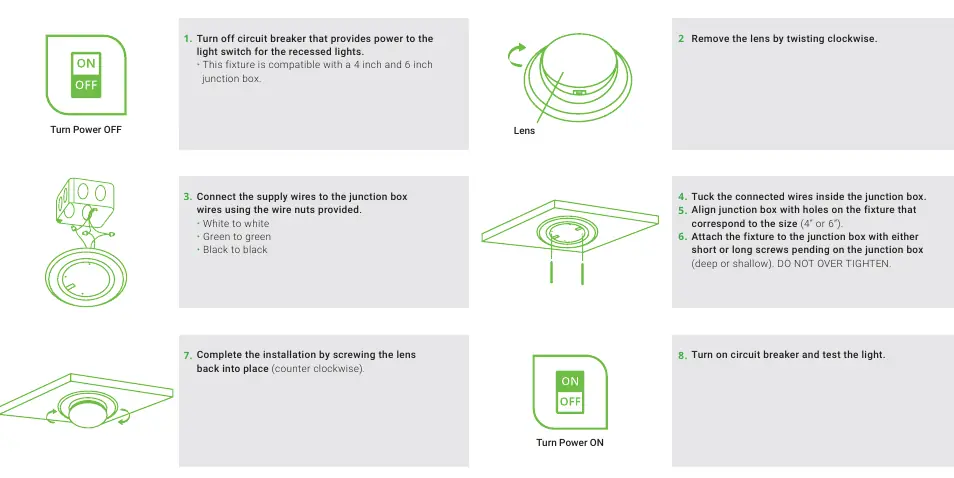
- Turn off the circuit breaker.
- Remove the lens by twisting it clockwise.
- Connect the supply wires to the junction box wires using the provided wire nuts (White to white, Green to green, Black to black).
- Tuck the connected wires inside the junction box.
- Align the junction box with the holes on the fixture corresponding to the size (4 inch or 6 inch).
- Attach the fixture to the junction box using either short or long screws, depending on the junction box depth. Do not over-tighten.
- Complete the installation by screwing the lens back into place (counter-clockwise).
- Turn on the circuit breaker and test the light.
Retrofit Installation
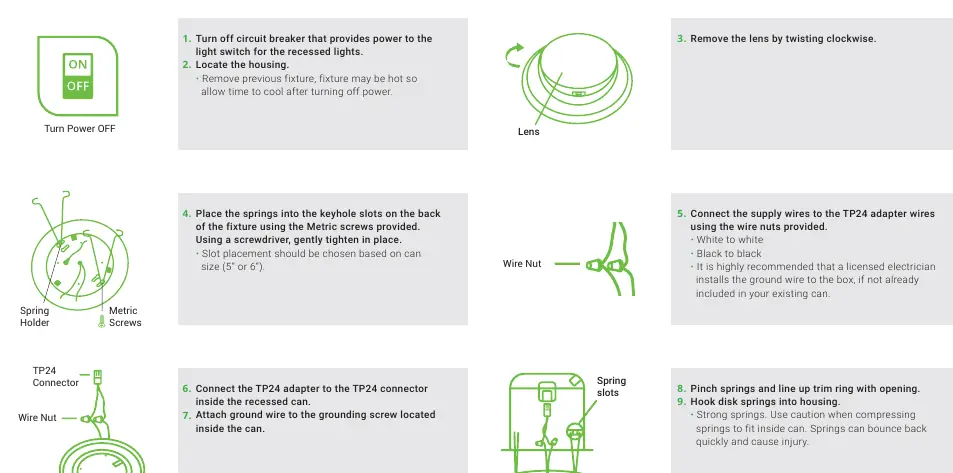
- Turn off the circuit breaker.
- Locate the housing and remove the previous fixture. Allow time for the fixture to cool if it was recently on.
- Remove the lens by twisting clockwise.
- Place the springs into the keyhole slots on the back of the fixture using the provided Metric screws. Tighten gently. Slot placement should be chosen based on the can size (5 inch or 6 inch).
- Connect the supply wires to the TP24 adapter wires using the provided wire nuts (White to white, Black to black).
- Connect the TP24 adapter to the TP24 connector inside the recessed can.
- Attach the ground wire to the grounding screw located inside the can.
- Pinch the springs and line up the trim ring with the opening. Hook the disk springs into the housing. Use caution as springs can bounce back quickly.
- Push the disk into the recessed can until secure.
- Complete the installation by screwing the lens back into place (counter-clockwise).
- Turn on the circuit breaker and test the light.
Safety Warnings
Risk of fire or electric shock. Do not alter, relocate, or remove wiring during installation. Do not make or alter any open holes in an enclosure of wiring or electrical components during kit installation. All electrical connections must be in accordance with local and National Electric Code (N.E.C.) standards.
Specifications
- Voltage: 120V
- Wattage: 15W
- Suitable for Locations: Damp
- Housing: Polycarbonate
- Weight: 0.39lbs
- Warranty: 7 years
Practical help
Common problems
Fixture does not fit the junction box or can
Ensure you are using the correct slot placement for the size (4"/6" for junction box, 5"/6" for retrofit can).
Springs are difficult to handle
Use caution when compressing springs to fit inside the can; they can bounce back quickly and cause injury.
Wiring uncertainty
Consult a licensed electrician if you are unfamiliar with proper electrical wiring connections or if the ground wire is not already included in your existing can.
Before use
- Turn off the circuit breaker power.
- Verify the size of your junction box (4" or 6") or recessed can (5" or 6").
- Ensure all components (TP24 connector, clips, wire nuts, screws) are present.
- Allow existing fixtures to cool before removal.
Specs in practice
- Suitable for Locations
- Rated for Damp locations.
Images and diagrams
- Surface Mount: Illustrates wiring connections and screw attachment points for junction boxes.
- Retrofit: Illustrates spring attachment to the fixture and TP24 adapter connection.
Model compatibility
- Compatible with 4 inch and 6 inch junction boxes.
- Compatible with 5 inch and 6 inch recessed cans.

Manual page author
Michael Turner
Technical manual editor
Reviews PDF manuals for structure, safety notes, and practical product details so readers can find the right information quickly.