Automotive / Motorcycle Accessories
Installation Manual for SW-MOTECH Kobra Handguard Kit
Quick installation guide for the SW-MOTECH Kobra Handguard Kit. Includes step-by-step mounting instructions, parts list, torque specifications, and safety warnings for proper motorcycle handlebar protection installation.
Table of contents
Manual images
Click an image to enlargeQuick guide from the manual
This document provides installation instructions for the SW-MOTECH Kobra Handguard Kit. Before beginning, ensure the motorcycle is in its original state and that you have medium-strength thread locker available. After installation, it is critical to verify that all handlebar controls (throttle, brake, clutch, kill switch) operate freely and are not obstructed by the handguards. Re-check all screw connections after the first 50 km of riding.
Safety and general information
- Installation requires good technical understanding; if unsure, have the kit installed by a specialist workshop.
- Do not ride the motorcycle if controls are obstructed or if the handguards interfere with operation.
- Use medium-strength thread locker on all screws during assembly.
- Ensure cables and hoses are not pinched or stretched.
- If necessary, adjust the brake hose or handlebar position to maintain clearance.
Parts list
The kit includes the following main components:
- Handlebar clamp pair (CS-STD)
- Connectors (left and right)
- Backbones (left and right)
- Threaded adapters
- Various screws (M6, M8) and nuts
- Handlebar end weights
Installation instructions
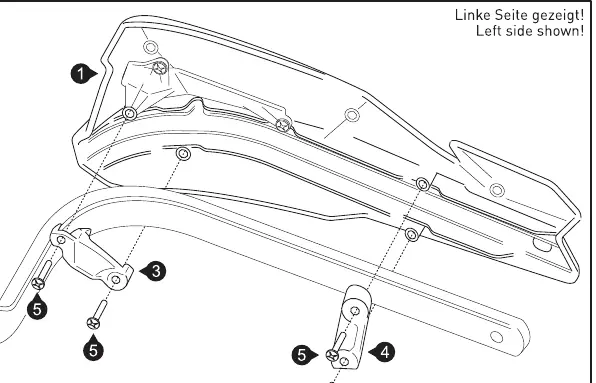
Step 1: Preparation
Remove the existing handlebar end weights. Loosen the marked screws of the speedometer unit and push it upwards slightly to create enough room for the mounting process.
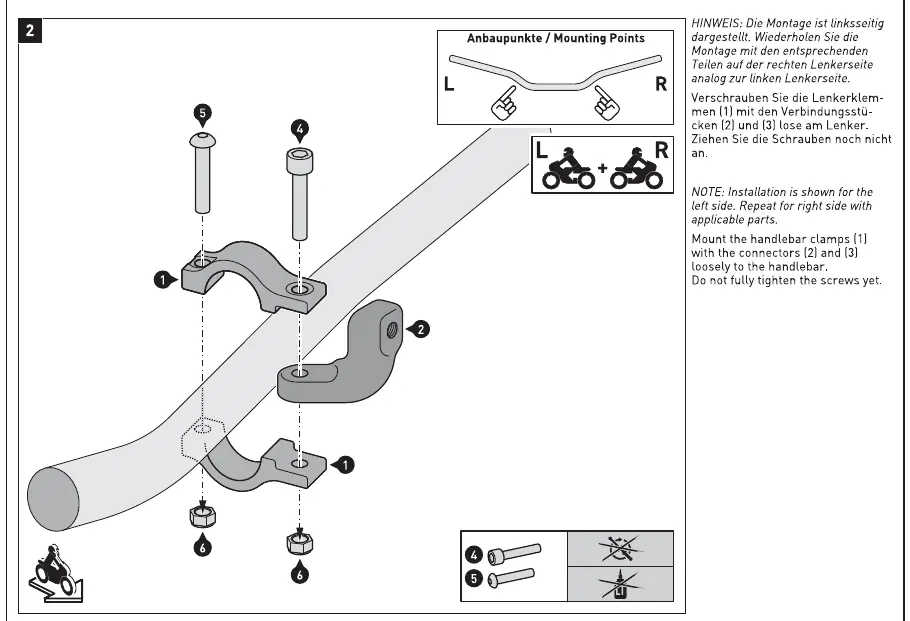
Step 2: Mounting clamps
Mount the handlebar clamps (1) with the connectors (2) and (3) to the handlebar. Do not fully tighten the screws yet. Ensure the installation is performed on the correct side (L/R).
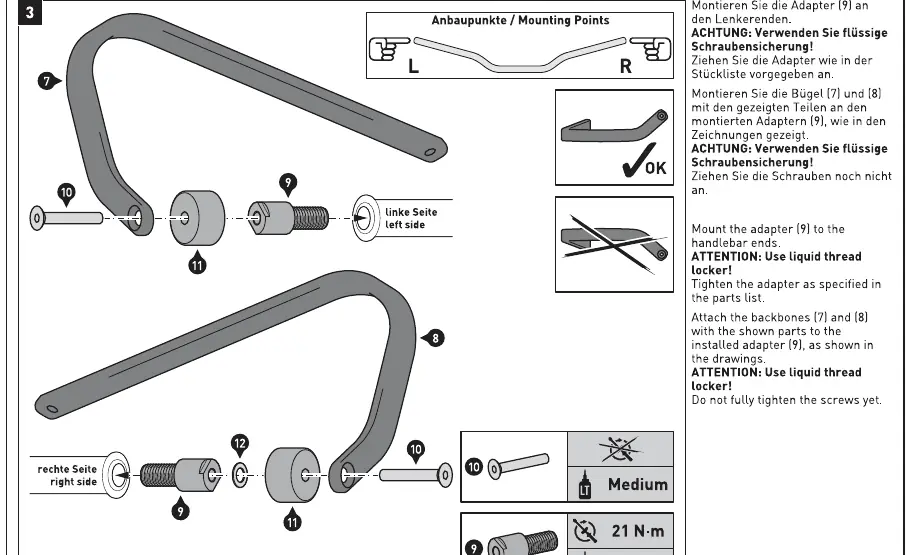
Step 3: Adapters and backbones
Mount the adapters (9) to the handlebar ends using the provided screws. Attach the backbones (7) and (8) to the installed adapters and connectors. Apply medium-strength thread locker to all screws. Do not fully tighten the screws yet.
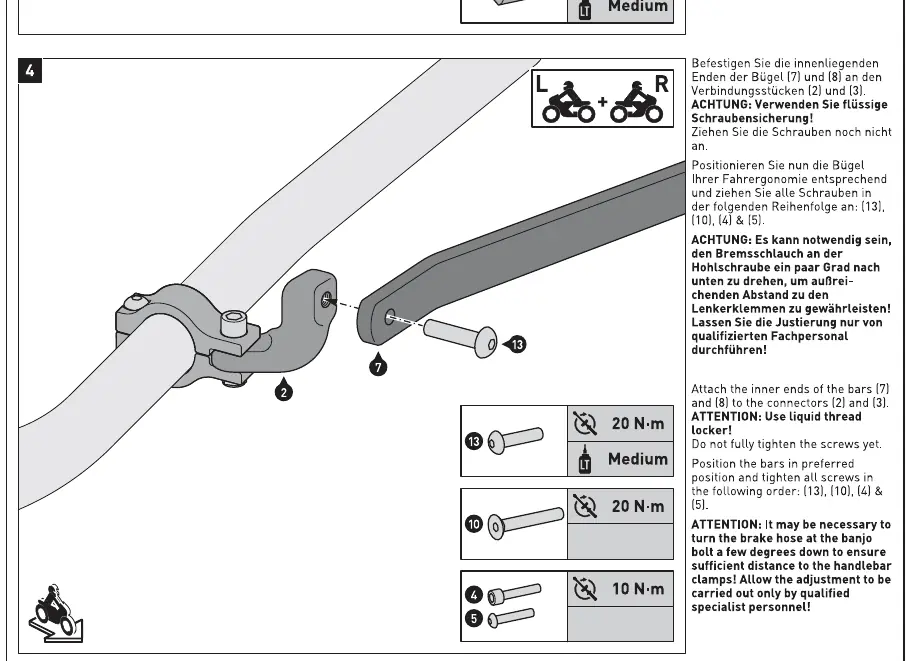
Step 4: Final positioning
Position the backbones in your preferred ergonomic position. Tighten all screws in the following order: (13), (10), (4), and (5). Ensure the brake hose does not rub or get pinched. If necessary, turn the banjo bolt a few degrees to ensure sufficient distance.
Installing handguard shells
Attach the handguard shells (1) and (2) to the backbones. Tighten the screws carefully by hand (max. 2 Nm) to avoid damaging the threads.
Torque specifications
Refer to the torque table provided in the manual for specific bolt sizes. Use the following general guidelines:
- 8.8 Steel bolts: Follow the torque values listed for M4, M5, M6, M8, M10, M12.
- 10.9 Steel bolts: Follow the higher torque values listed for M4, M5, M6, M8, M10, M12.
- Handguard shell screws: Maximum 2 Nm.
Manufacturer information
SW-MOTECH GmbH & Co. KG
Practical help
Common problems
Controls obstructed
Ensure the throttle, brake, clutch, and kill switch operate freely. Adjust the handlebar position or brake hose angle if necessary.
Screws loosening
Always use medium-strength thread locker on all screws during assembly.
Brake hose interference
It may be necessary to turn the banjo bolt a few degrees to ensure sufficient distance from the handguard components.
Before use
- Verify all parts are present according to the parts list.
- Ensure the motorcycle is in its original state.
- Have medium-strength thread locker ready.
- Ensure you have the correct tools for M4-M12 bolts.
- Check that the speedometer unit has been moved if required for clearance.
Specs in practice
- Medium Thread Locker
- Required for all screws to prevent loosening due to motorcycle vibrations.
Images and diagrams
- Step 1: Removing handlebar end weights and adjusting speedometer.
- Step 2: Mounting clamps to the handlebar.
- Step 3: Attaching adapters and backbones.
- Step 4: Final positioning and tightening sequence.
- Shell Installation: Attaching plastic shells to the backbones.
Model compatibility
- Designed for specific motorcycle models; check the application list on the SW-MOTECH website for your specific bike.

Manual page author
Emily Carter
User documentation editor
Prepares concise manual descriptions and highlights the most useful setup, operation, and maintenance information for readers.