Toys / RC Models & Drones
E-flite Timber 1.5m 10-Year Anniversary Edition User Manual
Comprehensive user manual for the E-flite Timber 1.5m 10-Year Anniversary Edition RC airplane. This guide covers assembly, transmitter setup, flight tips, maintenance, and troubleshooting.
Table of contents
Manual images
Click an image to enlargeQuick Guide from the Manual
The E-flite Timber 1.5m 10-Year Anniversary Edition is a high-performance RC aircraft. Before your first flight, ensure you have a compatible 6+ channel transmitter with Spektrum DSM2/DSMX technology and a 4S 3200mAh 30C LiPo battery. Always perform a range check and verify control surface directions before flying.
Model Assembly
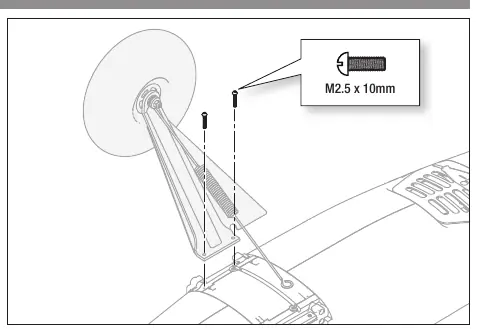
Landing Gear Installation: Insert the landing gear assembly into the fuselage pocket and secure it using the provided M2.5 x 10mm machine screws. Attach the spring assemblies to the plastic bracket in the fuselage using M3 x 16mm self-tapping screws and brass stepped washers.
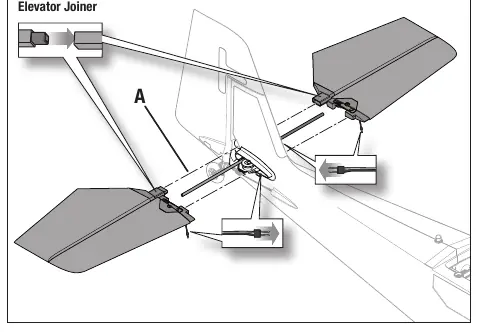
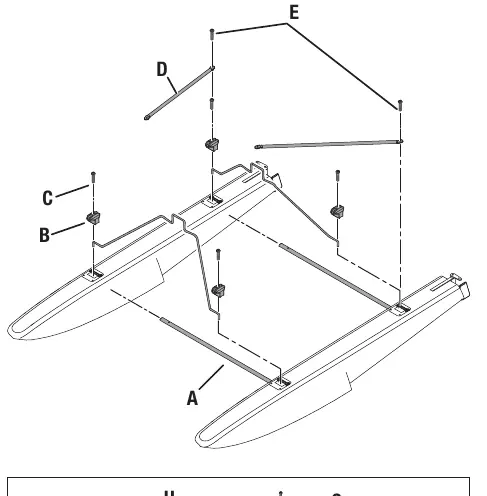
Horizontal Stabilizer: Slide the joiner (A) into the fuselage. Install the stabilizer halves, ensuring the control horn faces down, and secure with 2.5 x 12mm self-tapping screws.
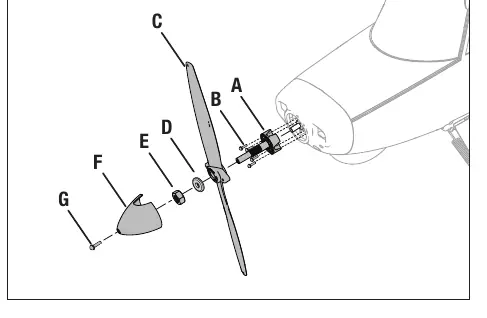
Propeller Installation: Slide the adapter onto the motor shaft and secure with M2.5 x 8mm screws. Install the propeller, washer, and nut, then secure the spinner with the M3 x 8mm screw.
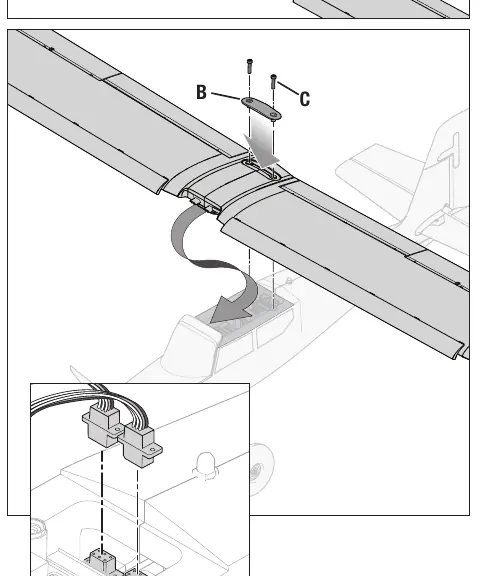
Wing Assembly: Insert the wing joiner tube into the left wing, slide the halves together, and secure the wing to the fuselage using M6 x 30mm nylon bolts.
Transmitter Setup
The receiver includes a pre-loaded Smart Transmitter File (STF) for quick setup on compatible Spektrum transmitters (NX, iX series). For manual setup, ensure the wing type is set to 1 Ail 1 Flap and the tail type to Normal. Configure Dual Rates and Expo as specified in the manual for Aileron, Elevator, and Rudder.
SAFE Select Technology
SAFE Select provides flight protection with bank angle limits and self-leveling. It is enabled or disabled during the binding process. You can assign a switch to toggle between SAFE Select and AS3X+ modes.
Battery and ESC
Install the battery in the center of the compartment to achieve the recommended Center of Gravity (CG) of 60mm ± 6mm from the leading edge. Always power on the transmitter first, then connect the battery to the ESC. The ESC will initialize with a series of tones.
Flying Tips
Always take off and land into the wind. Use partial flaps for takeoff and full flaps for landing to shorten distances. If the motor power decreases, land immediately as this indicates the Low Voltage Cutoff (LVC) has been triggered.
Maintenance and Repairs
The aircraft is constructed from EPO foam, which can be repaired using standard adhesives like CA or epoxy. After flying, disconnect the battery, power off the transmitter, and store the battery at storage voltage.
Practical help
Common problems
Oscillation during flight
Check for imbalanced propeller, loose receiver, or worn parts. Ensure all fasteners are tight.
Aircraft will not bind to transmitter
Move transmitter further away from the aircraft, check that the bind plug is correctly installed, and ensure the battery is fully charged.
Motor power pulses or loses power
Low Voltage Cutoff (LVC) has been triggered. Land immediately and recharge or replace the flight battery.
Controls reversed
Perform the Control Direction Test and reverse the channel settings on your transmitter.
Before use
- Charge flight battery fully.
- Perform a radio system range check.
- Verify control surface directions.
- Ensure receiver is securely mounted.
- Set transmitter flight timer to 5 minutes.
- Check that all screws and linkages are tight.
Images and diagrams
- Landing gear installation showing screw locations.
- Stabilizer and wing assembly diagrams.
- Receiver port assignments for AR631+.
- Control surface direction test movements.
Model compatibility
- Requires 6+ channel transmitter with Spektrum DSM2/DSMX technology.
- Recommended battery: 4S 3200mAh 30C LiPo with IC3 connector.
- Optional parts available for floats, skis, and slats.

Manual page author
David Miller
Documentation analyst
Organizes user manual content into clear summaries, with attention to model details, product context, and everyday usability.