Automotive / Garage Equipment
User Manual for Tradequip 1217T Infrared Thermometer
Quick guide for the Tradequip 1217T Infrared Thermometer. Learn how to install the battery, operate the device, adjust settings, and understand the distance-to-spot ratio for accurate temperature measurements.
Table of contents
Manual images
Click an image to enlargeQuick Guide
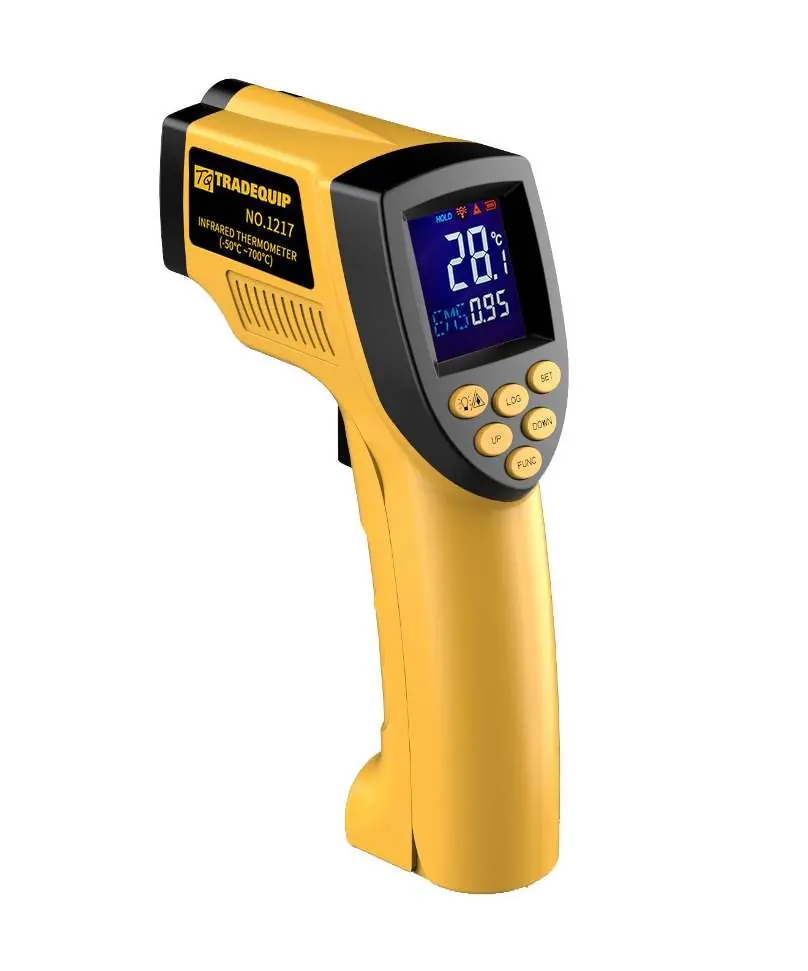
The Tradequip 1217T is an infrared thermometer designed for industrial and automotive use. It measures surface temperature without contact. Key specifications include a temperature range of -50°C to 700°C and a 12:1 distance-to-spot ratio. Always allow the unit to stabilize for 30 minutes before use if moving between environments with large temperature differences.
Safety Instructions
Warning: This device is for industrial and automotive application only. It is not suitable for human or animal use.
- Protect the unit from electromagnetic fields (EMF) from arc welders or induction heaters.
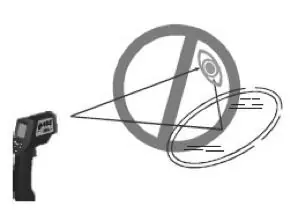
- Do not look directly into the laser beam or direct it at other people's eyes.
- Avoid directing the laser at reflective surfaces.
- Do not use optical instruments (e.g., telescopes, binoculars, magnifiers) to view the laser output as this may pose an eye hazard.
- Remove batteries before storing the device.
- Do not attempt to disassemble or repair the unit; it contains no serviceable parts.
Assembly and Setup
Unpacking: Inspect the unit for damage upon removal from packaging. Dispose of packaging materials safely away from children.
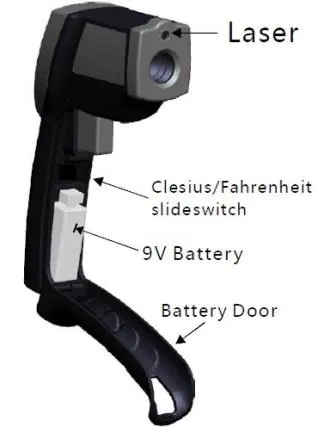
Battery Installation: Press the battery door clip, pull down and forward to open the door, and install a 9V battery.
Celsius/Fahrenheit Selection: Open the battery door and use the slide switch to select between Celsius and Fahrenheit.
Operation
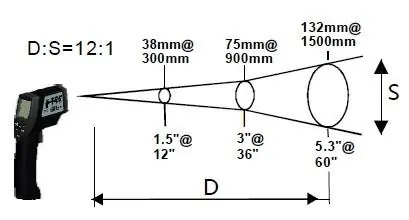
Distance to Spot Ratio: The unit has a 12:1 ratio. As the distance (D) from the target increases, the measured area (S) becomes larger. For critical accuracy, ensure the target is at least twice as large as the spot size.
Emissivity: The unit is pre-set to 0.95 emissivity, suitable for most organic materials and painted surfaces. For shiny or polished metal surfaces, cover the target with masking tape or flat black paint to ensure accurate readings.
Measuring: Pull the trigger to turn on the unit. Aim at the target surface and pull the trigger to display the temperature on the LCD.
Locating a Hot Spot: Aim the thermometer outside the area of interest, then scan across with an up and down motion until the hot or cold spot is located.
LCD Display and Controls
The device features several control buttons:
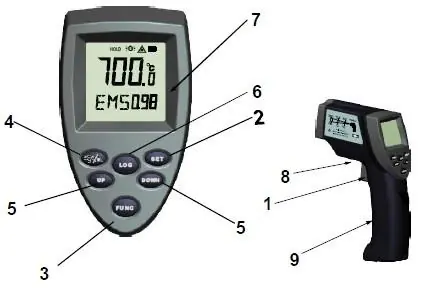
- Trigger: Turns on the unit and displays the reading.
- Set: Turns on the backlight.
- Function: Accesses MAX, MIN, DIF, AVG, HAL (high alarm), LAL (low alarm), STO (data storage), and EMS (emissivity) settings.
- Alarm: Confirms temperature settings and saves emissivity.
- Up/Down: Adjusts temperature alarm settings.
- Log: Stores temperatures to 100 memory groups.
Maintenance and Storage
- Store in a dry location on a level surface between -20°C and 50°C.
- Always switch off and remove batteries before storage.
- Clean with a soft cloth slightly dampened with a water solution. Do not use harsh chemicals or solvents.
- Keep the laser pointer aperture clean using a soft lint-free cloth.
- Do not dry the thermometer using fire or an electric dryer.
Warranty
Tradequip products are guaranteed against defective materials and workmanship for 12 months from the date of purchase (90 days if hired out). For warranty claims, return the complete tool to your nearest authorized warranty repair agent or contact the TQB Brands Pty Ltd Warranty team at [email protected].
Manufacturer information
TradeQuip
Practical help
Common problems
Inaccurate readings on shiny or polished metal surfaces
Cover the target surface with masking tape or flat black paint and measure the tape/paint once it reaches the same temperature as the material underneath.
Unit not turning on or displaying correctly
Check the 9V battery installation and ensure the battery is charged.
Laser safety concerns
Do not stare into the beam, direct it at reflective surfaces, or use optical instruments like magnifiers to view the laser output.
Before use
- Inspect the unit for cracked joins or damaged parts.
- Ensure the 9V battery is installed correctly.
- Allow 30 minutes for the unit to stabilize if there has been a large ambient temperature change.
- Verify the target surface is larger than the spot ratio (12:1).
- Ensure the device is set to the correct temperature scale (Celsius/Fahrenheit).
Specs in practice
- Temperature Range
- -50°C to 700°C
- Distance to Spot Ratio
- 12:1; the measured area size increases as the distance from the target increases.
Images and diagrams
- The Distance to Spot ratio diagram illustrates how the target area size increases as the distance from the thermometer increases.
- The control panel diagram identifies the location of the Trigger, Set, Function, Up/Down, and Log buttons.
Model compatibility
- For Industrial and Automotive application only.
- Not suitable for Human or Animal use.

Manual page author
Emily Carter
User documentation editor
Prepares concise manual descriptions and highlights the most useful setup, operation, and maintenance information for readers.