Electronics / Data Center Infrastructure
SmartRack Vertical Standoff Security Cages 1U-3U
Installation guide for Tripp Lite SmartRack Vertical Standoff Security Cages (1U-3U). Includes step-by-step mounting instructions for EIA-compliant 2- or 4-post open frame racks.
Quick answers from the manual
Quick answer
- This manual provides installation instructions for mounting SmartRack Vertical Standoff Security Cages (1U-3U) onto EIA-compliant 2- or 4-post open frame racks. p. 2, 3
Key actions
- Attach the hinged cage to the right side of the rack and the latch bracket to the left side. p. 3
- Adjust the cage for smooth operation before tightening screws. p. 3
Problems and fixes
Cage alignment issues
Adjust the position of the hinged cage and latch bracket before fully tightening the screws.
p. 3Where to find it in the PDF
- Package Contents p. 2
- Installation p. 3
Table of contents
Manual images
Click an image to enlargeQuick guide from the manual
The SmartRack Vertical Standoff Security Cages are designed to protect equipment mounted in EIA-compliant 2- or 4-post open frame racks. The cage features a hinged design for easy access and includes a latch bracket for security. Ensure your rack is compatible before beginning installation.
Package Contents
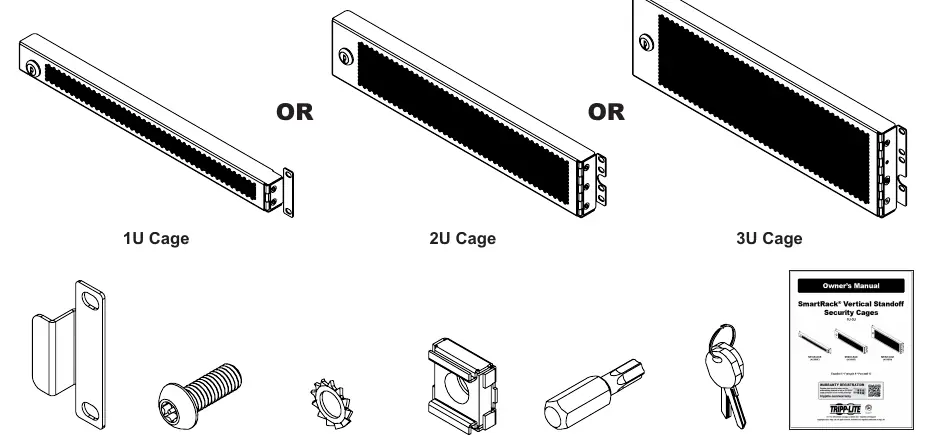
- Hinged Cage (1U, 2U, or 3U)
- Latch Bracket
- M6 Security Screws
- Lock Washers
- Cage Nuts
- Security Bit
- Keys
Installation
Note: Use the included security bit to install security screws. If using a 4POSTRAILKIT, follow specific instructions for that kit; otherwise, use the provided cage nuts.
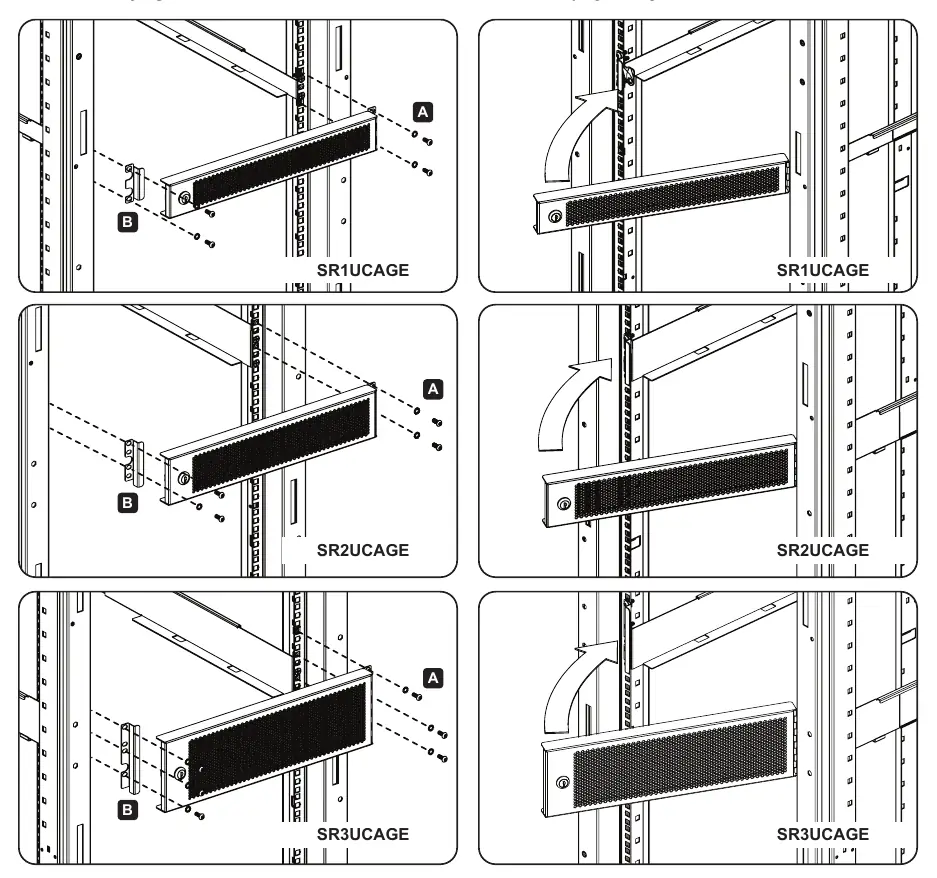


Step 1: Mounting the Cage
Attach the Hinged Cage to the right side of the rack (marked A) and the Latch Bracket to the left side of the rack (marked B). Do not fully tighten the screws at this stage to allow for adjustments.
Step 2: Adjustment and Securing
Adjust both the hinged cage and the latch bracket as needed to ensure the cage opens and closes smoothly. Once the alignment is correct, fully tighten all screws to secure the unit.
Safety and Warranty
This product is intended for EIA-compliant racks. Always verify the suitability of the hardware for your specific application. The product includes a 5-year limited warranty covering defects in material and workmanship. Refer to the warranty section for full terms and exclusions.
Practical help
Common problems
Cage does not open or close smoothly
Adjust the positioning of the hinged cage and latch bracket before fully tightening the mounting screws.
Hardware does not fit the rack
Ensure your rack is EIA-compliant. If the hardware is not suitable for your specific rack application, contact the rack manufacturer for a solution.
Before use
- Verify the rack is an EIA-compliant 2- or 4-post open frame rack.
- Identify the correct cage size (1U, 2U, or 3U) for your equipment.
- Ensure you have the included security bit for the M6 security screws.
- Determine if a 4POSTRAILKIT is being used, as this affects screw installation.
Images and diagrams
- The installation diagrams illustrate the hinged cage mounted on the right vertical rail and the latch bracket mounted on the left vertical rail.
Model compatibility
- Compatible with EIA-compliant 2- or 4-post open frame racks.
- Not all mounting applications may be suitable; verify hardware fitness before installation.

Manual page author
Michael Turner
Technical manual editor
Reviews PDF manuals for structure, safety notes, and practical product details so readers can find the right information quickly.