Electronics / Monitors
User Guide for Uniview 0235C68W Face Recognition Access Control Terminal
Quick guide for the Uniview 0235C68W Face Recognition Access Control Terminal. Includes installation steps, wiring diagrams, web login credentials, and face recognition setup requirements.
Table of contents
Manual images
Jump to the sectionQuick guide from the manual
This document provides essential information for installing and configuring the Uniview 0235C68W Face Recognition Access Control Terminal. Key procedures include physical installation, wiring, and initial network configuration via the web interface. For optimal performance, ensure the device is installed at a recommended height of 1.3m and that the environment has adequate lighting without intense glare.
Product Overview
The terminal integrates face recognition, audio, and access control functionalities. The package includes the terminal, wall mount bracket, screw components, T10 star-head key, drill template, cables, and terminal blocks.
Installation
Before installation, ensure you have the necessary tools: Phillips screwdriver, electric drill, tape measure, marker, and adhesive (silicone glue/glue gun). The installation steps are as follows:
- Determine the position of the 86x86mm junction box. If no box is present, use the drill template to mark and drill holes.
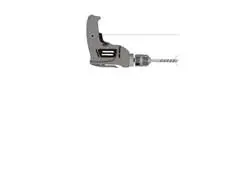
- Paste the drill template on the wall. If using a junction box, align the template holes with the box. If not, drill 30mm deep holes and insert expansion bolts.
- Mount the bracket by aligning it with the junction box or wall holes and tightening the screws.
- Secure the cover using the provided screws.
- Use the T10 star wrench to loosen the tamper-proof screws, attach the terminal to the bracket hook, and then tighten the tamper-proof screws to secure the device.
Wiring
Plan your wiring for power, network, door lock, Wiegand, alarm, and RS485 cables based on your networking requirements. The terminal supports connection to a security module. Ensure all connections are made according to the provided schematic diagrams, noting that input devices send signals to the terminal, while output devices receive them.
Web Login
To manage the terminal via a web browser:
- Default IP Address: 192.168.1.13
- Default Username: admin
- Default Password: 123456
Open Internet Explorer (IE9 or later), enter the IP address, and log in. You are strongly recommended to change the default password immediately to a strong password of at least nine characters including digits, letters, and special characters.
Personnel Management
Personnel can be managed via the Web page, the terminal screen, or an entrance guard management platform. On the Web page, navigate to Setup > Intelligent > Face Library to manage personnel information.
Appendix
For accurate face recognition, follow these requirements:
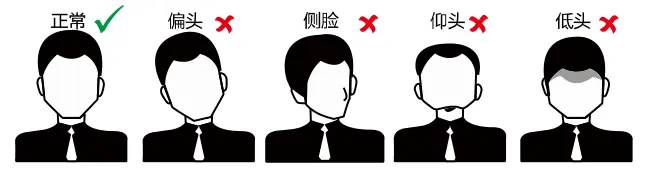
- Face Photo Collection: Face the camera directly, do not wear hats/caps, ensure both ears are visible, use a solid background, and avoid heavy makeup.
- Recognition Range: The effective recognition distance is 0.5m to 2m.
- Facial Expression: Maintain a natural expression and keep the face centered in the recognition window.
Manufacturer information
Uniview
Practical help
Common problems
Face recognition fails or is inaccurate
Ensure the user is standing within the effective recognition range (0.5m to 2m), the lighting is adequate (avoid intense light), and the facial expression is natural and centered.
Cannot access the Web login page
Verify the device IP address (default is 192.168.1.13). If a DHCP server is present, the IP may have changed; check your network settings. Ensure your browser is IE9 or later.
Tamper-proof screws are loose
The tamper-proof screws are designed with an interference fit; they can be loosened for maintenance but will not fall off.
Before use
- Ensure adequate lighting at the installation site.
- Verify the power supply provides stable voltage and meets device requirements.
- Prepare necessary tools: Phillips screwdriver, electric drill, tape measure, marker, and glue.
- Change the default password (123456) immediately after the first login.
- Ensure the device is installed at a recommended height of 1.3m from the ground.
Specs in practice
- Recognition Distance
- 0.5m to 2m is the optimal range for the camera to detect and authenticate faces.
- Default IP Address
- 192.168.1.13 is the factory setting for network access.
- Default Credentials
- Username: admin, Password: 123456. Must be changed for security.
Images and diagrams
- Wiring diagrams illustrate connections for power, alarm, RS485, Wiegand, and door locks.
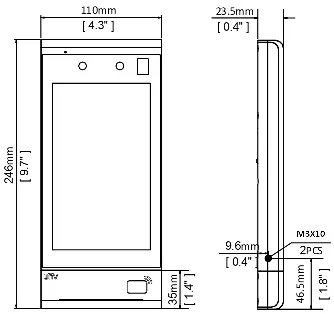
- Installation diagrams show how to use the drill template and mount the bracket.
- The recognition range diagram defines the 0.5m-2m operational zone.
Model compatibility
- Supports connection to a security module for enhanced access control.
- Compatible with various input/output devices including alarm sensors, door magnetic sensors, and electric strikes.

Manual page author
David Miller
Documentation analyst
Organizes user manual content into clear summaries, with attention to model details, product context, and everyday usability.