Electronics / Security Cameras
User Manual for Uniview IP Camera 0235C8T7
Quick guide for the Uniview IP Camera 0235C8T7. Includes installation, waterproof cabling, mounting, web login, and network security settings.
Table of contents
Manual images
Click an image to enlargeQuick Guide Overview
This document provides essential installation and setup instructions for the Uniview IP Camera. It covers critical procedures such as waterproofing cables, mounting the device, and initial network configuration.
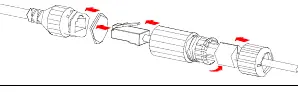
Waterproof Requirements
Proper waterproofing is mandatory for outdoor installations to prevent device damage. Failure to follow these steps may void the warranty.
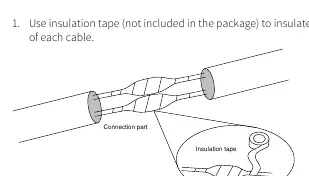
- Cable Preparation: Connect all necessary cables and cut off unused copper wires.
- Insulation: Use insulation tape to wrap the connection part of each cable.
- Waterproofing: Use self-adhesive waterproof tape. Fully stretch the tape at both ends, wrap the connection tightly, and tighten the tape at both ends to prevent leakage.
- Components: Install supplied waterproof components on the network cable in sequence. Ensure the rubber ring is mounted onto the network cable interface first.
- Unused Cables: If a DC cable is not used, insert the plug into the interface.
Cable Connection
The camera features various interfaces (e.g., RS485, Audio, Power, Network). Ensure all connections are secure and protected. If the camera is installed outdoors, place the cables into a waterproof junction box (purchased separately) after the waterproof treatment is completed.

Micro SD Card Installation
To use local storage, install a Micro SD card inside the camera.
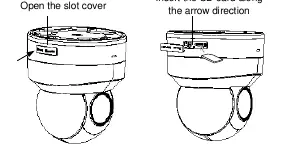
- Remove the back cover of the camera.
- Insert the Micro SD card into the slot.
- Do not hot-plug the SD card while the camera is powered on, as this may damage the device or the card.
- Disconnect power before installing or uninstalling the card.
Mounting the Camera
The camera supports ceiling or wall mounting. Ensure the mounting surface can support the weight of the device.
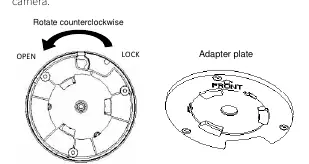
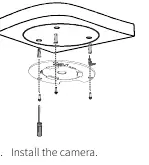
- Detach Plate: Rotate the adapter plate counterclockwise to detach it from the camera.
- Fix Plate: Attach the sticker to the mounting surface, drill holes, and fix the adapter plate with screws. Ensure the 'FRONT' mark on the plate points in the desired monitoring direction.
- Attach Camera: Align the 'FRONT' mark on the plate with the gap between 'OPEN' and 'LOCK' on the camera. Rotate the camera counterclockwise until it is securely fastened.
Startup and Web Login
Once installed, connect the power to start the device.
- Default IP Address: 192.168.1.13
- Default Login: Username: admin, Password: 123456
- DHCP: The camera has DHCP enabled by default. If a DHCP server is present, the IP address may be assigned dynamically.
- Security: It is strongly recommended to change the default password after the first login to a strong password containing digits, letters, and special characters.
Network Security
To enhance security, it is recommended to:
- Keep firmware up to date.
- Change passwords regularly.
- Enable HTTPS/SSL for encryption.
- Disable unused features like UPnP, SNMP, or Multicast if not required.
- Isolate the video surveillance network from other service networks.
Manufacturer information
Uniview
Practical help
Common problems
Camera not working after installation
Check if the power adapter or PoE device meets the requirements. Ensure the power cable length is not excessive, as this can cause voltage drops.
Water damage to cables
Ensure all external cable connections are wrapped with insulation tape and self-adhesive waterproof tape. Use a waterproof junction box.
Cannot log in to the web interface
Verify the IP address. If DHCP is enabled, the camera may have been assigned a different IP by your router. Use the default admin/123456 credentials.
Before use
- Verify the mounting surface can support the camera weight.
- Ensure the power supply provides stable voltage.
- Install the Micro SD card before mounting if local storage is required.
- Waterproof all external cable connections.
- Remove the protective film from the glass window only after mounting is finished.
Specs in practice
- Default IP Address
- 192.168.1.13 (unless assigned via DHCP)
- Default Login
- Username: admin, Password: 123456
Images and diagrams
- Waterproofing: Shows how to wrap cables with insulation tape and waterproof tape.
- Mounting: Illustrates rotating the adapter plate counterclockwise to detach and aligning the 'FRONT' mark for installation.
Model compatibility
- Supports Micro SD card for local storage.
- Compatible with standard PoE or DC power adapters.

Manual page author
Michael Turner
Technical manual editor
Reviews PDF manuals for structure, safety notes, and practical product details so readers can find the right information quickly.