Electronics / Security Systems
User Manual for Uniview Wi-Fi Kit 0250C03E
Quick guide for the Uniview Wi-Fi Kit 0250C03E. Learn how to install the hard drive, set up Wi-Fi, pair cameras, mount devices, and configure the EZView app for remote monitoring.
Table of contents
Manual images
Click an image to enlargeQuick Guide from the Manual
This guide provides essential setup instructions for the Uniview Wi-Fi Kit. The default login credentials for the NVR are: Username: admin, Password: 123456. It is strongly recommended to change these to a strong password containing digits, letters, and special characters upon first login.
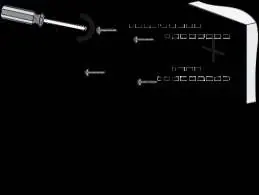
Disk Installation
To install a hard drive for recording:
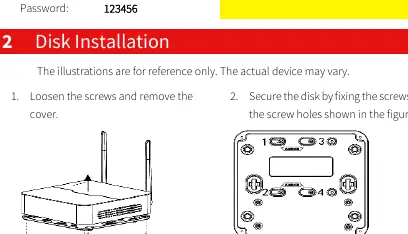
- Loosen the screws and remove the NVR cover.
- Secure the disk by fixing the screws into the designated holes.
- Connect the data and power cables to the disk.
- Replace the cover and tighten the screws.
Connecting the Kit
Follow these steps to connect your system:
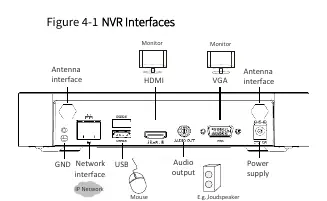
- Connect the NVR to a monitor using a VGA or HDMI cable.
- Plug a mouse into the USB interface on the NVR.
- Connect both the NVR and the camera to their respective power supplies.
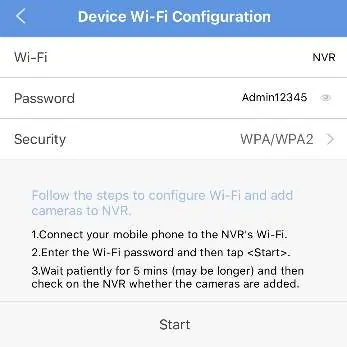
Wi-Fi Configuration
To configure Wi-Fi settings:
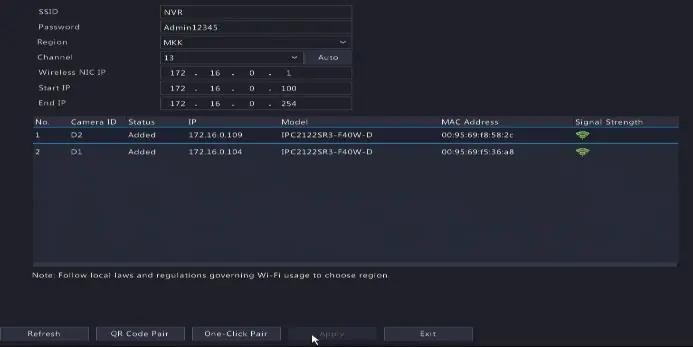
- Right-click on the NVR screen and select Menu > Network > Wi-Fi AP.
- Adjust settings such as SSID, Region, and Channel as needed.
- Ensure the NVR's wireless NIC IP is in a different network segment than the LAN IP.
- Click Apply to save changes.
Pairing Devices
If cameras are offline, you must pair them again:
- One-Click Pair: Connect camera and NVR to the same switch or via network cable. Right-click on NVR, go to Menu > Network > Wi-Fi AP. Press the RESET button on the camera (within 1-10 minutes of power-on), then click One-Click Pair on the NVR.
- QR Code Pair: Power on the camera, press the RESET button, go to Menu > Network > Wi-Fi AP on the NVR, and select QR Code Pair to scan the code.
Installing the Camera
For wall mounting:
- Paste positioning stickers on the wall and drill 30mm-depth guide holes (6-6.5mm bit).
- Insert plastic rivets into the holes.
- Attach the camera to the wall using the universal joint.
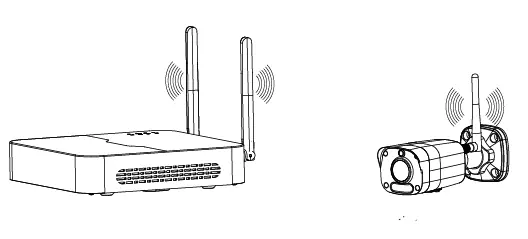
- Rotate the antenna clockwise onto the interface.
- Adjust the monitoring direction and connect power.
Note on Signal: Wi-Fi connectivity is strongest when antennas are parallel to each other. Avoid pointing the top of one antenna directly at another.
Remote Access via EZView
To access your system remotely:
- Download the EZView app from the App Store or Google Play.
- Sign up for an account and select the International service area.
- Tap Devices > Add and scan the QR code on the device body.
- Use the Live View/Playback menu to view your cameras.
Manufacturer information
Uniview
Practical help
Common problems
Camera offline after changing Wi-Fi settings
Pair the camera with the NVR again using the One-Click or QR Code method.
Reset button not responding
The reset button only functions within 1-10 minutes after the camera is powered on. Power cycle the camera if needed.
Weak Wi-Fi signal
Ensure antennas are parallel. Avoid pointing the top of one antenna directly at another.
Before use
- Ensure the wall is strong enough to support the camera weight.
- Prepare a VGA or HDMI cable for monitor connection.
- Have a USB mouse ready for NVR interface navigation.
- Ensure the power supply meets the device requirements.
- Verify the NVR and camera are connected to power.
Specs in practice
- NVR Default IP
- 192.168.1.30
- IPC Default IP
- 192.168.1.13
- Default Username
- admin
- Default Password
- 123456
Images and diagrams
- Figure 4-1: NVR rear panel interfaces including antenna, network, USB, audio, and power.
- Figure 6-1: Optimal antenna positioning for strongest signal.
Model compatibility
- Some camera models support Micro SD cards.
- NVR wireless NIC IP must be in a different network segment than the LAN IP.

Manual page author
Michael Turner
Technical manual editor
Reviews PDF manuals for structure, safety notes, and practical product details so readers can find the right information quickly.