Lighting / Outdoor Lighting
Installation Instructions for Vista 1051YM Commercial Series Linear Floodlight
Quick installation guide for the Vista 1051YM Commercial Series Linear Floodlight. Includes step-by-step mounting instructions, wiring diagrams, and safety requirements for proper setup.
Table of contents
Important Installation Notes
The Vista 1051YM must be installed and grounded in accordance with the National Electrical Code (NEC) and local codes. This luminaire is UL listed for above-grade installation only. Always use UL-recognized wire connectors for all electrical connections. Note that the luminaire can become hot during operation; take care when selecting the installation location.
Luminaire Mounting Instructions
- Ensure the electrical supply is turned off at the circuit breaker before starting installation or servicing.
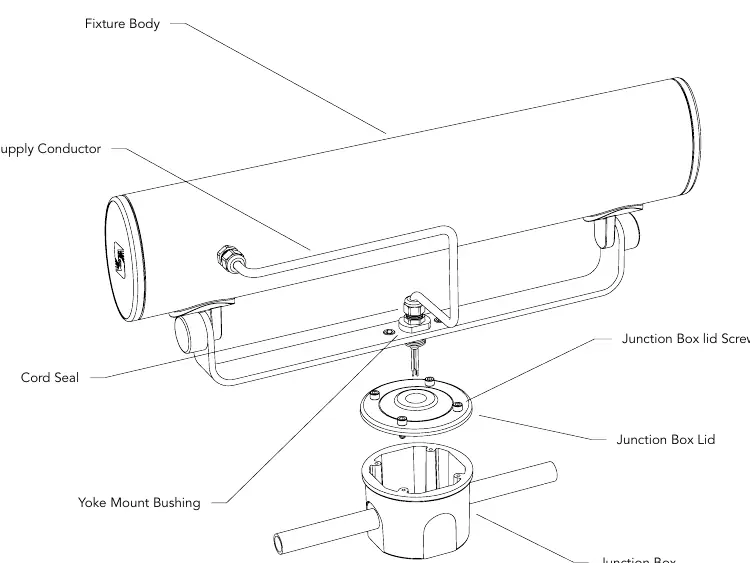
- Thread the Luminaire Supply Conductor cable through the Cord Seal and the Yoke Mount Bushing through the Yoke center hole into the Junction Box Lid. Tighten the Yoke Mount Bushing fully.
- Route the luminaire supply conductors into a wet-location-rated Junction Box (provided by others).
- Attach conduit supply conductors (provided by others) to the luminaire conductors, observing correct polarity: connect line to black, neutral to white, and ground to green. Use approved wiring methods.
- Secure the Junction Box Lid onto the Junction Box using the provided screws and tighten.
- Adjust the aim of the fixture as desired and firmly re-tighten the Yoke Aiming Hex Nut(s) located underneath the Yoke Decorative Caps.
- Re-assemble the Decorative Caps onto the Yoke.
- Tighten the Yoke Locking Set Screws to secure the aiming position.
- Supply power to the luminaire and check for proper operation.
Maintenance
To ensure proper operation and efficiency, the lens must be kept clean and free of dirt, dust, leaves, trash, and mineral deposits from water. A regular scheduled maintenance program is recommended.
Practical help
Common problems
Fixture is loose or aiming shifts
Ensure the Yoke Aiming Hex Nut is tightened firmly and the Yoke Locking Set Screws are secured.
Luminaire becomes too hot
Ensure the fixture is located in an appropriate area with adequate ventilation, as the unit generates heat during operation.
Before use
- Verify electrical supply is off at the circuit breaker.
- Ensure the Junction Box is rated for wet locations.
- Confirm use of UL-recognized wire connectors.
- Check wiring polarity: Line to Black, Neutral to White, Ground to Green.
- Ensure all screws and bushings are tightened fully.
Specs in practice
- NEC Compliance
- Installation must adhere to the National Electrical Code and local regulations.
Images and diagrams
- The diagram illustrates the assembly of the Yoke Mount Bushing, Junction Box Lid, and the Luminaire Supply Conductor connection.
- It highlights the sequence of components from the fixture body down to the junction box.
Model compatibility
- Requires a wet-location-rated Junction Box (not included).
- Conduit supply conductors are provided by the installer.

Manual page author
Emily Carter
User documentation editor
Prepares concise manual descriptions and highlights the most useful setup, operation, and maintenance information for readers.