Computers / Tablets
User Manual for Vivitar 2-in-1 Charging Phone Stand FBWDS-BLK
Quick guide for the Vivitar 2-in-1 Charging Phone Stand (FBWDS-BLK). Learn how to power the device, charge your smartphone and AirPods, and check compatibility requirements.
Quick answers from the manual
Quick answer
- The Vivitar 2-in-1 Charging Phone Stand (FBWDS-BLK) charges Qi-compatible smartphones and AirPods simultaneously. It requires a USB-C power source, ideally a QC 18W adapter for best results. p. 1, 2
Key actions
- Place your phone horizontally on the center of the charging pad. p. 1
First start
- Connect the USB-C cable to the stand and a suitable USB charging adapter. p. 1
Problems and fixes
Device not charging
Check phone placement (must be horizontal) and ensure the power adapter is QC 18W or higher.
p. 1, 2Technical specifications
| Parameter | Value | Meaning | Pages |
|---|---|---|---|
| Input | 9V/2A (QC 18W) | Power requirement for the stand | p. 2 |
| Smartphone Output | 10W/7.5W/5W | Wireless charging power for phones | p. 2 |
Where to find it in the PDF
- Setup and Charging Instructions p. 1
- Specifications and Warranty p. 2
Table of contents
Manual images
Click an image to enlargeQuick guide from the manual
The Vivitar 2-in-1 Charging Phone Stand (FBWDS-BLK) is designed to charge two devices simultaneously: a Qi-compatible smartphone and Apple AirPods. For optimal performance, especially when charging two devices at once, use a plug-in adapter with power above QC 18W.
Powering the stand
To power the charging stand:
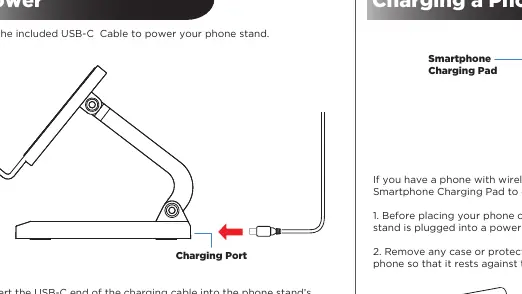
- Insert the USB-C end of the included cable into the Charging Port on the stand.
- Insert the USB-A end of the cable into a suitable USB charging adapter.
- Once plugged in, the LED Indicator Light will turn red and blue momentarily, then turn off.
Charging your devices
Charging a smartphone
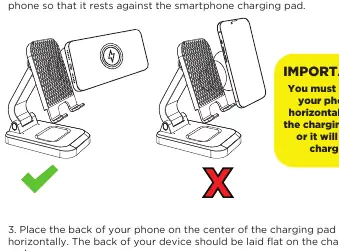
Important: You must place your phone horizontally on the center of the charging pad for it to charge. If placed vertically, it may not charge.
- Ensure the stand is plugged into a power source.
- Remove any protective case or cover that may block the back of the phone.
- Place the back of the phone on the center of the charging pad horizontally.
- The phone should start charging upon contact. Use your phone's display to track progress.
- The indicator light will turn blue when the pad is charging a device.
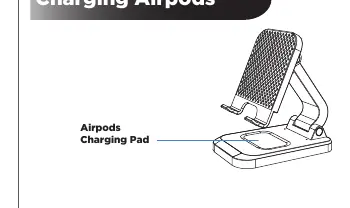
Charging AirPods
Place your AirPods on the designated Airpods Charging Pad. There is no specific indicator light for the Airpods pad; use the indicator light on your AirPods case to track progress. If both pads are in use, the main indicator light will turn blue.
Compatibility
The stand is compatible with Qi-enabled devices, including:
- iPhone 15/14/13/12/11/X/8 series
- Samsung S22/S21/S20/S10/S9/S8 series
- AirPods 3/2/Pro series
Safety Precautions
- Do not expose the stand to high temperatures, extreme cold, high humidity, or water.
- Do not attempt to open or repair the stand yourself.
- Do not use the stand on flammable materials like rugs or bedding.
- Do not place metallic items on the charging surfaces.
- Unplug the stand when not in use for extended periods.
Practical help
Common problems
Phone is not charging
Ensure the phone is placed horizontally on the center of the charging pad. Remove any thick protective cases.
Slow charging or charging failure when using two devices
Ensure you are using a plug-in adapter with power above QC 18W.
Before use
- Verify you have a USB-C cable and a suitable USB charging adapter.
- Check that your phone supports Qi wireless charging.
- Remove any protective covers that might block the back of the phone.
- Ensure the stand is placed on a non-flammable surface.
Specs in practice
- Charging Input
- Requires 9V/2A (QC 18W) for optimal performance.
- Smartphone Output
- Supports 10W, 7.5W, or 5W depending on the device.
- AirPods Output
- Fixed at 3W.
Images and diagrams
- The stand features a vertical pad for smartphones and a flat base pad for AirPods.
- The USB-C charging port is located at the rear base of the stand.
Model compatibility
- Compatible with Qi-enabled smartphones and AirPods.
- May not be compatible with some older versions of Qi-enabled devices.

Manual page author
Emily Carter
User documentation editor
Prepares concise manual descriptions and highlights the most useful setup, operation, and maintenance information for readers.