Power / Uninterruptible Power Supplies
User Manual for Xmart SUPRA 1100/1600/2100 Interactive UPS
Quick guide for the Xmart SUPRA 1100, 1600, and 2100 Interactive UPS. Includes installation steps, battery maintenance, LCD alarm codes, and technical specifications.
Table of contents
Manual images
Click an image to enlargeQuick guide from the manual
This document provides essential operating and safety information for the Xmart SUPRA 1100, 1600, and 2100 Interactive UPS models. The UPS is designed to provide electrical protection and backup power for personal computers. Key operational requirements include indoor installation in a controlled environment, ensuring proper ventilation, and verifying that the total connected load does not exceed the UPS capacity.
Safety Instructions
Warning: This product operates with dangerous voltages. Installation, operation, and maintenance must be performed only by qualified technicians.
- Do not open the unit; internal areas are locked by screws.
- Always treat the unit as having dangerous voltages, even when turned off and unplugged, due to internal batteries.
- Do not install outdoors or in closed cabinets that restrict airflow.
- Do not dispose of batteries in fire; they contain dangerous liquids.
Battery Maintenance
Battery life is typically 3 to 5 years under optimal conditions (temperature below 25°C). High temperatures and frequent deep discharges will significantly reduce lifespan.
- Storage: If storing for long periods, recharge batteries according to the following schedule:
- -25°C to +30°C: Recharge every 4 months for 4 hours.
- +30°C to +45°C: Recharge every 2 months for 4 hours.
- It is recommended to fully discharge the UPS once every 3 months to maintain battery health.
UPS Description and Parts
The UPS features an LCD touch-screen for monitoring and control. Key components include:
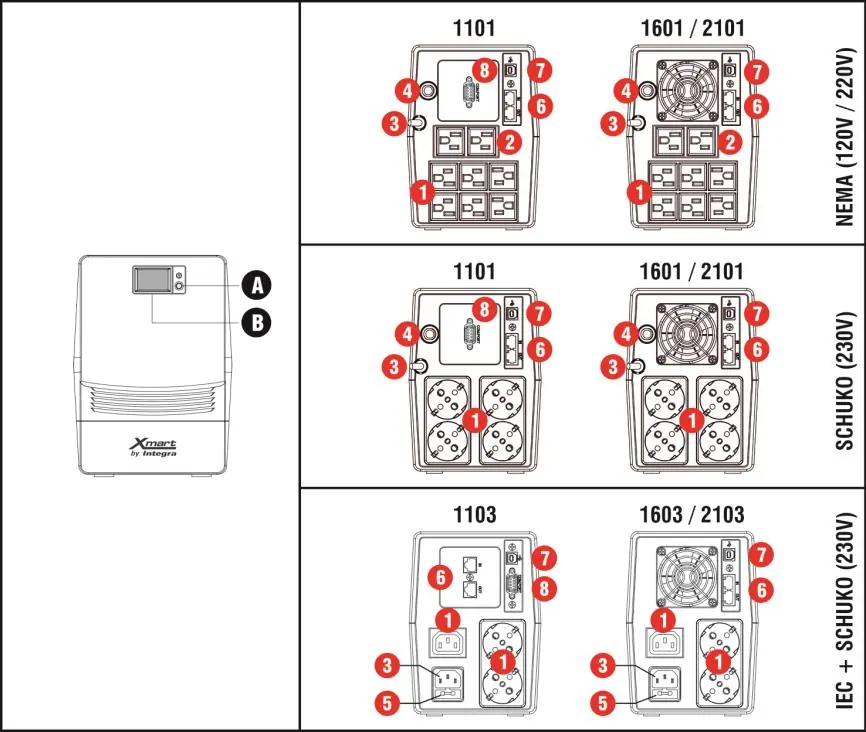
- A: ON/OFF button
- B: LCD Touch-Screen
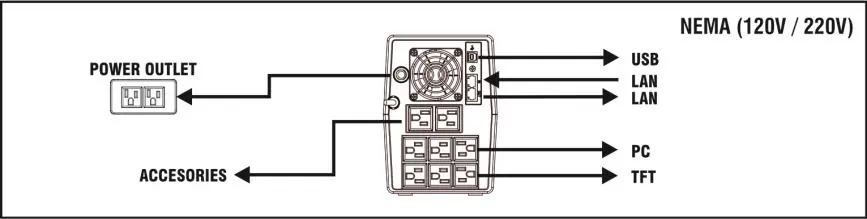
- 1: Battery backup outputs
- 2: Surge protected outputs
- 3: AC Input
- 4: Input Breaker
- 5: Input Fuse
- 6: RJ-45 protected sockets
- 7: USB port
- 8: RS-232 port (1101 & 1103 models only)
Installation
Follow these steps for proper setup:
- Install indoors in a clean, dust-free environment.
- Keep the UPS at least 20cm away from PC screens to avoid interference.
- Connect the LAN cable to the RJ45 IN port if network protection is required.
- Plug the UPS power cord into an AC source.
- Connect your devices to the UPS AC outlets.
- Ensure the unit has adequate ventilation; do not place in closed boxes.
Operation and LCD
Once installed, press the ON/OFF button on the front panel to start the UPS. The green LED will illuminate. The LCD displays utility and UPS data. You can cycle through screens by touching the LCD. The unit includes a COLD-START function, allowing it to turn on even during an AC power failure.
Troubleshooting
The LCD displays alarm codes to assist in troubleshooting:
- F01 (Output Shortcircuit): Remove faulty equipment from the UPS output.
- F02 (Overload): Remove non-critical equipment from the UPS output.
- F03 (Overcharge): Call technical service.
- F04 (Battery Low): Recharge for 6 hours. If the issue persists, call technical service.
- F05 (Output High under battery mode): Call technical service.
- F06 (High Temperature): Call technical service.
Technical Specifications
The UPS is available in three capacities: 1100VA/600W, 1600VA/900W, and 2100VA/1200W. All models feature a transfer time of 2-6 ms and are compatible with Windows, Mac OS, Linux, and Unix via the USB/RS-232 interface.
Practical help
Common problems
Output Shortcircuit (F01)
Remove faulty equipment from the UPS output.
Overload (F02)
Remove non-critical equipment from the UPS output.
Battery Low (F04)
Recharge for 6 hours. If the problem persists, contact technical service.
High Temperature (F06)
Contact technical service.
Before use
- Ensure installation is indoors in a controlled environment.
- Keep at least 20cm distance from PC screens to avoid interference.
- Verify AC source compatibility with UPS specifications.
- Ensure total load in Watts does not exceed the maximum UPS capacity.
- Connect LAN cable to RJ45 IN port if using network protection.
Specs in practice
- Transfer Time
- 2-6 ms typical; time taken to switch to battery power during AC failure.
- Operating Altitude
- 0-2000m above sea level.
Images and diagrams
- The rear panel diagrams illustrate the layout of power outlets, USB/RS-232 ports, and RJ-45 protected sockets for different models (NEMA, SCHUKO, IEC+SCHUKO).
Model compatibility
- Compatible with Windows, Mac OS, Linux, and Unix via USB/RS-232.
- Laser printers and copiers require careful load calculation due to high peak power consumption.

Manual page author
David Miller
Documentation analyst
Organizes user manual content into clear summaries, with attention to model details, product context, and everyday usability.