Automotive / Tyre Inflators
User Manual for Zebronics ZEB-MAX LINK+ Wireless Gamepad
Quick guide for the Zebronics ZEB-MAX LINK+ wireless gamepad. Learn how to connect, switch modes (X-Input, D-Input, PS3, PS4, Xbox 360, Android), use the turbo function, and understand the controls.
Quick answers from the manual
Quick answer
- The ZEB-MAX LINK+ is a plug-and-play wireless gamepad. To connect, press the MODE button to power on, then plug the USB receiver into your device. Use the MODE button to switch between X-Input, D-Input, Android, PS3, PS4, and XBOX 360 modes. p. 2, 5, 6, 7
Key actions
- Enable Turbo Function p. 8
- Switch LED Modes p. 8
First start
- Power on and connect p. 5, 6, 7
Problems and fixes
General maintenance
Unplug the gamepad from your PC when not in use. Do not disassemble the product.
p. 2Maintenance and reset
- Charging p. 2
Technical specifications
| Parameter | Value | Meaning | Pages |
|---|---|---|---|
| Interface | 2.4GHz Wireless USB Receiver | Connection type | p. 3 |
| Charging Time | 2.5H approx. | Time to fully charge | p. 3 |
| Usage Time | Up to 14h | Battery life | p. 3 |
Where to find it in the PDF
- Controls Diagram p. 4
- Connection Modes p. 5, 6, 7
Table of contents
Manual images
Click an image to enlargeQuick guide from the manual
The Zebronics ZEB-MAX LINK+ is a plug-and-play wireless gamepad. To begin, ensure the device is charged using the provided connector cable. The controller connects via a 2.4GHz USB receiver. Always unplug the gamepad from your PC when not in use to conserve battery and prevent issues. Do not disassemble the device, as this voids the warranty.
Device Overview and Controls
The gamepad features 17 buttons, dual analog sticks, and dual vibration motors. Key controls include:
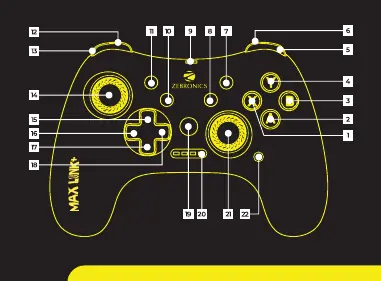
- 1-4: A / B / X / Y buttons
- 5-6: Triggers R1 / R2
- 7: Start
- 8: Clear Button
- 9: Type-C Port for Charging
- 10: Turbo Button
- 11: Select
- 12-13: Triggers L2 / L1
- 14: Left Joystick
- 15-18: Direction Pad (Up/Right/Down/Left)
- 19: Mode Button
- 20: LED Indicator
- 21: Right Joystick
- 22: RGB Control
Connection Modes
To power on the controller, press the MODE button. The LED indicators (1, 2, 3, 4) will flash while searching for a connection. Plug the receiver into the target device's USB port.
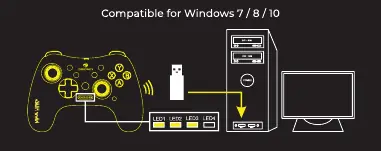
- X-Input Mode: Connects to Windows. LED 1, 2, 3 will stay on with vibration feedback upon successful connection.
- D-Input Mode: Press the MODE button while in X-Input mode to switch. LED 1 will turn on.
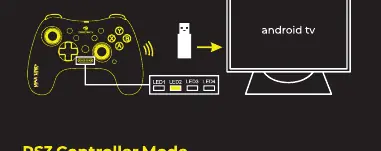
- Android Input Mode: Connects to Android media boxes/TVs. LED 2 will stay on.
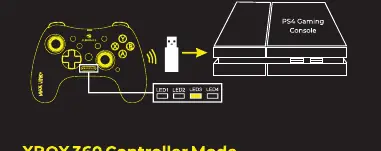
- PS3 / PS4 Controller Mode: Connects to gaming consoles. LED 3 will stay on.
- XBOX 360 Controller Mode: Connects to XBOX 360. LED 1, 2, 3 will stay on.
Turbo Function and LED Modes
The Turbo function allows for continuous input. Press and hold the TURBO button and the desired action button (A/B/X/Y) for 5 seconds to enable. To disable, hold the CLEAR button and the previously selected action button for 5 seconds.
Turbo Speed Adjustment:
- Maximum Speed: Hold TURBO + UP arrow.
- Medium Speed: Hold TURBO + RIGHT arrow.
- Minimum Speed: Hold TURBO + DOWN arrow.
Press the dedicated LED button to cycle through built-in LED modes: Dynamic LED, Static LED, and LED OFF.
Specifications
- Interface: 2.4GHz Wireless USB Receiver
- Compatibility: Windows, PS4, PS3, XBOX 360, Android
- Charging Time: Approx. 2.5 hours
- Usage Time: Up to 14 hours (without RGB lights)
- Weight: 220g
Practical help
Common problems
Controller not connecting
Ensure the USB receiver is plugged into the device and the controller is powered on (press MODE). Check if the correct mode is selected for your device.
Turbo function not working
Ensure you are holding the TURBO button and the action button simultaneously for 5 seconds to activate.
Before use
- Charge the gamepad for approximately 2.5 hours using the provided connector cable.
- Plug the 2.4GHz USB receiver into the target device.
- Press the MODE button to power on the controller.
- Verify the LED indicator matches the required mode for your device (e.g., LED 1, 2, 3 for X-Input).
Specs in practice
- Charging Time
- Approximately 2.5 hours to reach full charge.
Images and diagrams
- The controller features a Type-C port (9) located at the top for charging.
- The LED indicator (20) shows the current connection mode and status.
- The RGB Control button (22) allows switching between lighting modes.
Model compatibility
- Compatible with Windows, PS4, PS3, XBOX 360, and Android media boxes.
- Plug and play device; no drivers required.

Manual page author
Michael Turner
Technical manual editor
Reviews PDF manuals for structure, safety notes, and practical product details so readers can find the right information quickly.