Lighting / Controllers & Dimmers
User Manual for Zigbee 100W LED Driver
Comprehensive user guide for the Zigbee 100W LED Driver. Includes instructions for wiring, Zigbee network pairing, TouchLink commissioning, factory resets, and technical specifications.
Table of contents
Important Information
Before installing the Zigbee 100W LED Driver, please read all instructions carefully. Do not install the device with power applied. Do not expose the device to moisture. This device is rated IP20 and is suitable for indoor LED lighting applications only.
Wiring and Installation
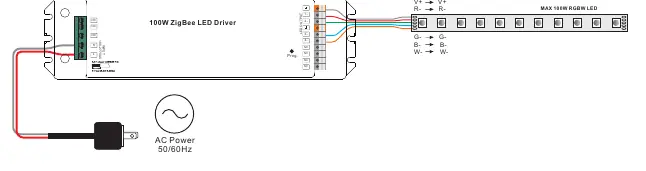
Ensure the wiring is performed according to the connection diagram. The driver accepts an AC input of 100-277V. The output is a 12V DC constant voltage supply with 4 channels (R, G, B, W). Connect your LED strips to the corresponding output terminals (V+, R-, G-, B-, W-). Ensure the total load does not exceed 100W.
Zigbee Network Pairing
To add the device to a Zigbee network:
- Remove the device from any previous Zigbee network (perform a factory reset if necessary).
- Set your Zigbee controller or hub to 'Add lighting device' or 'Pairing mode'.
- Power on the device. It will enter network pairing mode automatically (the connected light will flash twice slowly).
- The device will appear in your controller's menu once successfully paired.
TouchLink Commissioning
TouchLink allows direct pairing between the driver and a Zigbee remote without a hub.
- Short press the 'Prog.' button 4 times (or re-power the device 4 times) to start TouchLink commissioning.
- Bring the remote or touch panel within 10cm of the LED driver.
- Set the remote to TouchLink commissioning mode.
- The connected light will flash twice to indicate a successful link.
Factory Reset
If you need to reset the device:
- Manual Reset: Short press the 'Prog.' button 5 times continuously, or re-power the device 5 times if the button is inaccessible. The connected light will blink 3 times to confirm the reset.
- Remote Reset: If the device is already added to a network, you can use a Zigbee remote to perform a 'Touch Reset' by bringing the remote within 10cm and initiating the reset procedure on the remote.
Technical Specifications
- Input Voltage: 100-277V AC, 50/60Hz
- Output: 12V DC, 4 Channels
- Max Power: 100W
- Max Current: 8.3A total
- Dimming Interface: Zigbee (Pulse Width Modulation)
- Dimming Range: 0.1% - 100%
- Operating Temperature: -20°C to +50°C
Practical help
Common problems
Pairing fails
Ensure the device is removed from any previous Zigbee network before attempting to pair. Perform a factory reset first.
TouchLink fails
Ensure the remote or touch panel is within 10cm of the LED driver during the commissioning process.
Device not responding
Check the power supply connections and ensure the device is within the range of your Zigbee coordinator or hub.
Before use
- Ensure power is disconnected before starting any wiring.
- Verify that the input voltage is between 100-277V AC.
- Confirm that the LED load is 12V DC and does not exceed 100W total.
- Ensure the installation environment is dry (IP20 rating).
Images and diagrams
- The wiring diagram illustrates the AC input (L, N) and the 4-channel LED output terminals (V+, R-, G-, B-, W-).
- The 'Prog.' button is located on the output side of the driver for manual control and pairing.
Model compatibility
- Compatible with universal Zigbee coordinators and gateway products.
- Supports up to 30 remotes per device.
- Supports Zigbee Green Power remotes (max 20).

Manual page author
David Miller
Documentation analyst
Organizes user manual content into clear summaries, with attention to model details, product context, and everyday usability.